

Basic Tab of Scene Options
Settings for duration, background, and effects
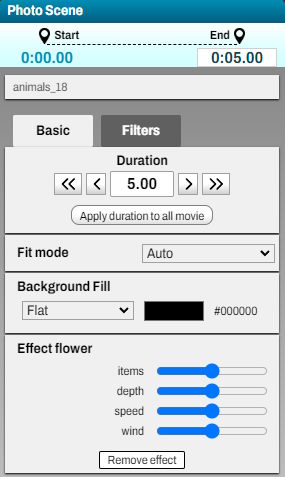
Here you can define the duration of the scene. You can click directly on the time and enter a value, or click on the arrows to the left or right to adjust the duration.
The 'Apply duration to entire movie' button will apply this scene's duration to all other scenes, except for video scenes.
Next, you can set the background.
By default, the background is solid, and you can change its color by clicking on the color rectangle, which is black by default.
A panel will open for you to choose the desired color. Click outside the color selector to close it.
There are also backgrounds with a circular, vertical gradient or using a pattern or texture. In these cases, a second color can be defined.
For scenes with a photo or video background, you can change the adjustment mode, which defines how the background fills the scene. This is useful when the media used has a different aspect ratio than the movie.
For example, if you place a portrait-mode photo in a landscape-mode movie, there will be black bars on either side of the photo, or the photo will be cropped at the top or bottom. The adjustment mode lets you choose how this is handled.
The automatic mode makes the best decision to cover the scene without significant cropping.
The 'fit with background' mode creates a blurred copy of the photo or video in the background to better fill the scene.
For video scenes, you can define additional parameters:
First, you can choose the playback range of the video. By default, the video plays fully, but by clicking 'Set segment,' you can choose the start and end points of the video.
In the segment definition tool, simply move the start and end markers. The 'Play selection' button allows you to check if the segment matches your selection. Once done, click 'Confirm,' and the scene duration will automatically adjust.
The 'Sync with video' option sets the video start time based on its presence in previous scenes or elements.
For example, if you have a floating video element that uses the same video earlier in the movie, checking this option will allow the video to play in the scene while preserving its timeline, ensuring continuity.
You can use a video in various forms, making it disappear and reappear, and it will maintain its playback progress.
Next, you'll find a selector to set the video's sound volume, followed by another selector that allows you to adjust the music volume during the video scene.
You can significantly lower the music volume to better hear the video's sound within the scene.
Then, there are fade-in and fade-out settings for the video's sound. The sound volume will increase or decrease gradually according to the specified duration.
Lastly, there is a speed modifier for video playback. Sound is disabled if the video is not played at normal speed.
Finally, if the scene includes an effect, you have settings to choose the number of elements, their speed, and their movement.


