You can color grade photos and short videos entirely in a browser, and the fastest path is a four-step chain: upload, correct, grade, export. Watch for two things when picking a tool: scopes or at least basic correction controls, and LUT export so your work travels. Kudoflix covers both without a single download.
TL;DR:
- Correcting technical issues first ensures consistent color and exposure before applying creative grades, preventing mismatched clips later.
- Exporting a LUT after correction enables the same look to be quickly applied across multiple clips, saving time on large projects.
- Using scopes and verifying white balance helps avoid guessing and prevents drift between shots caused by relying solely on visual judgment.
- Browser tools with real-time preview, RAW support, and LUT export are suitable for simple edits but may struggle with complex timelines or high dynamic range footage.
- Separating correction from grading and testing presets across several clips reduces the risk of inconsistent or over-processed results.
Table of Contents
- Color Correction vs. Color Grading: Why Order Matters
- The Quick Online Workflow: Grade an Image or Clip in 4 Steps
- The Controls You’ll Actually Use in an Online Color Grader
- Beginner Mistakes That Wreck an Otherwise Good Grade
- How to Choose an Online Color Grading Tool
- Step-by-Step: Correct, Grade, and Export a Clip
- Does Your Display Actually Affect the Grade?
- Can You Collaborate on a Grade Without Sending Files Back and Forth?
- Where Online Color Grading Still Falls Short
- What File Formats Actually Work in Browser Editors
- One Habit That Fixes Most Bad Grades
- Try Color Grading in Kudoflix, No Download Required
- Sources
Color Correction vs. Color Grading: Why Order Matters
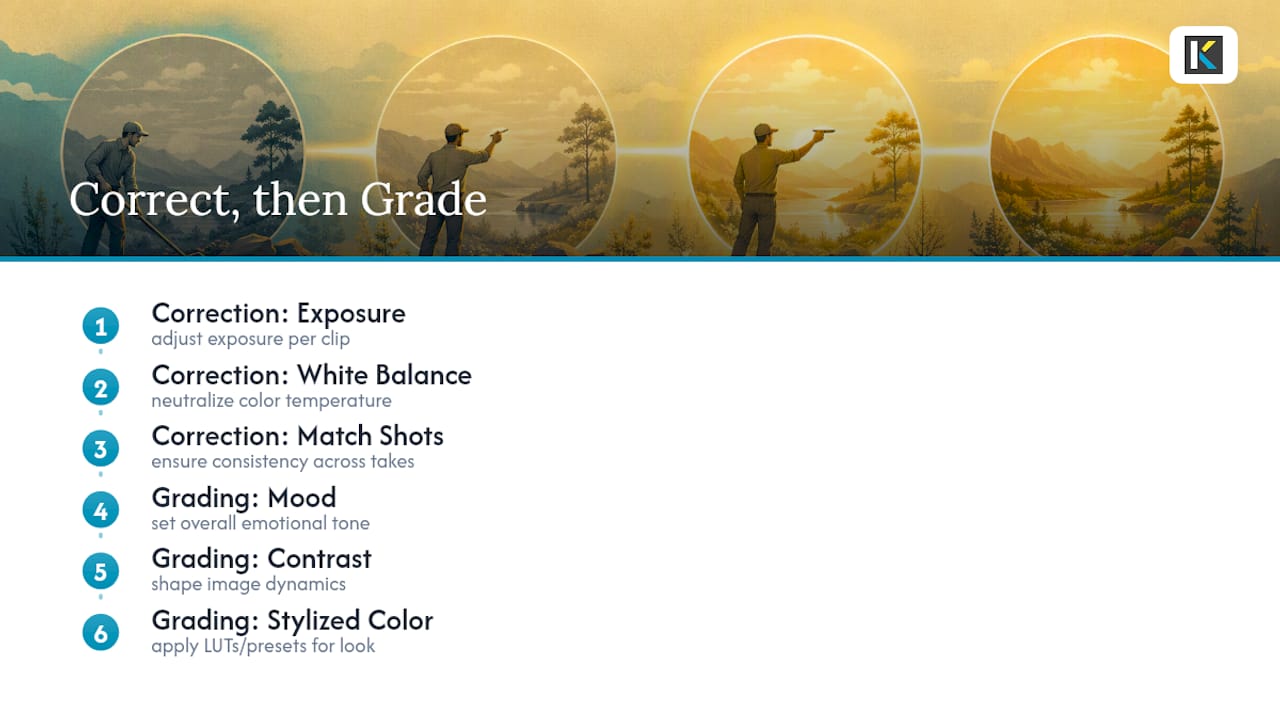
Color correction is the technical fix: exposure, white balance, and matching shots so they don’t look like they came from different cameras. Color grading is the creative pass that comes after, where you push mood, contrast, and stylistic color choices into the footage.
Skip correction and grade straight from raw footage, and you get inconsistent results across clips. A warm-toned preset applied to one shot that’s slightly underexposed and another that’s slightly blown out won’t match, no matter how good the preset is. Cliptude’s breakdown of the two processes makes the same point: treat correction as its own dedicated pass, not a step you rush through on the way to the fun part.
The practical order looks like this:
- Fix technical problems first: exposure, white balance, exposure consistency between clips.
- Match neighboring shots so cuts don’t jump in tone or temperature.
- Only then apply the creative grade: LUTs, presets, or manual color wheels.
- Refine skin tones and specific colors last, using secondaries.
The Quick Online Workflow: Grade an Image or Clip in 4 Steps
Most browser-based color correction online tools follow the same basic shape. Here’s the sequence that gets you a clean result without wasted passes:
- Upload a representative frame or clip. Pick the worst-looking shot in the batch, not the best one. If that shot grades well, the rest usually follow.
- Correct first. Adjust exposure, fix white balance, and match the shot against neighboring clips before touching anything creative.
- Apply the grade. Load a preset or LUT, or build the look manually with color wheels and curves, then dial in HSL secondaries for skin tones or specific color fixes.
- Export. Save your image or video, and export a
.cubeLUT if your tool supports it, so the same look travels to other clips or into a full editor later.
That fourth step is easy to skip and it’s the one that saves the most time on multi-clip projects. A LUT exported from one corrected frame can carry the same grade across an entire timeline.
The Controls You’ll Actually Use in an Online Color Grader
A handful of controls do almost all the work in web-based color grading. Knowing what each one fixes saves you from randomly dragging sliders until something looks right.
- Temperature/tint and white balance correct skin tones and strip out color casts from mixed lighting.
- Contrast, highlights, shadows, and midtones shape the tonal range without clipping detail out of either end.
- Color wheels and RGB curves let you push shadows, midtones, and highlights independently. Wheels are faster for quick moves; curves give finer control over specific tonal ranges.
- HSL secondaries isolate a single hue, like a background color or a shirt, without touching the rest of the frame. This is where skin tones get their final polish.
- Presets, LUTs, and AI-assisted grades give you a fast starting point. Browser tools like Luttie typically bundle curves, wheels, and HSL secondaries alongside one-click LUT application, but a preset is a starting point, not a finished grade. AI color-matching tools that copy a reference photo’s style, like Evoto’s approach, still need manual refinement on secondaries afterward.
- RAW/frame support and live preview matter more than most people expect. Live preview means you catch a bad move instantly instead of exporting, checking, and re-editing.
Pro Tip: Always drop your grade’s opacity to zero and back to full a few times before exporting. It’s the fastest way to see exactly what the grade changed, and it catches over-processed skin tones you’d otherwise miss.
Beginner Mistakes That Wreck an Otherwise Good Grade
The single most common mistake is grading before correcting. It’s tempting to slap a moody preset on raw footage because it looks dramatic immediately, but StudioBinder’s process breakdown notes that skipping the correction pass is exactly what causes inconsistent looks between clips later.
A close second: trusting your eyes over your monitor. Screens lie, especially laptop displays with aggressive auto-brightness. Waveforms and vectorscopes exist precisely because human perception adjusts to whatever’s on screen, even when the actual values are off.
- Grading before correcting causes drift between clips that no amount of secondary tweaking fixes later.
- Skipping scopes means you’re guessing at white balance and highlight clipping instead of verifying it.
- Applying a LUT to one clip without testing it on others in the same sequence is asking for a mismatch two cuts later.
Pro Tip (Mandrixx): Never commit to a LUT after testing it on just one clip. Run it across three or four representative shots from the same project first. A LUT that looks perfect on a bright outdoor shot can crush shadows into mud on an interior clip from the same shoot.
How to Choose an Online Color Grading Tool
Six things separate a browser tool worth using from one that wastes your time. None of these require comparing brand names, just checking what’s actually on offer.
- Ease of use. If you can’t find white balance and contrast within ten seconds of opening the tool, it’s built for a different audience.
- RAW/frame decoding and LUT export. If you plan to eventually move a project into a full editor, LUT export lets your browser-based grade travel with you.
- Real-time preview. Slow processing turns grading into a guessing game. You need to see the change as you make it, not thirty seconds later.
- AI presets balanced with manual control. One-click styles are fine for a starting point, but a tool with no manual wheels or curves underneath will hit a ceiling fast.
- Privacy and where processing happens. Some tools process locally in the browser; others upload footage to cloud servers. That distinction matters if you’re working with client footage under an NDA.
- Export formats and quality. Check for H.264 and H.265 at minimum. ProRes support matters if you’re feeding footage back into professional software later.
Step-by-Step: Correct, Grade, and Export a Clip
This is the exact sequence to run in any browser editor, whether you’re grading one photo or a short reel.
- Prepare. Pick two or three representative frames from your footage, including the worst-lit one. If you’re on a laptop, dim the room and turn off aggressive auto-brightness so you’re not judging color against a shifting baseline.
- Correct. Set exposure first, then white balance. If your tool has waveform or vectorscope readouts, use them to confirm skin tones sit where they should and highlights aren’t clipping. Match this shot against neighboring clips before moving on.
- Grade. Load a LUT or start from scratch with lift, gamma, and gain wheels. Push the overall mood, then switch to HSL secondaries to isolate skin tones, skies, or any color that’s drifted too far during the creative pass.
- Finalize. Make small global tweaks, double check skin tones haven’t gone orange or gray, and export. If the tool supports it, export a
.cubeLUT alongside your media so you can reapply the same look to other clips without redoing the work.
Pro Tip: Export at a slightly higher resolution than you need and downscale in your final platform. It hides minor grading artifacts that show up more obviously at native resolution.
Does Your Display Actually Affect the Grade?
Yes, more than most people account for, and it’s the reason a grade that looked perfect on your laptop can look washed out or oversaturated on someone else’s phone. Most consumer laptop and phone screens don’t reproduce color the same way a calibrated monitor does. Auto-brightness, blue light filters, and aggressive contrast enhancement all shift what you’re seeing while you grade.
A simple fix before any serious session: turn off auto-brightness, disable night-shift or blue-light modes, and view your work in a consistently lit room rather than direct sunlight or a pitch-dark space. Neither extreme gives you an accurate read on shadow detail or highlight clipping.
If you’re grading for a specific platform, like a phone-first social feed, check your result on an actual phone screen before calling it done. A grade built entirely on a desktop monitor sometimes reads flat or muddy on a smaller, brighter mobile display. This is one reason live preview on the actual export format matters more in browser-based tools than in traditional desktop suites, where you’re often working from a single reference monitor.
Full studio calibration hardware is overkill for casual and semi-professional work, but the basic checks: consistent lighting, disabled auto-adjustments, and a second-screen check, catch the majority of surprises before they reach your audience.
Can You Collaborate on a Grade Without Sending Files Back and Forth?
Increasingly, yes. Browser-based tools remove the biggest friction point in traditional grading collaboration: the multi-gigabyte file transfer. Because the footage and the edit both live in the same web session, sharing a project often means sending a link rather than exporting, uploading, and waiting for someone else to download and open a proprietary project file.
Feedback loops get shorter as a result. A client or collaborator can open a shared link, see the current grade applied in real time, and leave notes on specific frames instead of scrubbing through a downloaded video and guessing which timestamp they meant. Some tools support shared preset libraries, so a small team can standardize on the same LUT or look across multiple projects without passing files around manually.
The tradeoff is control. Real-time collaboration usually means the project lives on someone’s servers rather than your local drive, which loops back to the privacy question worth checking before you start a client project. For solo creators and small teams working on social content, though, the speed gain from skipping file transfers usually outweighs that tradeoff.
Where Online Color Grading Still Falls Short
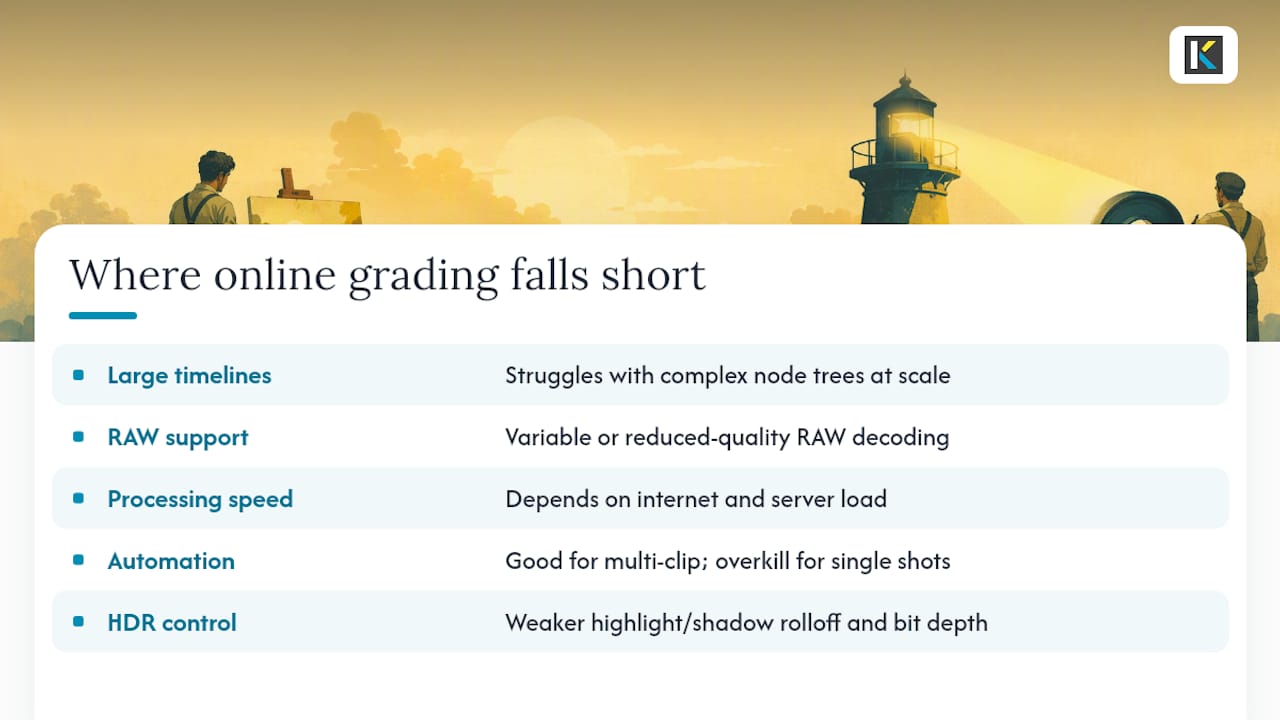
Browser tools have closed a lot of ground on desktop software, but they haven’t closed all of it. The biggest gap shows up on large, multi-hour timelines with dozens of clips: desktop-grade software built for that scale still handles complex node trees and multi-track color pipelines more comfortably than most web apps.
RAW file support is another sticking point. Some browser tools decode RAW formats well; plenty don’t, or handle them at reduced quality compared to dedicated desktop RAW processors. If you’re shooting RAW and grading matters to your final image quality, check this before committing a project to a browser workflow.
Processing speed depends entirely on your internet connection and the tool’s server load, which introduces a variable desktop software simply doesn’t have. A slow connection turns “real-time preview” into a laggy guessing game, undercutting one of the format’s biggest advantages.
Cloud-based tools that do automatic scene detection and shot matching save real time on multi-clip projects, but that same automation is overkill and sometimes clumsy on a single image or short clip. Match the tool’s complexity to the size of the job rather than reaching for the most automated option by default.
Finally, fine control over highlight rolloff and shadow detail on very high dynamic range footage still tends to favor desktop-grade tools with deeper bit-depth handling. For social clips, quick edits, and most photo work, none of this matters much. For color-critical film or broadcast work, it still does.
What File Formats Actually Work in Browser Editors
Most online color grading tools handle a predictable set of formats on the way in and out. On the input side, MP4 with H.264 encoding is close to universal, since it’s the default output of most phones and cameras. MOV files, common from iPhones and many mirrorless cameras, are also broadly supported.
Photo formats follow a similar pattern: JPEG is the default, while PNG shows up when transparency matters. Support for RAW formats, whether camera RAW like CR2 or DNG, or video-specific formats, varies a lot between tools and is worth checking before you build a workflow around it.
On export, H.264 remains the safest choice for social platforms and general sharing because of its compatibility and reasonable file size. H.265 (HEVC) offers better compression at the same quality but isn’t universally supported by every platform yet. ProRes shows up in tools built with a professional post-production audience in mind, useful if your grade is heading into a desktop NLE for finishing rather than straight to a feed.
LUT export, when available, typically comes as a .cube file, the same format desktop grading software reads natively. That compatibility is what lets a grade built in a browser travel into Resolve, Premiere, or any other tool your workflow eventually needs.
One Habit That Fixes Most Bad Grades
Separate correction from grading. Every time. It sounds almost too simple to matter, but it’s the single habit that prevents the most common failure: a grade that looks great on one clip and wrong on the next three.
The second habit worth building: test any LUT or preset across several representative clips before you commit a whole project to it. A grade that flatters one shot can crush another from the same shoot.
For a closer look at applying this to short-form content specifically, the Kudoflix guide to grading social clips walks through real examples. Open a browser editor and run the correct-then-grade sequence on your next project. It’s faster to build the habit by doing it than by reading about it.
— Mandrixx
Try Color Grading in Kudoflix, No Download Required
Every workflow step covered here, correction, grading, LUT-style presets, and export, runs directly inside Kudoflix’s browser editor with no software install and no waiting on downloads. Its color filter library gives you fast starting points for a grade, while manual controls let you refine skin tones and match clips the way this guide walks through. Processing runs fast enough for the live-preview workflow that makes correction-then-grading practical instead of tedious.
If you’re curious what a finished project actually looks like, the use cases page shows real examples across social clips, business content, and personal projects. Open the editor, upload your worst-looking clip first, and run the four-step workflow from start to finish. You’ll have a graded, exported result before a traditional download-and-install process would even finish.
Sources
- Color grading vs. color correction process for video | StudioBinder
- Color correction vs. color grading: what’s the difference? | Cliptude blog
- What’s the difference between color correction and color grading? | NoFilmSchool
- Color Grading Software — Free Tool for Video & Photos | Luttie
Recommended