
Music video project editing is the process of assembling performance and narrative footage, synchronized to a song, to produce a professional video that captures mood and tells a story. This guide covers every step from file organization to final export, using industry standards like 24fps for cinematic footage and audio levels between -6 and -12 LUFS. You will learn the editing techniques for music videos that separate polished work from amateur cuts. Whether you are just starting out or refining your process, these steps give you a repeatable framework for every project.
What are the essential preparations for a music video project editing guide?
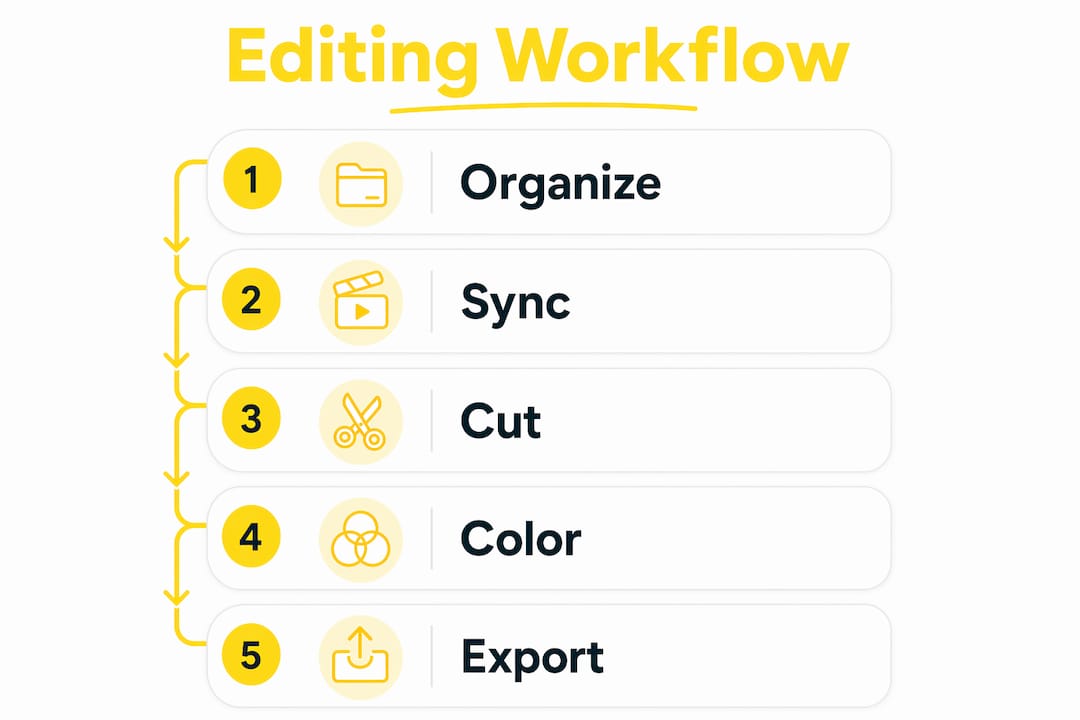
Strong editing starts before you open your timeline. The decisions you make during setup determine how fast and clean your edit will be.
File organization is the foundation of every efficient edit. Organizing clips by take, angle, and quality into labeled bins saves hours and prevents the frustration of hunting for the right shot mid-session. Create separate bins for performance footage, B-roll, and audio files the moment you import your media.

Frame rate and resolution matching comes next. Standard frame rates for professional music videos range from 24fps for a cinematic look to 60fps for slow-motion shots. Mixing frame rates inside one timeline without proper settings creates judder and visual inconsistency that no color grade can fix.
Before you place a single clip, confirm your project settings match your primary camera’s output. Set your sequence to the frame rate and resolution of your hero footage. If you shot B-roll at 60fps for slow motion, your editing software handles the conversion inside a 24fps timeline.
Here is a quick pre-edit checklist:
- Label every clip with camera angle, take number, and a quality rating (keep, maybe, reject)
- Confirm all footage matches your sequence frame rate or is flagged for slow-motion conversion
- Import the final mixed audio track, not a rough mix
- Create a dedicated folder for graphics, titles, and motion assets
- Back up your project folder before you start cutting
Pro Tip: Color code your bins. Performance clips in one color, B-roll in another, and audio in a third. Most editing platforms support this, and it cuts your clip-hunting time significantly.
How do you sync music and footage effectively?
Syncing is the single most important technical skill in music video editing. A cut that lands one frame late breaks the rhythm the viewer feels, even if they cannot name why.
The professional method follows these steps:
- Drop the master audio track first. Place your final mixed song on the timeline before any video. This track is your map.
- Place markers at every major beat and vocal cue. Pro editors mark every beat and vocal cue before adding a single video clip. This ensures every cut is rhythm-motivated, not arbitrary.
- Identify the song’s structure. Mark the intro, verse, chorus, bridge, and outro. Each section has a different energy level that should drive your cutting pace.
- Sync performance footage using waveforms. Line up the waveform of your on-set audio recording with the master track. Most editing platforms display waveforms visually, making frame-accurate alignment possible.
- Use the Merge Clips or Multicam function for multi-angle shoots. If you recorded a clapperboard, your software can sync clips automatically using the audio spike. This is faster and more accurate than manual alignment for large clip counts.
- Lock the audio track. Once synced, lock the master audio so no accidental nudge shifts it out of alignment during the edit.
Pro Tip: For shoots with three or more camera angles, build a multicam sequence. It lets you switch between angles in real time while the timeline plays, cutting your sync work from hours to minutes.
Syncing is not just a technical step. It establishes the pacing and energy of the entire video. A chorus that hits exactly on the downbeat feels powerful. The same cut placed two frames early feels rushed and amateur.
Which editing techniques create professional visual storytelling?
The cut is your primary tool. Every other technique, transition, and effect serves the cut. Matching cut energy to music intensity is critical. Rapid cuts suit high-energy songs. Longer takes and cross-dissolves suit ballads. Forcing fast cuts onto a slow song destroys emotional immersion just as surely as slow cuts on a dance track kill energy.
Cut types and transitions
Limiting transitions to invisible or match cuts during fast sequences avoids the amateurish look that overused effects create. A match cut, where a gesture or shape in one clip continues in the next, creates visual flow without calling attention to the edit itself. Reserve wipes, spins, and glitch effects for moments where the song itself calls for a visual jolt.
| Technique | Best use | What to avoid |
|---|---|---|
| Hard cut | Beat-driven sequences, high-energy choruses | Using it randomly with no rhythmic motivation |
| Match cut | Connecting two angles or locations smoothly | Forcing a match when shapes do not align |
| Cross-dissolve | Slow songs, emotional transitions, time passing | Overusing on every cut in a fast sequence |
| Jump cut | Stylized, intentional effect for energy | Accidental jump cuts from poor coverage |
| Flashy effects | One or two signature moments per video | Applying to every transition throughout |
B-roll and multiple angles
B-roll is your safety net and your storytelling tool at the same time. Recording multiple angles, B-roll, and extra takes during the shoot gives you the flexibility to cover mistakes, extend a moment, or add visual context. A close-up of hands on a guitar string during an instrumental break adds meaning. Cutaways to a location establish narrative without a single word.
Color grading for mood and continuity
Color grading is not decoration. It is the visual equivalent of the song’s emotional tone. A warm, desaturated grade suits a nostalgic folk track. A high-contrast, cool grade suits an electronic or hip-hop video. Apply a base grade to all clips first for consistency, then add creative adjustments on top. Inconsistent color between shots signals a rushed edit to any viewer.
Pro Tip: Export a still from each major scene and line them up side by side before you finalize your grade. Color inconsistencies that are invisible during playback become obvious in a static comparison.
How do you polish audio and finalize export settings?
Clean, balanced audio matters more than flashy visuals. Viewers tolerate minor visual imperfections, but poor sound quality ends a watch session immediately.
Audio mixing standards:
- Keep dialogue and lead vocals between -6 and -12 LUFS for clarity across all playback devices
- Duck background music during any spoken word sections so dialogue stays intelligible
- Add a limiter on your master channel to prevent clipping at export
- Check your mix on earbuds, phone speakers, and studio monitors before you finalize
Captions and text overlays:
Over 80% of mobile users watch videos on mute. That statistic means your visual storytelling must work without sound. Add captions for any lyrics or spoken word. Kinetic text, where words animate in sync with the beat, doubles as both an accessibility feature and a visual effect. Tools like Kudoflix include kinetic text and caption features built directly into the editing workflow, so you do not need a separate application.
Export settings by platform:
| Platform | Resolution | Frame rate | Codec | Max file size |
|---|---|---|---|---|
| YouTube | 1920×1080 or 4K | Match source | H.264 or H.265 | No hard limit |
| Instagram Reels | 1080×1920 | 30fps | H.264 | 1 GB |
| TikTok | 1080×1920 | 30fps | H.264 | 287.6 MB |
| Vimeo | 1920×1080 or 4K | Match source | H.264 | Depends on plan |
Pro Tip: Save your export settings as a named preset the first time you configure them correctly. Every future export for that platform takes seconds instead of minutes.
What common mistakes should editors avoid?
Most editing errors come from decisions made before the edit starts, not during it.
- Pacing mismatch: Forcing a cut rhythm that does not match the song’s tempo makes the video feel disconnected. Always let the music dictate the cut pace.
- Overusing effects: Flashy transitions on every cut signal inexperience. Experienced editors limit themselves to subtle cuts and sparse effects to maintain storytelling clarity.
- Mismatched frame rates: Dropping 30fps footage into a 24fps sequence without adjusting settings creates stuttering that ruins otherwise good shots.
- Poor coverage during the shoot: If you only recorded one angle, your edit options are nearly zero. Planning for post-production during the shoot by capturing multiple angles and extra takes is the single biggest quality multiplier.
- Skipping the review export: Always export a low-resolution draft and watch it on a phone before final export. Audio sync errors and color shifts that are invisible on a large monitor show up immediately on a small screen.
“The best editors are the ones who planned the edit before they ever pressed record. Every extra angle you capture on set is an insurance policy in the edit bay.”
Test your final export on at least three different devices and two different pairs of headphones. What sounds balanced on studio monitors often sounds bass-heavy on earbuds.
Key Takeaways
A music video edit succeeds when rhythm, visual storytelling, and clean audio work together as a single system, not as separate tasks.
| Point | Details |
|---|---|
| Organize before you edit | Label clips by take, angle, and quality immediately on import to save hours later. |
| Sync audio first, then video | Drop the master track and place beat markers before placing any video clip. |
| Match cut energy to the song | Use rapid cuts for high-energy sections and longer takes for slow, emotional passages. |
| Audio quality drives viewer retention | Keep levels between -6 and -12 LUFS and add captions for the 80%+ of mobile viewers watching on mute. |
| Plan coverage during the shoot | Multiple angles and B-roll give you the flexibility to fix mistakes and add narrative depth in post. |
What editing rhythm actually teaches you
Most guides focus on the technical steps, and those steps matter. But after working through dozens of music video projects, the lesson that sticks is simpler: the edit is a performance, not a construction job.
The editors I respect most treat the timeline the way a musician treats a live set. They feel when a cut is landing wrong before they can explain why. That instinct comes from watching the video dozens of times with fresh ears, not from memorizing rules. The rules give you a starting point. Your ear and eye give you the finish line.
The other thing I have learned is that restraint is harder than creativity. Adding a glitch effect or a spin transition takes two seconds. Deciding not to add one takes real confidence. The videos that hold up over time are almost always the ones where the editor trusted the footage and the song to carry the weight, and got out of the way.
If you are just starting out, pick one technique per project to master. Nail your sync on the first project. Focus on color consistency on the second. Build your toolkit one skill at a time instead of trying to apply everything at once. That approach produces better work faster than any shortcut.
— Nicolas
Kudoflix makes music video editing more accessible
Putting these techniques into practice is faster when your editing platform does not slow you down with installs, crashes, or a confusing interface.
Kudoflix is a browser-based video editor built for creators who want professional results without the technical friction. It includes kinetic text tools, caption features, and export presets that match the workflows described in this guide. You can add beat-synced text overlays, apply color grades, and export directly to platform-specific settings without switching between applications. For aspiring videographers who want to apply what they have learned here right away, Kudoflix removes the setup barriers and puts the creative tools front and center.
FAQ
What frame rate should I use for a music video?
Use 24fps for a cinematic look and 60fps for slow-motion footage. Match your sequence frame rate to your primary camera’s output to avoid stuttering.
How do I sync video to music accurately?
Drop the master audio track first, then place timeline markers at every beat and vocal cue before adding any video clips. This method ensures every cut is rhythm-driven.
What audio level should music videos target?
Keep dialogue and lead vocals between -6 and -12 LUFS for clarity across all playback devices. Duck background music during any spoken sections.
Why do my transitions look amateurish?
Overusing flashy transitions is the most common sign of an inexperienced edit. Limit yourself to hard cuts and match cuts for most sequences, and reserve effects for one or two signature moments.
How do I edit a music video for mobile viewers?
Add captions and kinetic text overlays, since over 80% of mobile users watch videos on mute. Export at 1080×1920 for vertical platforms like Instagram Reels and TikTok.

[…] Music Video Project Editing Guide for Creators – Kudoflix Video Editing […]