
The Ken Burns effect is a slow panning and zooming animation applied to still images to simulate camera movement. You create it by defining a Start frame and an End frame, each with its own scale and position, and letting the editor interpolate the motion between them. The shortest path: open your editor, select a photo, set your crop start and end positions (or drop two keyframes), apply easing, and export.
Table of Contents
- What is the Ken Burns effect and when should you use it?
- How does the Ken Burns effect actually work technically?
- How to create the Ken Burns effect in any editor: a general workflow
- Quick how-to recipes for iMovie, Premiere Pro, Final Cut Pro, DaVinci Resolve, Canva, and Kudoflix
- Composition, pacing, and timing: how to match motion to mood
- Common mistakes and how to fix them
- Export settings that keep your Ken Burns animation sharp
- Where to see the Ken Burns effect in action
- Why subtle motion improves storytelling: what the evidence says
- Key Takeaways
- The motion that disappears into the story
- Kudoflix makes pan and zoom fast, from any browser
- Useful sources and official documentation
What is the Ken Burns effect and when should you use it?
The technique gets its name from American documentary filmmaker Ken Burns, who used slow pans and zooms across archival photographs so extensively in films like The Civil War that editors began calling it by his name. Before digital editing, the same motion was achieved with a rostrum camera physically moving over a print. Today it is standard in every major non-linear editor, often labeled “pan and zoom” or “crop and pan” depending on the software.

The effect solves a real production problem: what do you cut to when you have no video footage? A static photo on screen for a few seconds feels dead. Add a slow drift from one corner to a face, and the image breathes.
Common use cases:
- Documentary sequences where archival photos stand in for missing footage
- Family slideshows that need warmth and motion to feel cinematic rather than flat
- Product reveals that draw the viewer’s eye to a specific detail
- Social media stories and reels where motion holds attention in the first two seconds
- Educational videos that annotate a diagram by slowly zooming into a region
How does the Ken Burns effect actually work technically?
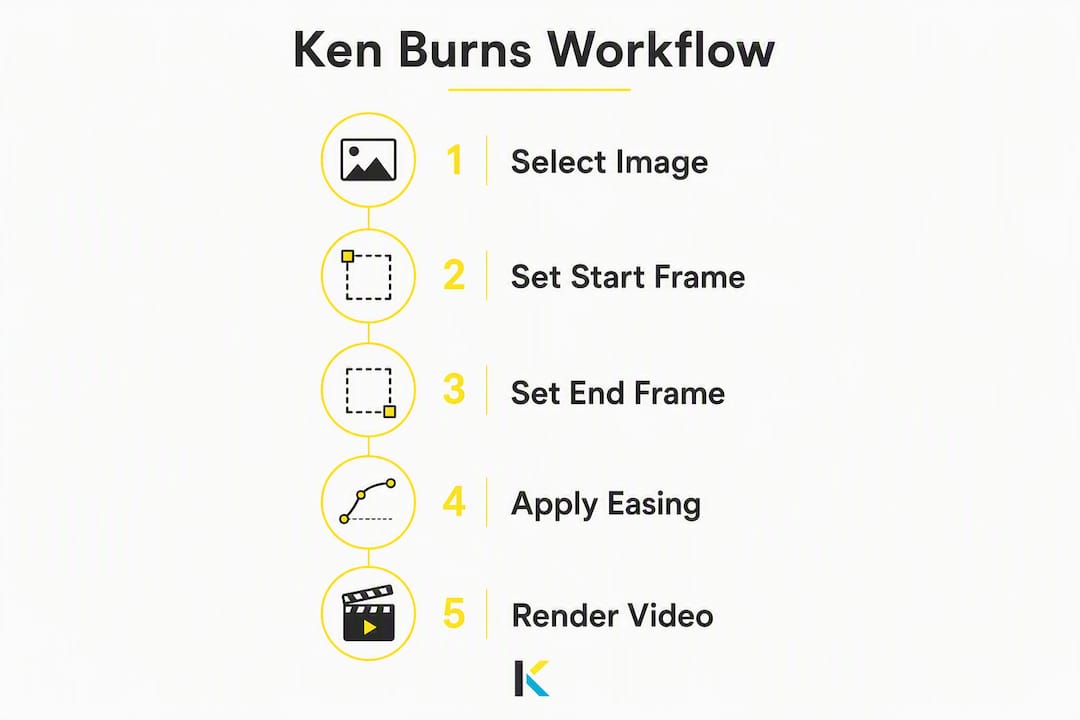
The core mechanic is simple: you define a Start frame and an End frame, each specifying a scale (how zoomed in) and a position (where the camera is centered), and the editor fills in every frame between them.
Start frame → End frame. If your Start frame is zoomed out to show the full image and your End frame is zoomed in 130% on the subject’s eyes, the editor creates a smooth push-in. Reverse those two frames and you get a pull-out. Combine a zoom with a horizontal drift and you get the classic Ken Burns diagonal glide.
Keyframes are the markers that tell the editor where each frame lives in time. In professional tools like Adobe Premiere Pro or DaVinci Resolve, you place a keyframe at the clip’s first frame (setting Scale and Position) and a second keyframe at the last frame (setting different Scale and Position values). The editor calculates every intermediate value automatically.
Easing is what separates a professional result from an amateur one. Linear interpolation moves at a constant speed from start to finish, which looks mechanical. Ease-In/Ease-Out or bezier interpolation mimics real camera physics: the motion accelerates gently at the start and decelerates into the end frame. That subtle ramp is what makes the movement feel organic.
One-click presets (available in iMovie, Canva, and Kudoflix) handle all of this automatically. Manual keyframing gives you precise control over speed curves, motion paths, and multi-point moves. Use presets when you need speed; use manual keyframes when the story demands a specific motion that no preset matches.
For advanced work, separating foreground and background layers and moving them at slightly different speeds creates a simulated parallax effect, adding perceived depth to a flat photograph.
How to create the Ken Burns effect in any editor: a general workflow
This sequence works regardless of which tool you use. Think of it as the template you adapt to each editor’s UI.
- Import your photo and place it on the timeline.
- Set the clip duration. Decide how long the image stays on screen before you touch any motion settings.
- Choose your focal point. Identify the detail the motion should reveal or emphasize. The motion path should serve that story beat.
- Set the Start frame. Move the playhead to the clip’s first frame. Set scale and position to establish where the “camera” begins.
- Set the End frame. Move the playhead to the clip’s last frame. Set a different scale and position to establish where the motion ends.
- Apply easing. Switch keyframe interpolation from Linear to Ease-In/Ease-Out (or equivalent). This single step has the biggest impact on perceived quality.
- Preview at full resolution. Watch the entire clip. Check for pixelation, jitter, or motion that fights the audio.
- Adjust pace. If the motion feels rushed, extend the clip duration. If it drags, trim it or increase the scale difference to cover more visual ground in the same time.
- Export at the project’s native resolution with a bitrate high enough to handle the detail exposed by the zoom.
Timing guidance from Cloudinary puts the practical range at about 2 seconds per image for fast-paced clips and up to 7 seconds for slow, contemplative ones. Match the duration to the emotional weight of the image.
Pro Tip: Start every project by creating one motion preset or template with your preferred easing and a moderate zoom ratio, then apply it across all images. Consistent rhythm across a slideshow reads as intentional craft, not accident.
Quick how-to recipes for iMovie, Premiere Pro, Final Cut Pro, DaVinci Resolve, Canva, and Kudoflix
iMovie (macOS and iOS)
iMovie includes a dedicated Ken Burns control with Start and End rectangles you draw directly on the viewer.
- Select the photo clip in the timeline.
- Click the Crop button in the toolbar (the overlapping rectangles icon).
- Choose Ken Burns from the crop options.
- Drag the green rectangle to frame the Start position; drag the red rectangle to frame the End position.
- Use Swap Start and End Areas to reverse the direction instantly.
- Press Play to preview, then adjust rectangle sizes to change the zoom ratio.
iMovie handles easing automatically, so the motion already has a gentle ramp built in.
Adobe Premiere Pro
Premiere Pro uses Effect Controls to animate Scale and Position keyframes, giving you full control over the motion curve.
- Select the clip and open Effect Controls.
- Move the playhead to the clip’s first frame. Click the stopwatch icons next to Scale and Position to create keyframes.
- Move the playhead to the last frame. Change Scale and Position to your End values; new keyframes are created automatically.
- Select both end keyframes, right-click, and choose Temporal Interpolation → Ease In to smooth the deceleration.
- Select both start keyframes and apply Ease Out for a smooth acceleration.
- Save the motion as a Preset (right-click the effect name in Effect Controls → Save Preset) to reuse it across clips.
Final Cut Pro
Final Cut Pro has a dedicated Ken Burns tool inside its Crop controls, similar in concept to iMovie but with more precision.
- Select the clip in the timeline.
- Open the Transform/Crop controls in the viewer toolbar.
- Click Crop, then select Ken Burns.
- Draw the Start rectangle and the End rectangle on the viewer.
- Adjust the rectangles until the motion path matches your focal point.
- Final Cut Pro applies smooth interpolation by default; check the Video Animation editor if you need to adjust the speed ramp manually.
DaVinci Resolve
DaVinci Resolve handles this through the Inspector panel in the Edit page, with full keyframe control.
- Select the clip and open the Inspector panel (top-right).
- Move the playhead to the first frame. Click the diamond keyframe icon next to Zoom and Position to set Start values.
- Move to the last frame. Change Zoom and Position to End values.
- Open the Keyframe Editor (or use the Curve Editor) and switch interpolation from Linear to Ease In/Ease Out on both keyframes.
- For a parallax feel, duplicate the clip to a track above, mask the foreground subject, and apply a slightly faster zoom to the top layer.
Pro Tip: In DaVinci Resolve, right-click a keyframe in the Curve Editor and select “Smooth” to get a bezier handle you can drag. Even a small curve adjustment makes the motion feel far more like a real camera move.
Canva
Canva’s approach is preset-driven, which makes it fast but less flexible.
- Add a photo to a presentation or video project.
- Select the photo and click Animate in the top toolbar.
- Choose Pan from the animation options (this is Canva’s equivalent of a Ken Burns move).
- Adjust the animation speed slider in the timeline panel at the bottom.
- For a zoom-in feel, use the Zoom animation preset instead.
- Canva does not expose manual keyframes, so the motion path is fixed by the preset direction.
Kudoflix
Kudoflix’s browser-based editor applies pan and zoom through its framing and keyframe controls, with no download required.
- Upload your photo and place it on the timeline.
- Select the clip and open the Effects or Animation panel.
- Choose a pan and zoom template from the built-in library, or set Start and End crop positions manually.
- Adjust the clip duration directly on the timeline to control motion speed.
- Apply an easing preset (Ease In/Out is available in the animation settings).
- Preview in the browser, then export at your chosen resolution.
Kudoflix’s visual effects library includes Ken Burns-style motion templates you can apply in a single click, making it a fast option for slideshows and social clips when you need results without a steep learning curve.
Composition, pacing, and timing: how to match motion to mood
Good composition choices matter as much as the technical settings. Before you set a single keyframe, identify the focal point the motion should reveal. The path from Start frame to End frame should lead the viewer’s eye toward that point, not away from it. Avoid framing that cuts off faces, text, or key objects at either endpoint.
A few rules that hold across every tool:
- Pan toward the subject being discussed. If the narration mentions a face, end the motion on that face.
- Avoid diagonal motion that crosses the frame’s center. It tends to feel random rather than intentional.
- Leave breathing room at both endpoints. A Start frame that is already tightly cropped leaves nowhere to go.
The table below maps mood to duration and easing style, using the 2–7 second range as the practical boundary.
| Mood | Duration per image | Easing style |
|---|---|---|
| Energetic / fast-paced | 2 seconds | Ease Out (quick start, gentle stop) |
| Conversational / balanced | 4–5 seconds | Ease In/Ease Out |
| Contemplative / cinematic | 7 seconds | Bezier (slow ramp both ends) |
Pro Tip: If you are cutting to narration, mark the script’s sentence breaks as timeline markers before you set motion endpoints. Ending a zoom exactly on a narration beat creates a satisfying rhythm that feels edited, not automated.
For visual storytelling that holds attention, the motion direction should mirror the emotional arc of the moment: a zoom-in builds intimacy, a pull-out creates distance or reveals context. Choosing the wrong direction for the story is a subtler mistake than pixelation, but viewers feel it even when they cannot name it.
Common mistakes and how to fix them
Most Ken Burns problems fall into four categories. Here is what to look for and what to change.
- Pixelation. The image looks soft or blocky at the End frame. Cause: the source photo’s resolution is too low for the zoom level. Fix: use a higher-resolution image or reduce the maximum zoom ratio. A 1080p project needs a source image of at least 2000px on its shorter side if you plan to zoom in by 130%.
- Jitter or stuttering motion. The clip moves smoothly in the editor but stutters on playback. Fix: render or cache the clip before previewing, and check that your project frame rate matches the export frame rate. Mismatched frame rates cause uneven playback even when the keyframes are correct.
- Wrong framing at Start or End. Important details (a face, a logo, a key object) are cut off at one endpoint. Fix: reopen the crop controls and expand the rectangle at the offending endpoint. Always preview at the first and last frame before committing.
- Abrupt, mechanical motion. The zoom feels like a machine, not a camera. Cause: linear keyframe interpolation. Fix: apply Ease-In/Ease-Out to both keyframes. In most editors this is a right-click on the keyframe; in iMovie and Canva it is applied automatically.
Before you export, run this quick checklist:
- Watch the full clip at 100% resolution (not a proxy).
- Check the first and last frame for edge artifacts or unwanted cropping.
- Listen to the audio while watching: does the motion endpoint land on a meaningful beat?
- Scrub slowly through the middle of the clip to catch any jitter that is invisible at normal speed.
Export settings that keep your Ken Burns animation sharp
The motion you built in the editor can degrade at export if the settings do not match the work. A few practical choices prevent that.
- Match your export resolution to the source. If your photos are 4K, export at 4K. Downscaling is fine; upscaling in the editor before export is not. Scaling up forces the encoder to invent detail, which compounds any pixelation from the zoom.
- Use H.264 as your baseline codec. It is universally supported and handles gradual motion well. For smaller file sizes with equivalent quality, H.265 (HEVC) is a strong choice, though older devices and platforms may not support it natively.
- Bump the bitrate when zooming heavily. A tight zoom exposes more fine detail per frame, which requires more data to encode cleanly. For a 1080p export with significant zoom, a bitrate of 16–20 Mbps is a reasonable floor. For 4K, 40–50 Mbps avoids visible compression artifacts on detailed textures.
- Match the project frame rate. Export at the same frame rate you edited in. Changing frame rate at export introduces duplicate or dropped frames that make smooth motion look choppy.
Final quality checklist before publishing:
- Play the exported file on the target platform (not just in your editor).
- Zoom in to 100% on the End frame to check for compression artifacts.
- Confirm the file plays at the correct frame rate on mobile, where hardware decoding varies.
- Check audio sync: a long render can occasionally shift audio by a frame or two.
Where to see the Ken Burns effect in action
Watching good examples is the fastest way to calibrate your own work. Here are the use cases worth studying and where to find them.
- Documentary sequences. Ken Burns’s own films (Baseball, Jazz, The Civil War) are the canonical reference. Watch how the motion always ends on the subject of the narration, never randomly.
- Family slideshows. Platform tutorial pages for iMovie and Final Cut Pro include short sample videos that show the effect at a moderate pace. These are useful benchmarks for personal projects.
- Product reveals. E-commerce brands use slow zooms on product photography to highlight texture and detail. Search for “product photo animation” on YouTube to find short demos.
- Social story clips. Instagram and TikTok creators apply fast, 2-second Ken Burns moves to single images to create motion where none exists. The Kudoflix examples gallery shows finished projects across several of these use cases.
One technique worth experimenting with: reverse Ken Burns, which starts tight and pulls out to reveal context. A zoom-out on a crowd photo, for example, starts with one face and ends with hundreds. It creates a completely different emotional register than a push-in, and most creators never try it.
Watch all demos at 100% resolution and full screen. Motion quality that looks fine in a small preview window often reveals jitter or pixelation at full size, and you want to judge your own work at the same scale your audience will see it.
Why subtle motion improves storytelling: what the evidence says
According to Britannica’s coverage of the technique, the movement should support the narrative. Pan toward the subject being discussed, or reveal a detail the narration is about to name. Motion that exists for its own sake pulls attention away from the story rather than into it.
That principle has a practical corollary: the best Ken Burns moves are ones the viewer does not consciously notice. They feel the intimacy of a slow zoom-in without registering that the camera moved. When a viewer notices the motion itself, the motion is probably too fast, too large, or pointed in the wrong direction.
A few rules that hold up across professional practice:
- Keep movement narrative-driven: every motion path should have a reason tied to the content.
- Use easing on every clip: linear motion is the single most common tell that a video was made by a beginner.
- Use high-resolution source images: the zoom amplifies every flaw in the source.
- Maintain consistent rhythm: matching durations across a slideshow creates a meditative, professional feel that random durations destroy.
For developers and power users working with large photo libraries, programmatic tools like the burns Python library formalize motion as a BurnsPath with defined easing styles, making it possible to generate consistent, non-repetitive motion across hundreds of images without making individual framing decisions for each one.
Key Takeaways
The Ken Burns effect works because two keyframes, correct easing, and a high-resolution source image are all it takes to turn a static photo into a cinematic moment.
| Point | Details |
|---|---|
| Start and End frames are everything | Set scale and position at the first and last frame; the editor handles every frame between them. |
| Easing is non-negotiable | Switch from linear to Ease-In/Ease-Out on every clip; this single change removes the mechanical look. |
| Duration drives mood | Use 2 seconds per image for energy, 4–5 seconds for balance, and 7 seconds for a contemplative, cinematic feel. |
| Resolution protects sharpness | Source images must be large enough to survive the zoom; pixelation at the End frame means the source is too small. |
| Kudoflix speeds up the process | Kudoflix’s browser-based editor offers one-click pan and zoom templates with built-in easing, no download needed. |
The motion that disappears into the story
Most tutorials treat the Ken Burns effect as a technical checkbox: add keyframes, apply easing, done. What they underplay is the directional choice. A zoom-in and a zoom-out are not interchangeable. A pan left and a pan right carry different emotional weight depending on what is in the frame. The editors who use this technique most effectively are not thinking about keyframes at all. They are thinking about where they want the viewer’s eye to be at the end of the clip, and they are working backward from that.
The other thing worth saying plainly: consistency matters more than any individual move. A slideshow where every image has a slightly different duration, a different easing style, and a random motion direction feels restless and amateurish even when each individual clip looks fine in isolation. Pick one motion preset, apply it across the whole project, and break the pattern only when the story genuinely demands it. That discipline is what separates a polished memorial video or documentary sequence from a collection of animated photos.
Kudoflix makes pan and zoom fast, from any browser
Skip the download, the render queue, and the keyframe math. Kudoflix’s online video editor applies Ken Burns-style pan and zoom in a few clicks, with built-in easing and a library of motion templates ready to go. Upload your photos, pick a template or set your own Start and End crop positions, adjust the clip duration on the timeline, and export. No installation, no steep learning curve.
For readers who want to go further, Kudoflix’s free-to-use video templates include slideshow and documentary layouts with motion already applied, so you can drop in your own images and have a finished Ken Burns slideshow in minutes rather than hours. Try it now at kudoflix.com/simple-professional-editing.
Useful sources and official documentation
These are the primary references used throughout this guide. Follow the tool-specific links for step-by-step UI details; use the Cloudinary and Britannica entries for deeper theory on timing and storytelling.
- Ken Burns effect — Wikipedia: origin, terminology, and the parallax/layer technique explained.
- How to apply a Ken Burns effect — Adobe HelpX: Premiere Pro keyframe workflow, easing settings, and saving motion presets.
- Ken Burns effect: Complete Guide — Cloudinary: timing guidance (2–7 seconds), resolution advice, and practical implementation notes.
- The Ken Burns Effect Explained — Britannica: short video and editorial context on narrative-driven motion.
- thorwhalen/burns — GitHub: open-source Python library for programmatic, deterministic Ken Burns motion across large image sets.
Recommended