
The simplest workflow to make a trip video is this: pick one story to tell, shoot a mix of wide, medium, and close-up clips with steady hands and clear audio, back everything up daily, then cut a short edit built around sound and a few hero moments. Shoot during golden hour when you can, and finish the whole thing in an editor like Kudoflix instead of wrestling with heavy desktop software.
TL;DR:
- Shooting during golden hour enhances the cinematic quality of travel videos, while harsh midday sunlight can be used effectively for energetic street scenes.
- Filming a variety of wide, medium, and close-up shots with steady technique creates more engaging and professional-looking footage.
- Backing up footage daily and organizing clips by day or location prevents data loss and simplifies editing, saving significant time.
- Using a simplified online editor like Kudoflix allows fast, cloud-based editing with pre-made templates, reducing hardware requirements and software friction.
- Finishing the edit within a week of returning and focusing on clean audio significantly improves the final video’s quality and viewer engagement.
Table of Contents
- How Do I Plan a Trip Video Before I Start Filming?
- What Shot Types and Composition Rules Make Travel Footage Look Professional?
- How Do I Get Steady Footage and What Gear Do I Actually Need?
- How Should I Handle Lighting While Filming My Trip?
- What’s the Best Way to Organize and Back Up Footage While Traveling?
- What’s a Realistic Editing Workflow From Rough Cut to Finished Video?
- What Are the Best Export Settings for YouTube, Instagram, and TikTok?
- Why an Online Editor Like Kudoflix Helps You Finish Faster
- An Editor’s Honest Take on Finishing Your Trip Video Fast
- Ready to Turn Your Footage Into a Finished Video?
- Sources
- FAQ
How Do I Plan a Trip Video Before I Start Filming?
Every strong trip video starts with a decision you make before you ever hit record: what’s this actually about? Not “my trip” in general, but one feeling or thread. Was it the food? The wrong turns that led somewhere better? The three days on the coast versus the two in the city? Pick one angle and let it drive every shot choice that follows.
Runtime matters just as much as theme. A vertical Reel or TikTok clip works best at 30 to 90 seconds. A YouTube recap or a video you’ll show family on the living room TV can run 3 to 8 minutes without losing anyone. Decide which one you’re making first, because a 6-minute story shot for Instagram will feel bloated, and a 45 second story stretched to 5 minutes will feel padded with filler.
Deciding your distribution platform early changes how you shoot, not just how you edit. Vertical footage for TikTok needs different framing than a horizontal YouTube edit, and trying to force one into the other after the fact costs you resolution and composition.
Before you leave, or before day one of filming, build a short shot list. It doesn’t need to be elaborate:
- One “hero moment” you want to capture each day (a sunrise, a meal, a specific street).
- Three or four B-roll ideas per location: hands, feet walking, local signage, a landscape wide shot.
- The two or three “must-get” shots you’d regret missing (the view from the hotel, the friend laughing, the food stall).
This kind of story focus isn’t just a creative preference. Research on storytelling and audience engagement shows coherent narratives hold attention and stick in memory far better than a loose collection of pretty clips, because the brain rewards a story it can follow.
Pack light but smart. A pocket-friendly checklist that actually matters:
- A portable battery pack (filming drains phones fast, especially in cold or hot weather).
- At least one extra memory card or 128GB+ of free storage.
- One simple audio solution, even just wired earbuds with a mic, for interviews or narration.
Ten minutes of planning before departure saves hours of frustrated scrubbing through footage later, trying to figure out what story you were even telling.
What Shot Types and Composition Rules Make Travel Footage Look Professional?
Three shot types carry almost every travel video: the wide shot that establishes where you are, the medium shot that shows what’s happening, and the close-up that adds texture or emotion. Skip any one of them and the footage feels flat. A video made entirely of wide shots looks like a postcard slideshow. A video made entirely of close-ups feels claustrophobic and disorienting.
Layer them the way working editors do: open a scene wide to set location, cut to medium for action or movement, then punch into a close-up for a detail. That wide to medium to close pattern, paired with basic stabilization and planned transitions, is what makes travel edits feel like they were made by someone with an eye, according to Insta360’s shooting guide, rather than someone just pointing a phone at things.
Pacing depends on clip length as much as content. A common rhythm mixes:
- Quick hits, 2 to 4 seconds, for energy (market stalls, footsteps, crowds).
- Medium holds, 6 to 10 seconds, for action that needs a beat to register (someone cooking, a boat departing).
- Scenic breaths, 12 to 20 seconds, for landscapes or moments that deserve room to sit.
Editors who mix all three clip lengths consistently produce edits that feel more alive than videos built entirely from one duration. A sequence of only very short clips can exhaust a viewer, while a sequence of only longer holds may lull them to sleep. Alternate deliberately.
Composition basics still apply on a phone screen the same way they do on a cinema camera. Keep the horizon level, always. Use the rule of thirds, placing your subject off center rather than dead in the middle, which almost every phone camera app lets you toggle on as a grid overlay. Leave lead space, meaning if someone is walking or looking in a direction, leave empty frame in front of them rather than behind. And if there’s any chance you’ll reframe this footage to vertical later, shoot with extra margin around your subject so you have room to crop without losing the shot.
Transitions are easiest to fake in camera rather than fix in the edit. Walking through a doorway, ducking under an arch, or panning past a tree trunk gives you a natural hide point to cut on, and it reads as intentional instead of jarring. Filming five seconds of movement before and after these moments gives your future edit something to work with.
How Do I Get Steady Footage and What Gear Do I Actually Need?
Shaky footage is the single fastest way to make a trip video look amateur, and fixing it in post rarely works well. Fix it while filming instead.
Body mechanics solve most stabilization problems for free. Bend your knees slightly and walk heel to toe rather than a normal heel strike, which is sometimes called the “ninja walk.” It absorbs vertical bounce before it ever reaches the lens. Keep your elbows tucked against your body rather than holding the phone or camera out at arm’s length, since a shorter lever arm means less wobble.
Most modern phones and mirrorless cameras include in-body or electronic stabilization that handles walking shots reasonably well on their own. A gimbal adds another level of smoothness for slow pans or long tracking shots, but it also adds weight, battery drain, and one more thing that can get flagged or questioned at airport security. For most trip footage, phone stabilization plus good walking technique covers 90% of situations. Save the gimbal for the shots you know in advance need to be perfectly smooth, like a slow reveal walking into a courtyard.
Phone shooters should lock focus and exposure manually before recording a shot, especially in scenes with bright skies or moving subjects, so the camera doesn’t hunt or pulse brightness mid-clip. Wipe the lens on your phone before every session (pocket lint and fingerprints are the number one cause of soft, hazy footage). Turn on the grid overlay for composition. And carry a small tripod or a flexible mini tripod for solo shots, sunset time lapses, or any moment you want to be in the frame yourself.
Pro Tip: Keep one cheap lavalier mic in your bag even if you don’t think you’ll do interviews. The moment you meet someone interesting on the trip, you’ll wish you had it.
Audio gear scales with what you’re filming. A clip-on lavalier mic is worth the small investment if you’re narrating or interviewing people. A lightweight shotgun mic helps for ambient sound in noisier environments. For most casual footage, your phone’s built in mic is genuinely fine, as long as you shield it from wind, since wind noise ruins audio faster than almost anything else. Cupping your hand loosely around the mic or filming with your back to strong wind fixes most of it.
How Should I Handle Lighting While Filming My Trip?
Golden hour, the hour after sunrise and before sunset, gives you soft, warm, directional light that flatters almost every subject and location, and it’s why so many travel videos look effortlessly cinematic without any color work at all, according to No Film School’s lighting breakdown. If you only plan one intentional shooting session per day, make it 30 to 45 minutes around sunrise or sunset.

Harsh midday sun isn’t something to avoid entirely, though. It creates high contrast and deep shadows that work well for busy markets, gritty street scenes, or any moment where you want energy and grit rather than softness. Shooting a chaotic street market at noon with hard light can look more honest than trying to force a golden hour glow onto a scene that’s inherently loud and bright.
A few camera settings save footage regardless of the light:
- Lock exposure and focus manually on your phone before filming a moving subject, tapping and holding until the lock icon appears.
- Watch for blown out highlights, especially bright sky behind a subject’s face, and expose for the face rather than the background.
- Shoot at 24 or 30 frames per second for a natural, cinematic motion feel; higher frame rates like 60fps are useful mainly for slow motion, not standard footage.
Neutral density (ND) filters, small darkened lens attachments, let you keep a slower, more natural shutter speed even in bright sunlight without overexposing the shot. They matter more for dedicated cameras than phones, but if you’re shooting with a mirrorless or action camera in strong sun, an ND filter keeps motion looking smooth instead of stuttery.
What’s the Best Way to Organize and Back Up Footage While Traveling?
Losing a week of footage to a corrupted card or a stolen phone is the single most avoidable disaster in travel filmmaking, and it happens because backup gets treated as an afterthought instead of a daily habit.
- Copy footage to two places every single day. Phone to a portable SSD, or phone to cloud storage, at minimum. Fifteen minutes before bed covers this.
- Organize by day or by location, not by camera roll chaos. A folder named “Day 3, Lisbon” beats scrolling through 400 unsorted clips two weeks later trying to remember where anything was shot.
- Watch every clip once and flag the gold. According to editors who cover combining trip footage into a finished video, the fastest path to a good edit is reviewing everything once, marking the emotionally strongest clips, and deleting what’s clearly unusable before you ever open an editor.
- Delete the obvious junk. Blurry, dark, or duplicate clips just clutter your timeline later. Cut them at triage time, not during the edit.
- Verify before you delete originals. Play back the backed up copy on the second device or platform before wiping the original card. A backup you haven’t confirmed isn’t really a backup.
Simple filename rules help too. Something as basic as “Day2_Market_01.mp4” beats “IMG_4471.mp4” when you’re trying to reconstruct a story two weeks after the trip ended. None of this needs to be elaborate. It just needs to happen daily, consistently, before fatigue and jet lag make you skip it.
What’s a Realistic Editing Workflow From Rough Cut to Finished Video?
A trip video comes together in five stages, and skipping straight to “add music and export” is why so many first attempts feel disjointed.
Import and organize comes first. Pull everything into one project, sorted by day or location, and delete anything you already flagged as unusable during your backup triage.
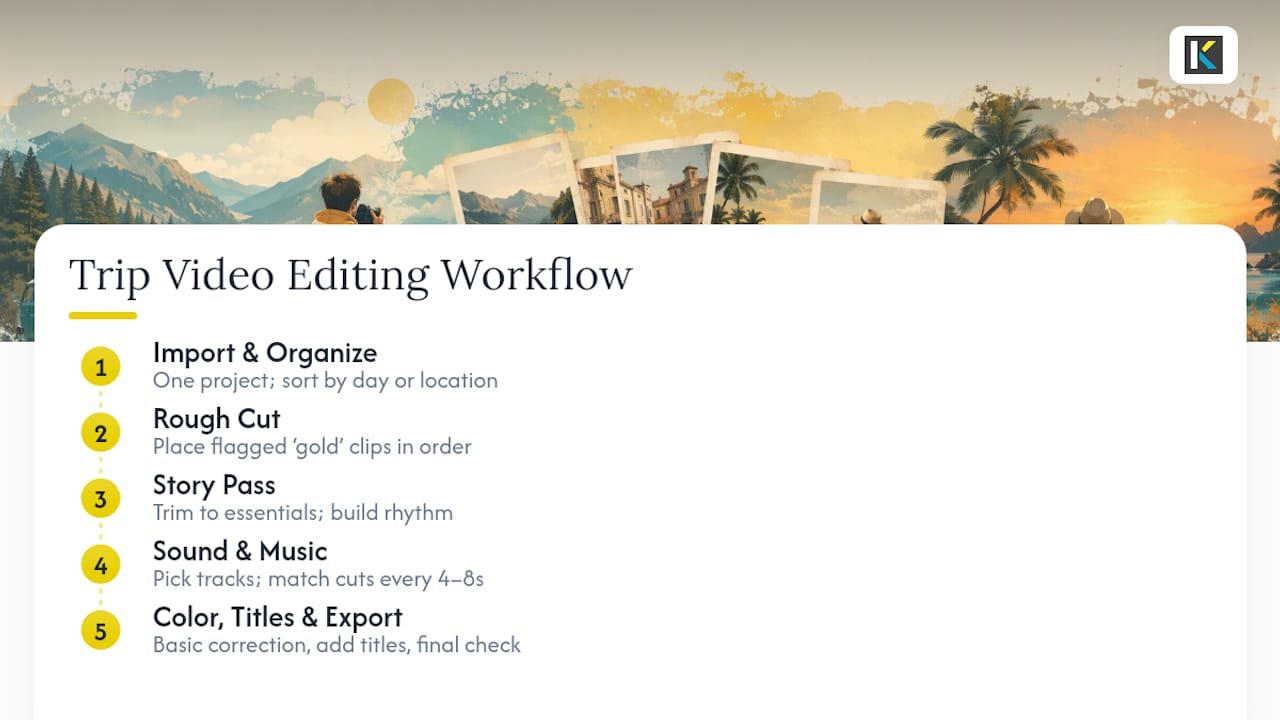
Rough cut is next: drag your flagged “gold” clips onto a timeline in rough chronological or thematic order, without worrying about exact trims yet. This stage is about sequence, not polish.
Story pass is where the real editing happens. Trim each clip down to its essential seconds, cut anything that doesn’t serve the theme you picked in the planning stage, and restructure if the order isn’t working. This is also where you build rhythm: alternate a quick 3 second hit with a slower 8 second hold, use one hero moment per section as an anchor, then surround it with detail shots. Practical guides on editing travel footage consistently point to this same sequence: plan the story, capture variety, organize the clips, then edit ruthlessly around a few key moments rather than trying to include everything.
Sound design and music come before final polish, not after, because music choice often reshapes your cuts. Royalty-free tracks from libraries built into an editor, or from stock music sites, keep you clear of copyright strikes on YouTube or muted audio on Instagram. Match your cut points loosely to the beat, but don’t chase every single beat with a hard cut. That kind of constant beat-chopping gets exhausting fast and pulls focus away from the footage itself. A cut on a strong beat every 4 to 8 seconds, rather than every beat, keeps pacing lively without feeling frantic.
Color, titles, and export finish the job. Basic color correction (fixing white balance, lifting shadows slightly, evening out exposure between clips shot in different light) does more for a polished look than any dramatic color grade. Add location titles or simple captions if they help the story, but resist the urge to caption every single clip. A quiet on-screen title reading “Day 4, Marrakech” does more work than three sentences of text.
Pro Tip: Use hard cuts far more often than fancy transitions. A clean cut on action or movement reads as intentional; a spinning wipe transition reads as 2009. Transitions work best sparingly, saved for genuine scene changes, not sprinkled between every clip.
Before you export, do one final watch through at full speed, checking for blown out audio, accidental identifying details like license plates or someone’s home address on a package, and any awkward jump cuts. Blur or trim anything that shouldn’t be public.
What Are the Best Export Settings for YouTube, Instagram, and TikTok?
One master edit, exported once at full quality, saves far more time than editing three separate versions for three platforms. Build your primary cut horizontally (or vertically, depending on your main platform), export that as your archival master, then reframe crops from it for everywhere else.
MP4 with H.264 compression is the standard format nearly every platform accepts without re-encoding issues. Export your master at 4K if your footage supports it, since that resolution holds up for archiving and gives you room to crop into vertical without losing sharpness. For the actual social uploads, 1080p is plenty. Nobody’s 4K TikTok view is rendering at native resolution anyway.
| Platform | Orientation | Recommended resolution | Typical length |
|---|---|---|---|
| YouTube | Horizontal | 1080p to 4K | 3 to 8 minutes |
| Instagram Reels | Vertical | 1080p | 30 to 90 seconds |
| TikTok | Vertical | 1080p | 15 to 60 seconds |
| Instagram feed post | Square or vertical | 1080p | Under 60 seconds |
Reframing to vertical from a horizontal master works best when you shot with extra margin around your subject in the first place, exactly why the composition section above matters. Most editors, including Kudoflix, let you crop and reposition the frame within each clip so a horizontal shot of a coastline can become a vertical crop centered on the person in frame, rather than a stretched or letterboxed mess.
Metadata matters more than most beginners realize. A clear, specific title (the actual location and what the video is, not just “My Trip 2026”), a short description with timestamps for longer edits, and a thumbnail that shows a real moment rather than a blurry paused frame all affect whether anyone clicks. Solid video SEO practices around titles, descriptions, and tags genuinely increase how far a travel video travels beyond your immediate friends and family.
Why an Online Editor Like Kudoflix Helps You Finish Faster
Most people who quit halfway through a trip video don’t quit because the footage was bad. They quit because the software felt like a second job. Traditional desktop editors demand long downloads, confusing panels, and render times that eat an entire evening.
Kudoflix runs entirely in the browser, with no installation and no waiting on a download bar before you can start cutting clips. That matters more than it sounds, especially if you’re editing on a laptop that isn’t built for heavy video work, since cloud processing handles the rendering load instead of your machine’s hardware.
A realistic finishing scenario looks like this: pick a travel-focused template built for trip recaps, drop in your flagged gold clips in rough order, trim to the story pass described earlier, add a royalty-free track from the built in library, and export. A 2 to 3 minute highlights reel built this way, starting from footage you’ve already organized and culled, realistically takes under an hour for someone with no editing background.
What actually speeds things up:
- Pre-built templates with pacing and transition points already set, so you’re filling in clips rather than designing structure from scratch.
- A transition and text library accessible in a few clicks rather than buried in menus.
- Export presets already matched to YouTube, Instagram, and TikTok specs, so you’re not guessing at resolution settings.
None of this replaces the planning and shooting decisions covered earlier. It just removes the software friction that stops a finished timeline from ever becoming a finished, exported video.
An Editor’s Honest Take on Finishing Your Trip Video Fast
Most people don’t fail at trip videos because they lack skill. They fail because they treat the edit like it needs to be perfect, and perfect never arrives. The honest fix is a time budget: give yourself one hour a day on the trip for backup and quick triage, and a single sitting of 2 to 3 hours after you’re home for the actual edit. Anything longer usually means you’re re-cutting the same three seconds fifteen times instead of moving forward.
Audio deserves more respect than most beginners give it. A slightly soft shot with clean sound beats a gorgeous shot with wind roaring over it, every time, because viewers forgive visual imperfection far more readily than they forgive bad audio. If you only fix one thing before exporting, fix the sound, not the color grade.
The rule worth adopting: finish within a week of returning, before the trip’s specific details blur together, and don’t let the footage sit untouched on a drive for six months waiting for the “right time” to edit. That right time rarely comes, and the footage rarely gets easier to cut the longer it waits.
— Mandrixx
Ready to Turn Your Footage Into a Finished Video?
Kudoflix is the alternative to a desktop editor for anyone who wants a finished trip video without the download wait, the plugin hunting, or the render times that eat a whole evening. Everything runs in the browser, so a laptop that struggles with heavy software still handles the edit fine, since the processing happens in the cloud rather than on your hardware.
The free plan is the easiest way to see if the workflow fits how you like to edit, with no card required to start cutting your first trip recap. If you want the full template library, transitions, and export options, the STARTER plan runs $9.99 a month or $83.88 a year, and PRO runs $12.99 a month or $119.88 a year, both listed on the pricing page.
Open the online video editor, drop in the footage you already organized and flagged, pick a travel template, and see how close you get to a finished cut in one sitting.
Sources
A few resources go deeper into specific pieces of this workflow than a single article can cover.
- No Film School — lighting and golden hour guidance
- Harvard Business Review — why your brain loves good storytelling
- Insta360 blog — how to make travel videos
- Bea Adventurous — how to edit travel videos (how-to and workflow)
- Paliparan — combining MP4 clips into a travel video
FAQ
How Do You Video Your Trip?
Plan one story or theme before you film, then capture a mix of wide, medium, and close-up shots with steady hands and clear audio. Back up footage daily, organize it by day or location, and build your edit around a few hero moments rather than every clip you shot.
What Is the Best App to Create Travel Videos?
It depends on whether you want to edit on your phone in the field or finish on a laptop afterward. Browser-based editors like Kudoflix work well for finishing at home since there’s no download, and travel-specific templates cut the time it takes to structure a highlights reel.
What Is the Best Way to Record My Travels?
Shoot in short bursts across the day rather than one long continuous recording, aiming for a wide shot, a medium action shot, and a close-up detail at each location. Film during golden hour when you can, and keep your phone or camera steady using the heel to toe walking technique described earlier.
How Can I Make a Travel Video Using My iPhone?
Lock focus and exposure manually before filming a moving subject, turn on the grid for composition, and clean the lens before each session since fingerprints and pocket lint soften footage noticeably. Once you’re home, import your clips into an editor, trim to your strongest moments, add royalty-free music, and export at 1080p for social platforms.
Recommended