Make an engaging Formula One video by securing legal footage or music rights first, capturing a tight set of high-impact shots at the track or from licensed sources, editing to music with fast, deliberate pacing, layering sound to sell the speed, and exporting settings matched to wherever you’re publishing. Skip any one of those five and the whole thing falls apart, no matter how good your color grade looks. The checklist below breaks each step into something you can act on today.
TL;DR:
- Using your own race footage minimizes licensing risks and gives full creative control, while stock clips require careful license verification for commercial use.
- Shooting at high frame rates, matching shutter speed to frame rate, and using telephoto lenses are essential to produce fast-looking, smooth, and dynamic F1 footage.
- Editing should focus on pacing with selective cuts and soundtrack synchronization, emphasizing contrast and avoiding repetitive shots to enhance viewer engagement.
- Overlays like telemetry data should be minimal, purposeful, and timed to support key moments without cluttering the visual flow.
- Employing online editing platforms with templates and royalty-free assets speeds up production, making rough cuts accessible for creators with limited technical setup.
Table of Contents
- How to Make a Formula One Video: The Pre-Shoot Checklist
- Can You Legally Use Race Footage and Music?
- What Camera Settings Work Best for Motorsport?
- Editing Techniques That Make F1 Footage Feel Cinematic
- Layering Sound So the Speed Actually Reads
- What Post-Production Workflow Keeps You Fast?
- How Should You Publish and Promote Your F1 Edit?
- How Do You Storyboard a Race Video Before You Shoot?
- How Do You Add Graphics and Telemetry Overlays?
- Staying Safe and Respectful When Filming at a Live Event
- What an Editor Learns After Enough Race Cuts
- Kudoflix: Build Your F1 Edit Without Fighting Your Software
- Sources
How to Make a Formula One Video: The Pre-Shoot Checklist
Before you touch a camera or open a timeline, build your shot list and confirm what you’re legally allowed to use. Rushing this step is why most amateur race edits look thrown together.
Shots to capture or source:
- Low-angle shots as cars pass, exaggerating speed
- Telephoto compression on braking zones and apexes
- Pit lane and paddock b-roll for texture and access
- Fan reactions, flags, and crowd energy
- Detail cutaways: tire smoke, brake glow, helmet visors
Audio and assets to gather: on-camera sync audio, ambient crowd recordings, a portable recorder for clean atmos, and a plan for voiceover if you’re building a narrative track.
Permissions to confirm: grandstand or paddock access tied to your ticket type, signed release forms for anyone recognizable on camera, and a licensing plan for any footage or music you didn’t shoot yourself.
Delivery targets: decide your frame rates and aspect ratios (16:9 for YouTube, 9:16 for Shorts and Reels) before you shoot, not after.
Can You Legally Use Race Footage and Music?
Broadcast footage from an official race feed is copyrighted by the rights holder and restricted from reuse, which is why so many “epic F1 edit” videos get pulled or demonetized within days. That restriction isn’t arbitrary. It’s the same reason your own ticket-holder footage is the safest asset you own.
Your practical options, ranked by risk:
- Your own footage shot at a race weekend: zero licensing risk, full creative control.
- Licensed stock clips from libraries like Pexels, where motorsport footage is genuinely abundant, but you still need to verify the specific license terms before using any clip commercially.
- Team or event-licensed footage, available in limited cases through official partnerships, but rarely accessible to independent creators.
- Trailers or promotional clips with cleared rights, occasionally usable under specific terms the rights holder states publicly.
- Fair-use arguments for commentary or criticism: legally murky, platform-risky, and not something to build a channel strategy around.
Music works the same way. Royalty-free libraries and paid sync licenses are the reliable path; Creative Commons tracks can work but often carry attribution requirements creators forget to honor.
Pro Tip: Save every license, invoice, and confirmation email in one folder per project. If a platform flags your video, you need proof of rights in under five minutes, not a scramble through old downloads.
What Camera Settings Work Best for Motorsport?
Getting the technical side right is what separates footage that looks fast from footage that just looks blurry. A few settings decisions matter more than the rest.
- Choose a telephoto lens (roughly 70 to 200mm) for close, compressed shots of cars braking and cornering, and keep a wider lens on hand for paddock and crowd context.
- Shoot at 60fps or higher whenever you plan to slow footage down; anything less turns smooth slow motion into a stutter.
- Match your shutter speed to your frame rate roughly at double (1/120 for 60fps) for natural motion blur that still reads clearly.
- Shoot in manual exposure mode. Track lighting swings hard between sun, shade, and cloud cover, and auto exposure will hunt constantly.
- Pick your vantage points before the session starts. A hairpin gives you braking drama; a long straight gives you top-speed passes; a raised grandstand gives you racing lines you can’t get trackside.
- Vary your angle across the session so your edit isn’t fifteen identical clips of cars going left to right.
- Pack more media cards and batteries than you think you need. Race weekends run long, and swapping gear mid-session costs you the exact shot you came for.
Scouting your vantage points ahead of time, and moving between them across a session, is standard advice from creators who shoot and edit Formula One racing for a living, and it’s the single biggest reason their footage doesn’t look repetitive.
Editing Techniques That Make F1 Footage Feel Cinematic
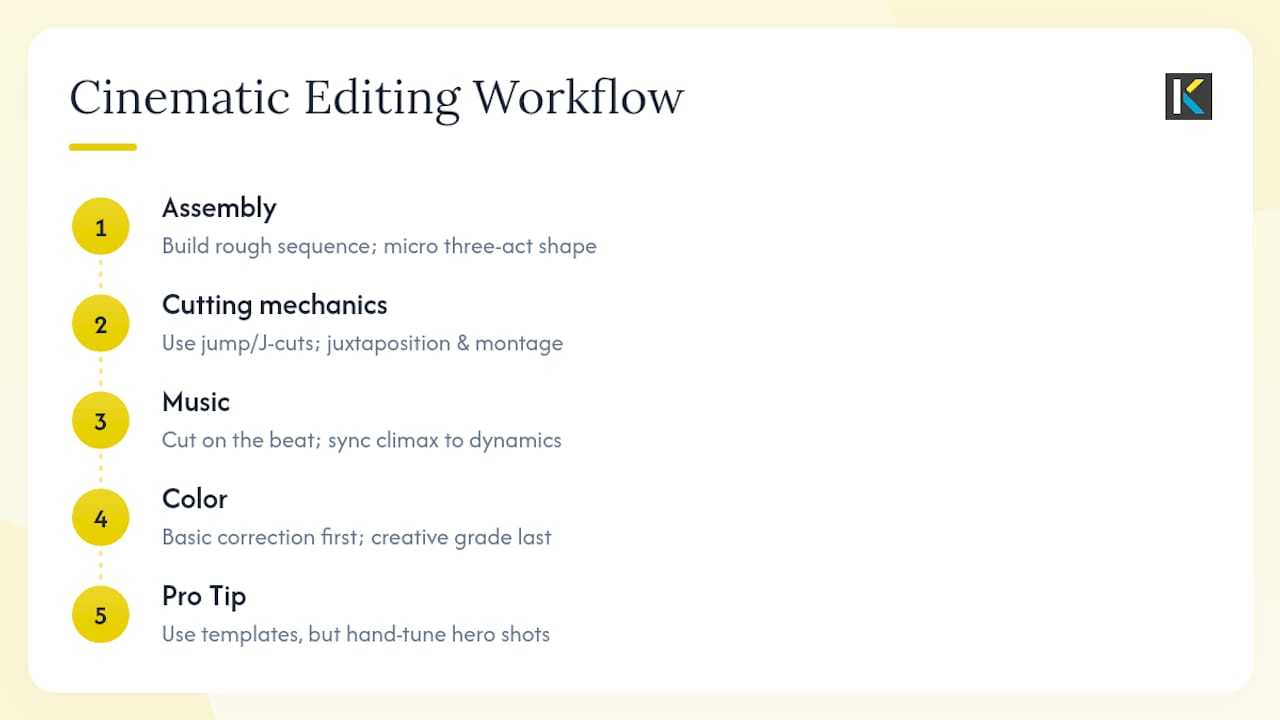
Assembly comes first. Pull your best clips into a rough sequence before you touch effects or color, and think in a micro three-act shape: setup, tension, payoff, even in a 60-second edit. Sequence by emotion, not chronology. The pole lap doesn’t have to open the video if a mid-race overtake tells a better story.
Cutting mechanics do the heavy lifting on pacing. Jump cuts and fast cuts push energy during action; J-cuts and L-cuts, where audio from one shot bleeds into the next, smooth transitions during quieter narrative beats. Editors who study top-performing race edits consistently point to juxtaposition and music-driven montage as the technique separating a memorable edit from a highlight dump: cutting a slow, human shot of a driver’s face against a fast onboard pass builds tension neither shot creates alone.
Music decides your rhythm. Cut on the beat, and time your visual climax to land on the song’s biggest dynamic shift, not a random bar. Video pacing and music-sync editing both hinge on this same principle: the cut should feel inevitable, not decorative.
Color comes last. Do a basic correction pass first, exposure and white balance, before applying any creative grade. Motorsport footage tends to have brutal highlights (chrome, sun glare, brake discs), so push your grade carefully and keep an eye on clipping. LUTs speed up a consistent look across clips, but apply them as a starting point, not a final answer.
Pro Tip: Templates and presets save real time on transitions and titles, but hand-tune your three or four hero shots manually. Viewers notice when every clip has the identical canned look.
Layering Sound So the Speed Actually Reads
Engine audio alone will not make your edit feel fast. Layering will. Start by isolating and syncing the audio from your primary car, then add competitor engine passes underneath, then bring in ambient crowd and atmosphere last. This bottom-up order keeps your mix from turning into noise.
- Isolate and sync the lead car’s engine sound first
- Layer in secondary engine passes for depth
- Add crowd atmosphere and ambient track noise
- Accent camera moves and hard cuts with whooshes or percussive hits
- Use subtle EQ, light compression, and a touch of reverb, never heavy-handed
Mixers who work professional race content describe getting every layer to sound right individually, then pulling the overall non-dialogue mix down by roughly 20 percent once it’s assembled. That drop is what keeps a busy mix from fatiguing the ear over a full edit, and it’s a rule worth adopting even if your ears tell you the louder version sounds more exciting in isolation.
What Post-Production Workflow Keeps You Fast?
Choose your codec strategy before you import a single clip. Mezzanine files (10-bit HEVC, roughly 50 Mbps) preserve enough color depth for a real grade while staying light enough to move across a network fast, which is exactly the approach used to cut Ferrari’s social content same-day. Lighter proxies work better when you’re editing on a laptop with limited storage and plan to relink to full-res masters later.
- Transcode camera originals to mezzanine or proxy files immediately after import, never edit off raw camera cards.
- Organize footage into dated folders by session (practice, qualifying, race) before you start cutting.
- Cut and grade off the mezzanine file, relinking to full-resolution masters only for your final long-form export.
- Run a deliverable checklist before export: audio levels, captions if needed, color consistency across clips, correct aspect ratio.
- Export with platform-specific presets: H.264 or H.265, 1080p or 4K, higher bitrate for YouTube long-form, and vertical framing with a safe-zone check for TikTok and Instagram Reels.
Skipping the transcode step is the single most common reason amateur editors lose hours to lag and dropped frames on longer race edits.
How Should You Publish and Promote Your F1 Edit?
Long-form edits (two to ten minutes) perform best on YouTube; short-form verticals (15 to 60 seconds) belong on TikTok and Instagram Reels, and cutting both from the same footage doubles your reach without doubling your shoot.
- Frame your thumbnail around contrast: a bright helmet or livery against a dark background outperforms a wide, busy track shot
- Titles that promise a specific moment (“The Overtake That Won It”) beat vague titles (“F1 Highlights”)
- Cut three or four vertical teaser clips from your main edit instead of one static trailer
- Track view count, average view duration, and click-through rate as your three core metrics, and stop guessing which cut worked once you have that data
The social-focused export presets built for YouTube, TikTok, and Instagram delivery remove the guesswork on frame sizes and bitrates, which matters most when you’re repurposing one shoot into four or five different edits.
How Do You Storyboard a Race Video Before You Shoot?
A storyboard for a race edit doesn’t need to be elaborate art. A simple shot list with rough timing notes, sketched on paper or in a spreadsheet, tells you what’s missing before you’re standing in a grandstand with one lens and no plan.
Start with your ending. Know what final emotional beat you want, a win, a crash recovery, a rivalry resolved, and work backward to figure out which shots actually build toward it. Most race weekends give you far more footage than story, so the storyboard’s real job is deciding what to leave out, not what to include.
Block your narrative into three rough phases: setup (grid, tension, anticipation), conflict (the race itself, overtakes, incidents), and resolution (podium, reaction, aftermath). Assign shot types to each phase before the session so you’re not improvising your coverage in real time. A wide establishing shot belongs in setup; tight onboard-style footage belongs in conflict; slow, quiet human shots belong in resolution.
Leave room for the story to change. The best race edits often pivot around something unplanned, a mechanical failure, an unexpected pass, and a rigid storyboard will fight you if you can’t adapt. Treat the plan as a skeleton, not a script.
How Do You Add Graphics and Telemetry Overlays?
Telemetry overlays, speed, gear, throttle, brake pressure, add a layer of technical authenticity that raw footage alone can’t deliver, and they’re one of the fastest ways to make an amateur edit look broadcast-adjacent.
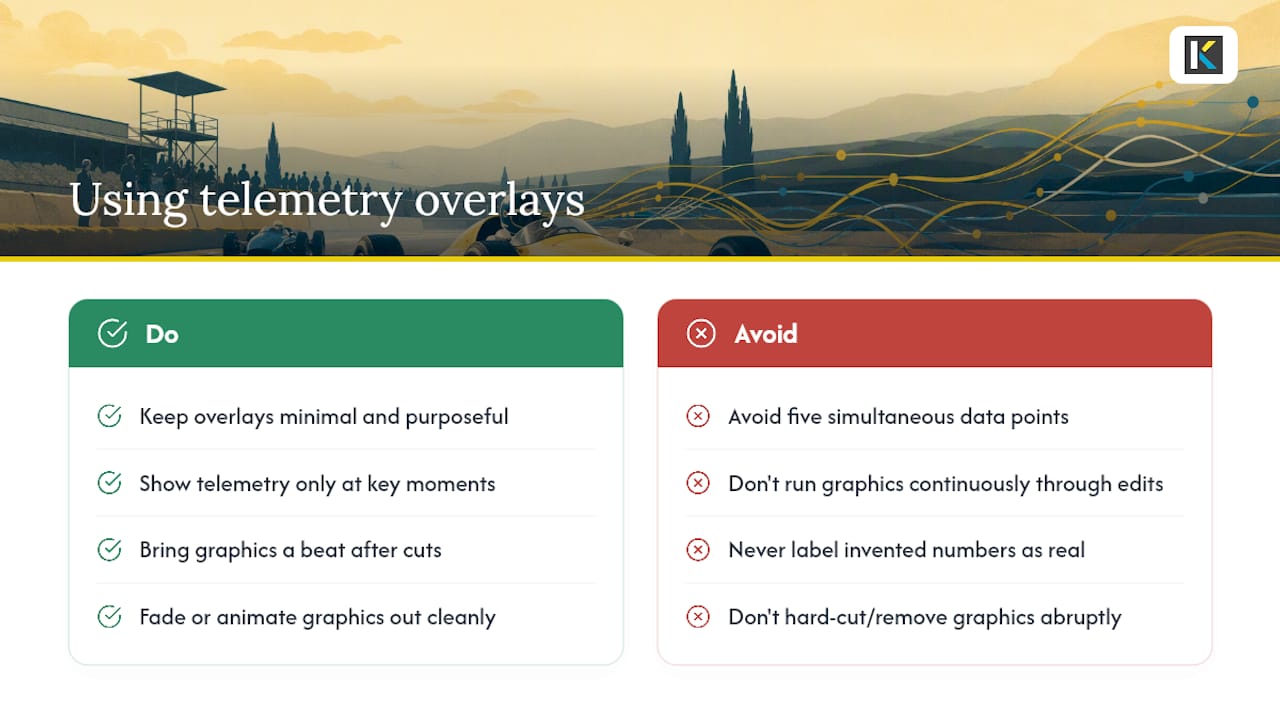
Keep overlays minimal and purposeful. A speed readout during a top-speed straight or a brake-pressure graphic entering a hairpin adds meaning; five simultaneous data points crammed into one corner of the frame adds clutter. Motion graphics should appear when they support a specific moment, not run continuously through the whole edit.
Timing matters as much as design. Bring a graphic in a beat after the cut, not exactly on it, so it doesn’t compete visually with the edit’s rhythm. Fade or animate it out cleanly rather than hard-cutting it away.
If you don’t have access to real telemetry data, stylized speed lines, gear indicators, or simple lower-third graphics using team colors can suggest the same technical feel without the accuracy claims. Just don’t label invented numbers as real data. That’s a credibility problem the moment a knowledgeable viewer notices.
Staying Safe and Respectful When Filming at a Live Event
Race weekends are loud, fast-moving, and genuinely dangerous if you’re not paying attention to your surroundings. Never cross barriers, marshal lines, or restricted zones to get a better angle, and always follow circuit staff instructions immediately, even mid-shot.
Respect fellow spectators’ space and consent. Filming crowd reactions is great b-roll, but pointing a camera in someone’s face without asking crosses a line fast, and a signed release form matters if you plan to use recognizable faces commercially. Keep gear secured and be aware of your footing, especially on temporary grandstands or gravel run-off areas where a dropped tripod can become a hazard for people below you.
Ethically, be honest about what your footage actually shows. Don’t imply official team or event access you don’t have, and don’t misrepresent stock or licensed clips as your own on-site footage. Viewers trust motorsport creators partly because the genre still feels grounded in real access and real risk. Misrepresenting either erodes that trust fast.
What an Editor Learns After Enough Race Cuts
Fewer, sharper highlights beat a timeline stuffed with every lap you shot. Most rough cuts run twice as long as the final version needs to be, and the discipline of cutting your favorite mediocre shot is where a good edit becomes a great one.
Small choices carry more weight than people expect: a single whoosh timed to a hard cut, or one deliberately quiet shot before the loudest moment. Contrast, not volume, is what makes speed feel real on screen.
— Mandrixx
Kudoflix: Build Your F1 Edit Without Fighting Your Software
Everything above still has to get assembled somewhere, and that’s usually where amateur race edits stall out: hours lost to render times, plugin crashes, or software that demands a steep learning curve before you cut a single frame. Kudoflix runs entirely online, no installs, no lengthy downloads, so you go from footage to timeline in minutes instead of losing an evening to setup.
The pacing and music-sync techniques covered above get easier with the right assets on hand. Kudoflix’s sports-focused templates and presets are built for fast-paced action edits like motorsport content, and its royalty-free music library sidesteps the licensing headaches this article just walked through. Transitions, text, and color filters live in the same interface, so you’re not jumping between four separate tools to finish one edit.
If you’ve got race footage sitting on a card right now, open a project and see how fast a rough cut comes together.
Sources
- The fast and the furious: A video creator’s guide to shooting and editing Formula One racing — Beemer Media
- Track to timeline: Brett Ramker’s high-speed workflow for Ferrari’s social content — Pomfort
- The sound and editing behind F1 — Shane Woods
- HOW TO MAKE GOOD FORMULA 1 EDITS AND VIDEOS — Dani Lozano
Recommended