For YouTube in 2026, the single best practice is: export MP4, H.264 High Profile, progressive scan, match your source frame rate, enable moov atom/faststart, and mix audio to roughly −14 LUFS.
Ready-to-copy presets:
- 1080p30 (quality-first): MP4 container, H.264 High Profile 4.0, 1920×1080, 30 fps (match source), VBR 2-pass at a suitably high bitrate for quality, AAC-LC 48 kHz stereo 384 kbps, moov atom/faststart ON, BT.709 color space
- 4K30 (quality-first): MP4 container, H.264 High Profile 5.1, 3840×2160, 30 fps (match source), VBR 2-pass at a suitably high bitrate for quality, AAC-LC 48 kHz stereo 384 kbps, moov atom/faststart ON, BT.709 color space
- Shorts/vertical (9:16): MP4 container, H.264 High Profile 4.0, 1080×1920, match source frame rate (typically 30 or 60 fps), VBR 2-pass at a suitable bitrate, AAC-LC 48 kHz stereo 384 kbps, moov atom/faststart ON
When to choose H.265 or AV1: Use H.265/HEVC when file size is a real constraint and your upload connection is slow, or when you’re delivering a 4K master and your hardware encoder supports it. AV1 gives the best compression efficiency but software encoding is still slow enough that most editors skip it for delivery. YouTube re-encodes everything to VP9 or AV1 on its end anyway, so your upload codec affects quality-in, not quality-out.
Quick upload check: faststart enabled, BT.709 color space tagged, native frame rate preserved.
Key Takeaways
For YouTube in 2026, the most important export decision is bitrate: upload well above YouTube’s published floor to give the re-encoder enough headroom to preserve quality.
| Point | Details |
|---|---|
| Container and codec | Use MP4 with H.264 High Profile for maximum compatibility; H.265 only when file size is a real constraint. |
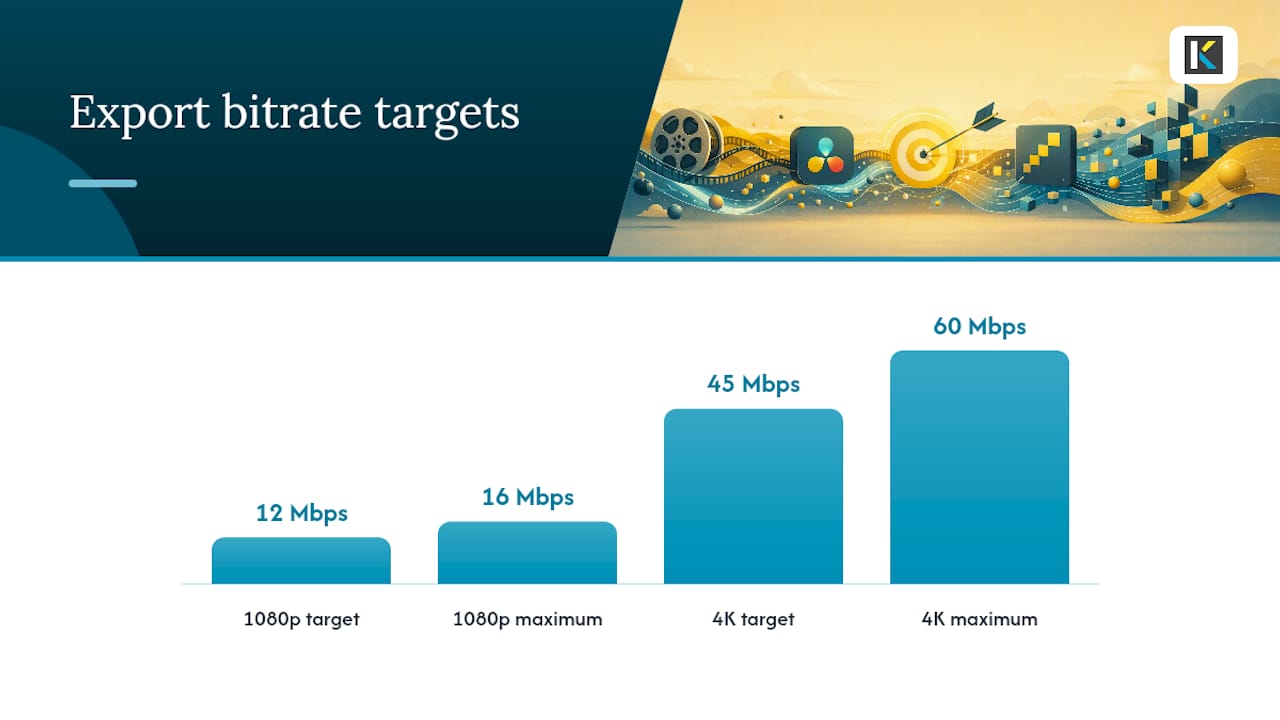
| Bitrate targets | Target 12 Mbps for 1080p30 and 45–60 Mbps for 4K30; YouTube’s 8 Mbps and 35–45 Mbps floors are minimums, not goals. |
| Frame rate rule | Always match your source frame rate; resampling causes visible judder and quality loss after upload. |
| Audio and loudness | Export AAC-LC at 48 kHz, 384 kbps stereo, mixed to −14 LUFS integrated with true peaks at or below −1 dBTP. |
| Kudoflix workflow | Kudoflix’s online editor includes YouTube-aligned export presets and templates, removing the need to configure settings manually for each project. |
After upload, wait for YouTube to finish processing the full-resolution stream before judging your export settings.
Table of Contents
- What are YouTube’s official export settings for 2026?
- Practical bitrate guidance by resolution and frame rate
- Which codec should you use in 2026: H.264, H.265, or AV1?
- Audio settings: what codec, sample rate, and loudness target should you use?
- Color space and HDR: when to use Rec.709 vs HDR masters
- How to export from Adobe Premiere Pro for YouTube (2026)
- How to export from DaVinci Resolve for YouTube (2026)
- FFmpeg command recipes for YouTube exports
- Upload and processing tips: faststart, black bars, and processing timelines
- Common issues and troubleshooting checklist
- Kudoflix testing notes and workflow tips
- The real tradeoff between speed and quality on YouTube
- Kudoflix makes YouTube-ready exports faster
- Sources
What are YouTube’s official export settings for 2026?
YouTube’s official upload spec names MP4 as the preferred container, H.264 as the recommended video codec for SDR content, and AAC or Opus for audio. Progressive scan is required. Chroma subsampling must be 4:2:0. Color space for SDR content is BT.709.
The platform publishes specific bitrate targets by resolution. Here are the numbers directly from YouTube’s spec:
These are YouTube’s floor values, not targets you should aim for exactly. Uploading at exactly 8 Mbps for 1080p leaves almost no headroom for re-encoding. More on that in the next section.
YouTube also requires the moov atom placed at the start of the file (faststart) so the platform can begin processing before the full file is received. Closed GOP is recommended. Edit lists should be avoided since they can cause sync issues after processing. Partner-only features like Content Manager and professional format support (MXF, MPEG-2) are separate from standard creator uploads and don’t apply to most editors reading this.
Key spec: YouTube’s published SDR bitrate for 1080p at standard frame rate is 8 Mbps, and 35–45 Mbps for 4K SDR at standard frame rate.
Practical bitrate guidance by resolution and frame rate
YouTube’s published floors are minimums, not recommendations. Upload at exactly the floor and you’re giving YouTube’s encoder almost nothing to work with, which shows up as banding in dark scenes and blocking in fast motion.

Practical guidance from CutScore puts it plainly: bitrate is the single most important factor for surviving YouTube’s re-encode. For footage with gradients, dark shadows, or high motion, push well above the floor.
One counterintuitive move worth knowing: uploading a 4K master often produces a cleaner 1080p playback than uploading a native 1080p file. YouTube allocates higher bitrate budgets and better codecs to 4K uploads, which benefits viewers watching at lower resolutions. If you have a 4K timeline, upload the 4K master even if most of your audience watches at 1080p.
For encoding method, CRF (Constant Rate Factor) is the most reliable quality-first approach. CRF 18 in H.264 gives excellent quality with manageable file sizes. VBR 2-pass is the right call when you need a predictable file size or are working within upload time constraints. Single-pass VBR is faster but less efficient; use it only when turnaround is the priority.
YouTube’s adaptive streaming means a higher-quality upload guarantees the best available rendition is possible for viewers with good connections. Uploading a compressed file caps the ceiling for every viewer, regardless of their connection speed.
Which codec should you use in 2026: H.264, H.265, or AV1?
The short answer is H.264 for most exports, H.265 when file size genuinely matters, and AV1 only if you have the time and hardware for it. Here’s why.
| Codec | Pros | Cons | Best For |
|---|---|---|---|
| H.264 (AVC) | Universal compatibility, fast encode, widely supported hardware acceleration | Larger files than H.265/AV1 at same quality | Default for all YouTube uploads |
| H.265 (HEVC) | smaller files than H.264 at same quality | Slower software encode; compatibility caveats on some platforms | 4K masters, slow-upload environments |
| AV1 | Best compression efficiency | Very slow software encode; limited hardware encoder support | Future-proofing; not practical for most 2026 workflows |
| VP9 | YouTube’s primary transcode target | Not practical as an upload codec for most editors | YouTube serves this to viewers; you don’t need to export it |
H.264 is still the sensible default. Every NLE, every hardware encoder, and every platform handles it without issues. Upload a well-bitrated H.264 file and YouTube will transcode it to VP9 or AV1 for delivery. Your upload codec doesn’t determine what viewers receive.
H.265/HEVC makes sense when:
- You’re uploading a 4K master and your connection is slow
- Your hardware encoder (NVIDIA NVENC, AMD VCE, Apple VideoToolbox) supports HEVC acceleration
- File size is a genuine constraint
One important caveat with HEVC: if you’re exporting for QuickTime or Apple platforms alongside YouTube, add the hvc1 tag to the container. Without it, some Apple players won’t recognize the codec. In Premiere Pro, this is handled in the export settings; in FFmpeg, add -tag:v hvc1 to your command.
DaVinci Resolve’s Studio version supports GPU-accelerated H.264 and H.265 encoding, which dramatically cuts export time for 4K. The free version of Resolve has more limited hardware encode options on certain platforms, so check your system before committing to an H.265 workflow.
For a deeper look at how modern codecs interact with platform delivery, the common video formats guide from Kudoflix covers codec behavior across social platforms.
Audio settings: what codec, sample rate, and loudness target should you use?
YouTube’s spec calls for AAC-LC or Opus audio, 48 kHz sample rate, stereo as the default (5.1 surround is accepted where needed). For stereo, 384 kbps AAC-LC is a solid target that gives YouTube’s encoder plenty to work with.
Loudness is where most creators leave quality on the table. YouTube normalizes audio to approximately −14 LUFS integrated loudness on playback. If your mix is louder than that, YouTube turns it down. If it’s quieter, it stays quiet. The goal is to deliver a mix that’s already at −14 LUFS so normalization doesn’t touch it, and to keep true peaks at or below −1 dBTP to prevent clipping after any processing.
Audio export checklist:
- Codec: AAC-LC (preferred) or Opus
- Sample rate: 48 kHz
- Channels: Stereo (default); 5.1 only when your source is surround
- Bitrate: 384 kbps stereo
- Integrated loudness target: −14 LUFS
- True peak ceiling: −1 dBTP
To measure loudness before export, use your NLE’s built-in loudness meter (Premiere Pro has one in the Audio Track Mixer; Resolve has a loudness meter in Fairlight). If you’re working in a DAW, iZotope RX or Waves WLM Plus both measure and normalize to a target LUFS.
Pro Tip: Run an FFmpeg loudnorm pass on your exported audio before final upload: ffmpeg -i input.mp4 -af loudnorm=I=-14:TP=-1:LRA=11 -c:v copy output.mp4. This copies the video stream without re-encoding and only processes audio, keeping the operation fast.
FFmpeg’s loudnorm filter handles two-pass normalization automatically and is the most reliable way to hit −14 LUFS without manual gain riding.
Color space and HDR: when to use Rec.709 vs HDR masters
For SDR content, export in BT.709 (also called Rec.709). That’s YouTube’s standard for SDR and what the platform expects. If you upload content tagged with different primaries, YouTube will standardize it to BT.709, which can cause a visible color shift if your source wasn’t actually in that space.
SDR workflow:
- Color space: BT.709
- Transfer characteristics: BT.709 (gamma 2.4 or sRGB)
- Bit depth: 8-bit is fine; 10-bit is accepted but rarely necessary for SDR
- Matrix: BT.709 (not full-range RGB)
The RGB matrix warning is worth taking seriously. If your NLE exports in full-range RGB instead of limited-range YUV BT.709, YouTube may reinterpret the color values and the result looks washed out or oversaturated on playback. Always confirm your export is tagged as YUV BT.709, not RGB.
HDR workflow (when to use it):
- Deliver HDR only when your source footage was captured in a log or HDR format and you’ve color-graded for HDR
- Use PQ (HDR10) or HLG as your transfer function; YouTube supports both
- Bit depth: 10-bit minimum for HDR
- Color space: Rec.2020 for HDR masters
- Include correct HDR metadata (MaxCLL, MaxFALL for HDR10)
Color shift warning: Uploading content tagged as Rec.2020 when it was actually graded for Rec.709 will cause YouTube to treat it as HDR and display it incorrectly on SDR screens. Tag your color space accurately.
If you’re not sure whether your timeline is HDR, check your sequence/timeline settings in Premiere or Resolve before exporting. A Rec.709 timeline exported with Rec.2020 tags is one of the most common causes of unexpected color shifts after upload.
How to export from Adobe Premiere Pro for YouTube (2026)
Before you open the export dialog, confirm two things: your sequence settings match your source footage (frame rate, resolution, color space), and your timeline color space is set to Rec.709 for SDR work.
Step-by-step export:
- Go to File > Export > Media (or press Ctrl+M / Cmd+M)
- Format: H.264
- Preset: Start with “YouTube 1080p Full HD” or “YouTube 2160p 4K Ultra HD” as a base, then customize
- Video tab:
- Profile: High
- Level: 4.0 (1080p) or 5.1 (4K)
- Frame Rate: Match Source (never resample)
- Field Order: Progressive
- Aspect: Square Pixels (1.0)
- Render at Maximum Depth: ON (for 10-bit source material)
- Bitrate Encoding: VBR, 2 Pass
- Target Bitrate: 12 Mbps (1080p30) or 45 Mbps (4K30)
- Maximum Bitrate: 16 Mbps (1080p30) or 60 Mbps (4K30)
- Key Frame Distance: 2× frame rate (e.g., 60 for 30 fps)
- Use Maximum Render Quality: ON for upscaled content
- Color space: Set output color space to Rec.709 (check “Video is Linear Color” only if your timeline is linear)
- Audio tab:
- Audio Codec: AAC
- Sample Rate: 48000 Hz
- Channels: Stereo
- Audio Quality: High
- Bitrate: 384 kbps
- Multiplexer tab: Enable Network Optimization (this places the moov atom at the start of the file)
- Click Save Preset and name it “YouTube 1080p 2026” or similar before exporting
Common Premiere export mistakes:
- Frame Rate set to a fixed value instead of “Match Source” — causes judder after upload
- Network Optimization unchecked — slows YouTube’s processing
- Bitrate Encoding left on CBR — wastes bits on static scenes, starves complex ones
- Color space not tagged — causes color shifts on playback
For smooth, fast editing on complex timelines, render your sequence before exporting to avoid dropped frames in the output.
How to export from DaVinci Resolve for YouTube (2026)
The built-in YouTube preset in Resolve’s Deliver page is convenient but often under-bits the output. Custom Export is the better path because it gives you direct control over the seven fields that matter most.
Step-by-step Deliver page setup:
- Open the Deliver page
- Select Custom Export (not the YouTube preset)
- Format: MP4
- Codec: H.264 (or H.265 if hardware acceleration is available and file size matters)
- Resolution: Match your timeline (1920×1080 or 3840×2160)
- Frame Rate: Same as Timeline (never convert)
- Encoding Profile: High (for H.264)
- Key Frames: Every 2 seconds (or set to 2× frame rate in frames)
- Network Optimization: ON (moov atom/faststart)
- Bitrate: Set to Restrict to and enter your target:
- 1080p30 SDR: 12–16 Mbps
- 4K30 SDR: 45–60 Mbps
- 1080p60 SDR: 16–20 Mbps
- Audio: AAC, 48 kHz, Stereo, 384 kbps
- Color Space: If using a color-managed timeline (DaVinci YRGB Color Managed or DaVinci Wide Gamut), set Output Color Space to Rec.709 Gamma 2.4 before rendering
- Click Add to Render Queue, then Render All
Resolve-specific pitfalls to check:
- Default YouTube preset caps bitrate too low for demanding footage; always verify the bitrate field
- Color-managed timelines require an Output Color Space transform to Rec.709; skipping this exports in the working color space, not Rec.709
- “Force debayer to highest quality” is worth enabling for 4K RAW or compressed RAW sources
- Render at Highest Quality: ON for any upscaled or optically flowed content
Matching your frame rate to the recorded footage is non-negotiable in Resolve. The “Same as Timeline” option is the correct choice every time.
FFmpeg command recipes for YouTube exports
These commands follow YouTube’s published spec and are ready to copy into your terminal. Each flag is explained so you can adapt them.
Baseline 1080p H.264 (quality-first):
ffmpeg -i input.mp4 -c:v libx264 -crf 18 -preset slow -profile:v high -level 4.0 -pix_fmt yuv420p -movflags +faststart -c:a aac -b:a 384k -ar 48000 output_1080p.mp4
-crf 18: quality-first constant rate factor (lower = better quality, larger file)-preset slow: better compression efficiency at cost of encode time-pix_fmt yuv420p: forces 4:2:0 chroma, required by YouTube-movflags +faststart: places moov atom at file start for faster processing
4K H.264 with bitrate target:
ffmpeg -i input_4k.mp4 -c:v libx264 -b:v 45M -maxrate 60M -bufsize 90M -preset slow -profile:v high -level 5.1 -pix_fmt yuv420p -movflags +faststart -c:a aac -b:a 384k -ar 48000 output_4k.mp4
H.265/HEVC with Apple platform tag:
ffmpeg -i input.mp4 -c:v libx265 -crf 20 -preset slow -tag:v hvc1 -pix_fmt yuv420p -movflags +faststart -c:a aac -b:a 384k -ar 48000 output_hevc.mp4
The -tag:v hvc1 flag makes the file readable by QuickTime and Apple devices alongside YouTube.
Shorts/vertical 9:16:
ffmpeg -i input_vertical.mp4 -c:v libx264 -crf 18 -preset slow -profile:v high -level 4.0 -pix_fmt yuv420p -vf "scale=1080:1920" -movflags +faststart -c:a aac -b:a 384k -ar 48000 output_shorts.mp4
For vertical uploads and short-format content, confirm your source is already 9:16 before scaling; upscaling a 16:9 source to 9:16 crops, not stretches.
Loudness normalization (audio-only pass):
ffmpeg -i input.mp4 -af loudnorm=I=-14:TP=-1:LRA=11 -c:v copy output_normalized.mp4
This copies the video stream untouched and only re-encodes audio. Run it as a final step after your main export when loudness is off. The FFmpeg loudnorm approach is the most consistent way to hit −14 LUFS without manual gain adjustments.
Upload and processing tips: faststart, black bars, and processing timelines
Moov atom/faststart is not optional. Without it, YouTube has to download your entire file before it can begin processing. With it, the platform starts reading metadata immediately, which speeds up both processing and the time before your video becomes available. Every export recipe in this guide includes it.
Black bars: don’t add them. YouTube’s player adapts the displayed video to the uploaded aspect ratio automatically. Hard-coded letterbox or pillarbox bars waste pixels and can produce awkward double-bars on some devices when the player also adds its own framing. Upload the native aspect ratio and let YouTube handle the rest. This applies to vertical uploads for Shorts, square uploads, and any non-standard ratio.
Processing timeline after upload:
- Low-resolution preview (360p/480p): available within a few minutes of upload completing
- Standard HD (720p/1080p): typically ready within 15–30 minutes for most videos
- VP9/AV1 high-quality streams: can take several hours for longer videos, especially at 4K
Don’t judge your video’s final quality from the low-resolution preview. Wait until the 1080p or 4K stream is available before deciding whether your export settings worked. YouTube’s processing status is visible in YouTube Studio under the video’s details.
Processing note: A 4K upload takes significantly longer to fully process than a 1080p upload. Plan your publish schedule accordingly if you need the highest-quality stream available at launch.
For cross-platform social media uploads, the same faststart and native-ratio rules apply across YouTube, Instagram, and TikTok.
Common issues and troubleshooting checklist
Quality dropped after upload:
- Check your export bitrate against the working targets above (not just YouTube’s floor)
- Confirm frame rate was not resampled during export
- Verify the video processed fully before judging quality (wait for 1080p/4K stream)
- Test with a short clip at higher bitrate and compare after full processing
Audio missing or out of sync:
- Confirm audio codec is AAC or Opus (not PCM/WAV inside MP4, which some players reject)
- Check that the container is MP4, not MOV with an incompatible audio track
- Avoid edit lists in the container; they cause sync drift after YouTube processing
- Re-export with explicit audio settings rather than relying on “match source” for audio
Color shifted on playback:
- Verify your export is tagged BT.709, not Rec.2020 or an undefined color space
- Check that your NLE is not exporting full-range RGB; output should be limited-range YUV
- In Premiere, confirm the “Video is Linear Color” checkbox matches your timeline’s actual color space
- In Resolve, confirm the Output Color Space transform is applied before rendering
General troubleshooting order:
- Verify source footage settings (frame rate, color space, resolution)
- Check export settings against the presets in this guide
- Upload a 30-second test clip and wait for full processing
- Compare the processed clip against your export file in a local player
- Adjust the single variable most likely to be the issue (bitrate, color space, or frame rate) and re-test
Kudoflix testing notes and workflow tips
Testing export presets across common timeline types reveals consistent patterns. For talking-head 1080p30 content, the difference between 8 Mbps and 12 Mbps is visible in skin tones and background gradients after YouTube re-encodes. At 8 Mbps, subtle banding appears in smooth backgrounds. At 12 Mbps, it disappears. For gaming content at 1080p60, the gap is even wider: fast motion at 12 Mbps holds detail that 8 Mbps loses entirely. For 4K B-roll, uploading at 45–60 Mbps produces noticeably cleaner 1080p playback than a 1080p upload at 12 Mbps, which confirms the 4K-master advantage described earlier.
Workflow checklist for consistent results:
- Save your export preset in Premiere or Resolve after the first successful upload; never rebuild settings from scratch
- Run a 30-second test upload before publishing a full video with new settings
- Upload the highest-resolution native master you have; downscaling happens on YouTube’s end
- Check loudness with a meter before export, not after; fixing it post-export adds a processing step
- Name export files with resolution and date (e.g.,
video_1080p30_2026-07.mp4) to avoid confusion across versions
Pro Tip: If you’re exporting multiple videos with the same settings, batch export in Premiere’s Export queue or Resolve’s Render Queue rather than exporting one at a time. Both support queuing multiple timelines with the same preset, which cuts total export time significantly on longer projects.
For trending 2026 editing workflows, pairing a solid export preset with a consistent project template is the fastest way to maintain quality across a high-volume publishing schedule.
The real tradeoff between speed and quality on YouTube
Most guides treat this as a binary: either export the highest-quality file possible or accept lower quality for speed. The actual decision is more granular than that.
For solo creators publishing two or three times a week, the quality-first presets in this guide are worth the extra export time. A 4K master at 45–60 Mbps takes longer to export and upload, but the downstream quality difference on YouTube is real and visible to viewers with good connections. That’s a worthwhile tradeoff when the content is meant to last.
For agencies or production teams turning around client deliverables on tight deadlines, the calculus shifts. A well-configured H.264 export at 12 Mbps for 1080p, with hardware acceleration enabled, often exports in real-time or faster. That’s fast enough that the quality argument for H.265 or a slower CRF preset rarely wins on deadline.
The 2026 shift worth watching is hardware AV1 encoding. NVIDIA’s Ada Lovelace GPUs (RTX 4000 series and later) and Intel Arc both support AV1 hardware encoding, which makes AV1 uploads practical for the first time without the software-encode penalty. As those GPUs become more common in editing workstations, AV1 will likely become the sensible default for 4K uploads within the next couple of years. For now, H.264 with a solid bitrate is still the most reliable path from timeline to published video.
Kudoflix makes YouTube-ready exports faster
If you’re spending more time configuring export dialogs than actually editing, Kudoflix is built for exactly that situation. The Kudoflix online video editor includes export-ready presets aligned with YouTube’s 2026 spec: correct container, codec, bitrate targets, and faststart enabled by default. No downloads, no complex settings panels, no rebuilding presets from scratch every project.
The template library includes YouTube-optimized formats for standard 16:9, vertical Shorts, and square uploads, each pre-configured for the right aspect ratio and resolution. Pick a template, edit your content, and export with one click. For creators who want professional results without the complexity of traditional NLE export workflows, that’s the practical next step. Start a free project at Kudoflix and export your first YouTube-ready video today.
Sources
These are the primary sources used to build this guide, organized by what each is best for.
Official specifications:
- YouTube recommended upload encoding settings – YouTube Help
- FFmpeg YouTube Encoding Settings — 2026 Guide
- DaVinci Resolve YouTube Export Settings (2026)
- Best Export Settings for YouTube — CutScore
FFmpeg recipes:
App-specific walkthroughs:
Bitrate and format guidance:
Recommended