Shoot on your phone, collect clips from other parents through a QR code or shared album, cut it together with a template, export at the right size, and send everyone a private cloud link. That’s the whole plan. No app downloads for grandma, no public posts, no waiting on your one shaky camera angle for the whole story.
Here’s the order that actually works, start to finish:
- Shoot: film in landscape, use the phone’s built-in stabilization, and grab a wide shot, a close-up, and a reaction shot for every key moment.
- Collect: set up a shared album or QR code before the event so other parents can drop in their footage without creating an account.
- Edit: use a template based editor like Kudoflix to assemble clips, trim dead air, and add music and titles in under an hour.
- Export: pick a resolution and bitrate that looks sharp but doesn’t choke someone’s inbox or data plan.
- Share: send a private, no-signup link (an ImageEvent-style album or similar) instead of posting to social media.
Each step below breaks down exactly how to pull it off, including where most parents get stuck.
Key Takeaways
A shareable kid-event video comes down to five steps: shoot on your phone, collect guest clips through a QR code or shared album, edit fast with a template, export at a size that streams cleanly, and share through a private link instead of social media.
| Point | Details |
|---|---|
| Collect before you edit | Set up a QR code or shared album before the event so guest footage arrives from every angle. |
| Edit with a template | A structured template with built-in transitions and titles keeps editing under an hour. |
| Export for compatibility | MP4 with H.264 at 1080p and 8 to 12 Mbps balances sharpness and file size for most devices. |
| Share privately, not publicly | A no-signup private link with an optional password protects footage better than a social post. |
| Back up in two places | Keep one local copy and one cloud copy, and check both every few months. |
| Use Kudoflix for fast edits | Kudoflix’s browser-based templates turn collected clips into a share-ready video without extra software. |
Table of Contents
- How Do You Decide What Kind of Video to Make?
- What’s the Best Way to Shoot Kids’ Events on a Phone?
- How Do You Get Video Clips From Other Parents?
- What’s a Fast Editing Workflow for a Kid’s Event Video?
- What Export Settings Keep the Video Sharp Without a Huge File?
- How Do You Share the Video Privately With Family?
- What Privacy Rules Should You Follow When Sharing Kids’ Videos?
- How Do You Make Sure the Video Doesn’t Get Lost Later?
- How Does Kudoflix Speed Up the Path From Clips to Shareable Video?
- Editorial Perspective on Making and Sharing Kid Event Videos
- Where Kudoflix Fits Into This Whole Process
- Useful Tools for Collecting, Sharing, and Editing Kid Event Videos
- Frequently Asked Questions
- Sources
How Do You Decide What Kind of Video to Make?
Not every recital or field day needs the same treatment, and picking the wrong format is the single biggest time sink in this whole process. Three formats cover almost every situation:
- Short highlight reel (1 to 3 minutes): the default choice for sharing with extended family. It forces you to cut ruthlessly, which usually makes for a better watch anyway.
- Full ceremony or performance recording: necessary when the event itself matters as a complete record, like a graduation, a full dance recital, or a religious ceremony where cutting anything feels wrong.
- Candid clip montage: loosely grouped behind-the-scenes moments, the getting-ready shots and goofing-around footage, that work well for a year-in-review edit later.
Most parents default to trying to record everything and then agonizing over what to cut. Decide the format before the event starts, and the whole workflow gets faster.
If you only have one hour of free time after the event, the highlight reel or the full recording are your realistic options. The candid montage is a weekend project, not a same-night one.
What’s the Best Way to Shoot Kids’ Events on a Phone?
Good footage starts with three phone settings, none of which take more than thirty seconds to check: landscape orientation, stabilization turned on, and Do Not Disturb enabled so a text notification doesn’t ruin a shot. Skip these and you’ll spend twice as long fixing things in the editor later.
Beyond settings, a simple shot list keeps you from missing the moments that actually make a video watchable:
- Wide establishing shot: the stage, the field, the classroom, so viewers know where they are.
- Mid-action shots: the actual performance, game, or activity, held steady for at least five seconds each.
- Close-ups: faces, hands, small details that a wide shot flattens out.
- Reaction shots: parents, siblings, friends watching, laughing, cheering.
- The finish: applause, bows, the final buzzer. Don’t cut away early.
For movement, slow pans beat fast ones every time, and a small tripod or even a stack of books works better than holding the phone for ten minutes straight. Avoid digital zoom entirely. It degrades quality fast and almost never looks intentional.
Pro Tip: Speeches and announcements are usually the worst audio in any event recording, because the built-in phone mic is often thirty feet from the speaker. If you know a speech is coming, either walk closer for a separate clip or ask someone standing near the podium to record ten seconds on their phone. You can splice that clean audio over your wider shot in editing.
How Do You Get Video Clips From Other Parents?
You will never capture the whole story alone, and trying to is how parents end up missing their own kid’s big moment because they were filming someone else’s. The fix is getting other families’ footage without a group text chain that inevitably loses half the clips.
Here’s the setup sequence:
- Create a private shared album or QR-enabled upload link a few days before the event.
- Test it yourself first: upload a sample clip and confirm it works on both a phone browser and a laptop.
- Print the QR code and place it at entrances, on programs, or on a poster near the check-in table.
- Mention the link in any pre-event email or group chat so parents know it’s coming.
- Check in once during the event to make sure clips are actually landing in the album.
QR codes and browser-based uploads beat asking people to download a separate app, mainly because most guests simply won’t bother installing something for a one-time upload. EventPics documents this exact pattern: guests scan a code, upload directly through their browser in original quality, and never need to create an account. SnapPix’s guidance on QR placement backs this up too, noting that visible codes at entrances and on printed materials meaningfully increase how many guests actually participate.
When you ask people to upload, give them three quick guidelines: keep clips under two minutes, shoot in landscape, and label the file with their name if the platform allows it. That last one saves you from guessing whose footage is whose later.
- Set clip length expectations upfront (under two minutes keeps files manageable).
- Ask for landscape orientation specifically, since vertical clips look awkward in a widescreen edit.
- Request a simple naming convention if the tool supports labeling.
Pro Tip: Appoint one person, usually not the parent who’s also trying to enjoy the event, as the moderator who approves uploads. This catches duplicate clips and the occasional off-topic photo before they clutter the album.
What’s a Fast Editing Workflow for a Kid’s Event Video?
You can realistically finish a highlight video in under an hour if you follow the same sequence every time instead of reinventing your process for each event. Decision fatigue, not lack of skill, is what makes editing take three hours instead of one.
- Import everything: your clips plus anything collected from other parents, into one project.
- Select highlights: scrub through quickly and mark only the segments with a clear moment, not the whole clip.
- Assemble on a template: drop your selected clips into a pre-built structure with an opening title, transition points, and space for a closing card.
- Trim and pace: cut dead air ruthlessly. Most raw clips have five to ten seconds of nothing before the actual moment starts.
- Add titles and music: a name card at the start, maybe a date stamp, and one or two royalty-free tracks.
- Quick color and audio fix: bump exposure if a clip is dark, and normalize audio levels so viewers aren’t reaching for the volume button every ten seconds.
- Export: pick your settings (covered next) and save.
When time is tight, prioritize story beats and clear audio over visual polish. A slightly underexposed clip with clean sound beats a perfectly graded clip where you can’t hear the kid actually say their line.
- Templates with pre-set transitions and lower thirds save the most time, since you’re not building pacing from scratch.
- A music-backed montage template works well when you have more short clips than long ones.
- Save color correction for last. It’s the easiest step to skip entirely if you’re out of time.
Pro Tip: Pick one or two music tracks with steady, predictable dynamics rather than songs with big quiet-to-loud swings. Use short crossfades, half a second or so, between clips instead of hard cuts. It hides awkward transitions almost completely, even in a rushed edit.
What Export Settings Keep the Video Sharp Without a Huge File?
The right export settings come down to matching your resolution and bitrate to how the video will actually be watched. A grandparent streaming on a tablet doesn’t need the same file a family will download and keep forever.
For most kid event videos, MP4 with H.264 encoding is the safest choice for compatibility across phones, tablets, and computers. H.265 produces smaller files at similar quality but isn’t supported everywhere, so stick with H.264 unless you know every recipient’s device can handle the newer codec.
Resolution and frame rate depend on the video type:
- Highlight reels: 1080p at 30 frames per second is plenty. It looks sharp on any screen and keeps file sizes reasonable.
- Full ceremony recordings: 1080p also works here, though you can drop to 720p if the recording runs over 30 minutes and file size matters more than crispness.
- Bitrate: aim for 8 to 12 Mbps for 1080p footage. Higher looks marginally better but balloons the file with diminishing returns.
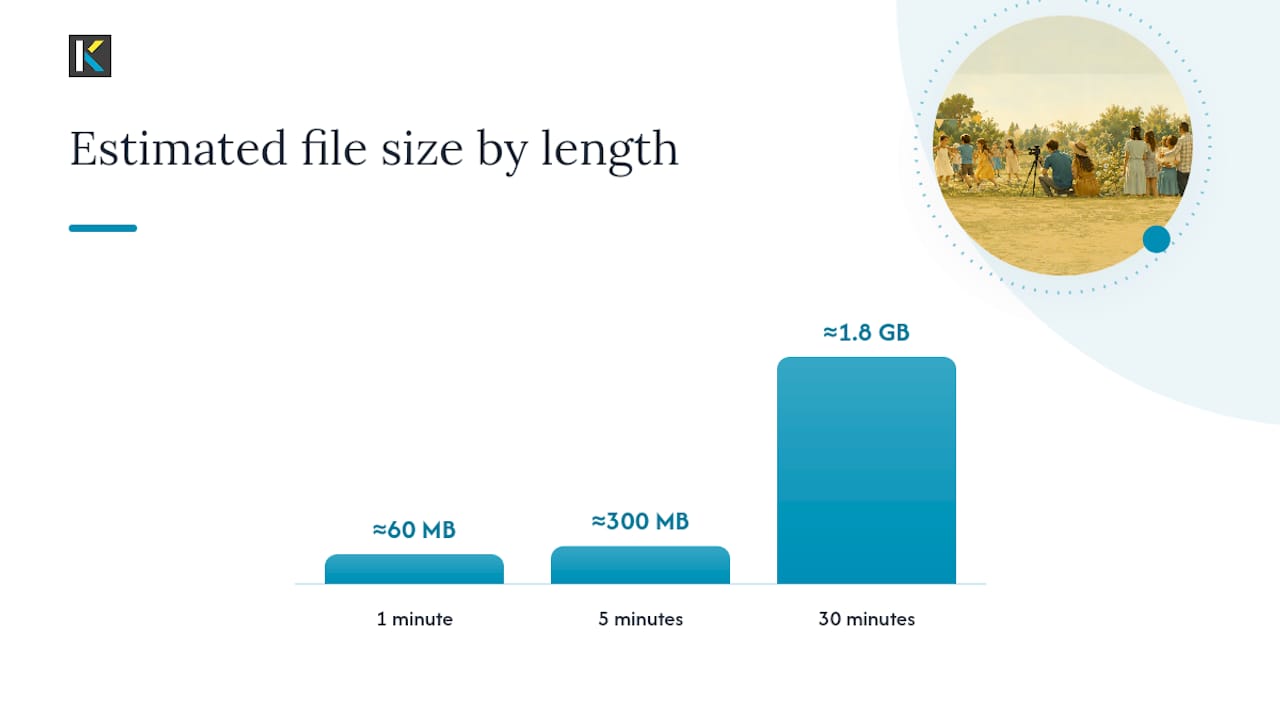
| Video Length | Estimated File Size |
|---|---|
| 1 minute | Approximately 60 MB |
| 5 minutes | Approximately 300 MB |
| 30 minutes | Approximately 1.8 GB |
These numbers matter because cloud video delivery services exist specifically to solve the size problem that email and messaging apps can’t handle. Most email providers cap attachments around 25 MB, which rules out sending anything longer than a very short clip directly.
If accessibility matters to your family, most editors let you burn in titles or add captions during export. Burned-in text is simpler for older relatives since it doesn’t rely on a viewer turning on a separate caption track.
How Do You Share the Video Privately With Family?
Skip social media entirely if privacy is a concern, since public posts strip quality, expose your kid’s face to strangers, and often can’t be fully deleted once shared. A private cloud link is faster to set up than most parents expect and works for every relative regardless of how comfortable they are with technology.
Here’s how the common options stack up:
- Email attachments: fine for a single short clip, but useless once you’re past a minute or two of footage due to size caps.
- Cloud links with guest access: handle any file size, work across devices, and don’t require the recipient to sign up for anything.
- Dedicated private album services: built specifically for this use case, often bundling photos and video into one shareable link with a password option.
- Messaging apps: convenient for short clips but usually re-compress video, which noticeably hurts quality on anything longer than thirty seconds.
- Physical drives: reliable and private, but slow to distribute if you have more than a couple of relatives to reach.
The step-by-step for the cloud link approach:
- Upload your finished video to a private sharing platform.
- Set the album or file to private, not public or “anyone with the link can index it.”
- Add a password if the footage includes multiple families’ kids.
- Set an expiration date if you don’t want the link live indefinitely.
- Send the link directly through text or email rather than a group chat where it might get forwarded further than intended.
ImageEvent’s approach to this is a useful model: one private link, an optional guest password, and no signup required for anyone opening it, whether they’re on a phone browser or a laptop. That last part matters more than it sounds. A platform that forces grandma to create an account is a platform she won’t use.
Pro Tip: Prioritize sharing tools that support no-signup browser viewing. Every extra step, like creating a password or downloading an app, cuts your actual audience down. The easier the link is to open, the more relatives will actually watch the video instead of letting it sit unopened.

What Privacy Rules Should You Follow When Sharing Kids’ Videos?
Before you send anything, run through who’s actually in the footage. If the video includes other people’s children, you’re making a decision about their privacy too, not just your own.
A quick consent checklist to work through:
- Who appears on camera besides your own child, and do you have a way to reach their parents?
- Does the school, daycare, or organization running the event have its own media policy?
- Has anyone at the event explicitly asked not to be filmed or posted?
- Are you sharing to a small private group, or could this end up somewhere more public than intended?
Asking permission doesn’t need to be formal. A short message before or right after the event usually covers it:
That one message solves most of the awkwardness in advance and gives anyone uncomfortable with it a clear, easy way to say so.
For etiquette once the video is out: don’t repost someone else’s family footage to your own social accounts without asking first, don’t tag other people’s kids by name in public captions, and think twice before forwarding a private family video to a broader group chat than the one it was intended for. Private sharing only stays private if everyone in the chain treats it that way.
How Do You Make Sure the Video Doesn’t Get Lost Later?
A finished video that only lives in one place is one phone crash away from being gone forever, and this happens more often than most parents assume. The fix is a two-step backup rule that takes about five minutes.
Keep one local copy, on your computer or an external drive, and one cloud copy, on whatever service you used to share the video. Check both copies still open correctly every six months or so. Corrupted files and dead links happen more than people expect, usually silently.
A simple naming and folder structure prevents the “which file is this” problem two years down the road:
- Folder structure:
Event Name / Year / Child Name - File naming:
2026-05-14_SpringRecital_Emma_Highlight.mp4 - Keep raw footage in a separate folder from the edited final, since you may want to re-cut it later for a year-in-review project.
For recurring events, like weekly practices or an annual recital, keeping one ongoing private album rather than starting a fresh link every time keeps your family’s archive organized in a single spot instead of scattered across a dozen forgotten emails.
Only keep raw footage long-term if you think you’ll actually reuse it. Otherwise, the edited highlight is usually enough, and it’s a lot easier to find in three years than forty minutes of unsorted clips.
How Does Kudoflix Speed Up the Path From Clips to Shareable Video?
Once you’ve got footage collected and a format picked, the editing step is where most parents either finish the project or abandon it halfway through. Kudoflix runs entirely in the browser, so there’s no software to download or install before you can start cutting your kid’s recital footage into something watchable.
The walkthrough looks like this:
- Import your clips, including anything collected from other parents’ phones, directly into a Kudoflix project.
- Choose a family-oriented template that already has an opening title, transition points, and a closing card built in.
- Drop your selected clips into the template’s timeline slots.
- Make quick trims to cut dead air and tighten pacing.
- Add titles, a date stamp, and a royalty-free music track from the built-in library.
- Export using a preset that balances quality and file size automatically.
The templates matter more than they might seem to at first glance. A parent editing at 9 PM after a long day doesn’t want to build a title card and figure out transition timing from scratch. Prebuilt transitions, ready-made lower thirds, and a royalty-free music library remove the decisions that otherwise eat up the most time.
Running your editing and sharing through one workflow also simplifies security. Instead of juggling a separate editor, a separate file converter, and a separate sharing tool, you export once from Kudoflix and drop that single file straight into your private album link. Fewer handoffs mean fewer places where quality drops or a file gets sent to the wrong person.
Pro Tip: Start with the template that most closely matches your event type (recital, sports, ceremony) rather than a blank timeline. It’s faster to delete slots you don’t need than to build structure from nothing.
Editorial Perspective on Making and Sharing Kid Event Videos
Most advice on this topic treats filming and editing as the hard part. It isn’t. The hard part is almost always the handoff: getting footage from five different phones into one place, and getting the finished video in front of relatives who don’t want to download an app or click through three privacy warnings just to watch their grandkid’s dance recital.
That’s where the conventional wisdom falls apart. Plenty of guides spend paragraphs on camera angles and color grading, then wave vaguely at “just share it on Facebook” as if that solves the actual problem. It doesn’t. Posting publicly trades convenience for a loss of control over who sees your kid’s face, and it strips video quality in the process. The QR code and private album pattern that EventPics and ImageEvent both build around exists precisely because “just post it” was never actually private, easy, or high quality at the same time.
If you take one thing from this whole process, prioritize the collection and sharing steps before you worry about making the video itself look polished. A slightly rough edit that reaches every grandparent through a link they can open in ten seconds beats a beautifully color-graded video that sits unwatched because Aunt Carol couldn’t figure out how to download the file. Get the pipeline right first. The editing, especially with a template doing most of the heavy lifting, is the part that takes the least effort once everything else is in place.
Where Kudoflix Fits Into This Whole Process
Kudoflix is the fastest route from a folder full of mismatched phone clips to a video you’re actually proud to send, without opening a single piece of desktop software or waiting on a render bar for twenty minutes. Everything runs in your browser, so there’s nothing to install on the laptop you only use twice a year for exactly this kind of project.
The family-focused templates are built around the exact workflow this article walks through: drop in your highlight clips, let the transitions and titles do the structural work, add a track from the royalty-free music library, and export. If you’ve been putting off editing because the last video software you tried felt like it needed a manual, Kudoflix was built specifically to avoid that problem.
Head to the online video editor and start a project with your event footage today. Pick a template, drop in your clips, and you’ll have a share-ready video in far less time than the last one took.
Useful Tools for Collecting, Sharing, and Editing Kid Event Videos
A few resources cover the three pieces of this workflow if you want to set them up before your next event:
- ImageEvent’s private sharing guide walks through setting up a no-signup album link with optional guest passwords, best for the final sharing step.
- EventPics’ QR upload page explains browser-based guest uploads without an app, best for collecting footage from other families.
- SnapPix’s QR placement guide covers where and how to display codes to maximize guest participation.
- Kudoflix’s video editor handles the assembly and export step with family-focused templates built for exactly this kind of project.
Frequently Asked Questions
What’s the fastest way to make a video for a kid’s event and share it with parents?
Shoot your footage on a phone, collect additional clips from other families through a QR code or shared album, assemble everything in a template-based editor like Kudoflix, and send the finished video through a private cloud link rather than a social media post.
How long should a kid event highlight video be?
One to three minutes works best for a highlight reel meant for extended family viewing. Anything longer starts to lose casual viewers, especially on a phone screen.
Is it safe to post a kid’s event video on social media?
It’s not the safest option if privacy matters to your family. Public posts expose footage to a much wider audience than intended and often compress video quality. A private link with no-signup viewing, like an ImageEvent-style album, keeps the video accessible only to people you’ve actually shared it with.
What video format works best for sharing with relatives who use different devices?
MP4 with H.264 encoding plays reliably across phones, tablets, and computers, which makes it the safest default when your recipients aren’t all using the same type of device.
How do I get footage from other parents at the same event?
Set up a QR code linked to a shared private album before the event and display it at entrances or on programs. Guests can upload directly through their phone’s browser without downloading an app or creating an account.
Do I need special software to edit a kids’ event video?
No. Browser-based editors like Kudoflix skip the download step entirely and use templates to speed up assembly, which matters most when you’re trying to finish an edit the same night as the event.
General guidance only. Always confirm consent with other families before sharing footage that includes their children, and check any school or organization media policy that may apply to your specific event.
Sources
- Share Event Video with Family | Private Link & No Ads | ImageEvent
- School Event Photo Sharing App – Free QR Code, No App for Parents
- How to Deliver Dance Performance Videos to Parents Without Stress — MediaZilla blog
Recommended