Ambient sound is the background audio bed that makes a scene feel like it exists in a real place. Without it, even a beautifully shot video feels hollow. Think of a conversation filmed in a downtown apartment: the distant traffic, the low hum of the HVAC, the faint echo off hard walls. None of those sounds are the point of the scene, but pull them out and the dialogue floats in a void. That’s what ambient sound does. It’s the sonic environment your audience never consciously notices — until it’s gone.
Key Takeaways
Ambient sound is the foundation layer of any believable video edit — get it right on set and the mix almost builds itself.
| Point | Details |
|---|---|
| Definition | Ambient sound is the background environmental audio bed that establishes a scene’s space and mood. |
| Room tone rule | Record 30–60 seconds of room tone at every new location, immediately after the last take. |
| Layering rule | Build 2–4 ambient layers per scene: room tone, environmental beds, and spot effects. |
| Mixing priority | Match one quiet bed to the dialogue tone; keep ambient beds significantly below dialogue level. |
| Kudoflix | Kudoflix’s browser-based editor with built-in royalty-free tracks speeds ambient-sound workflows for social and template-driven projects. |
Table of Contents
- What is ambient sound in video, and how does it differ from room tone?
- What types of ambient sound will you actually use?
- Why does ambient sound matter so much for your edit?
- On-set ambient recording checklist: what to capture and how
- How do you build and mix ambient sound in the edit?
- Where do you get ambient sounds: field recording vs. libraries?
- Common ambient-sound mistakes and how to fix them fast
- How ambient sound works across different video formats
- How to sync ambient sound effectively with your visuals
- Recording ambient sound in noisy or challenging environments
- Legal considerations when using ambient sound recordings
- The habit that separates good editors from great ones
- Kudoflix makes ambient sound editing faster for every creator
- Sources
What is ambient sound in video, and how does it differ from room tone?
These terms get used interchangeably on set, and that’s a problem. They’re related, but they’re not the same thing, and confusing them leads to real editing headaches.
Ambient sound (also called ambience or atmosphere) is the layered environmental audio bed that establishes a location’s character. It can include wind, traffic, wildlife, crowd murmur, or mechanical hum. It’s what the world sounds like at that place and time.
Room tone is narrower. StudioBinder defines room tone as the natural sound of a specific location when no intentional noise is being made — the fingerprint of that room. It’s recorded on set, usually after the last take, with everyone standing still and silent. Its job is continuity: filling the gaps between dialogue lines so edits don’t create unnatural drops in the audio.
Wild tracks are a step further out. These are discrete background sounds recorded separately on location — children playing in a nearby park, a street market, a passing train. You capture them because they’re happening, they’re relevant to the scene’s geography, and you may want to use them in the edit without being locked to a specific camera angle.
Foley is different again. It’s the post-production recreation of on-screen physical actions: footsteps, a door handle turning, fabric rustling. Foley artists perform these sounds in a studio, synced to picture.
- Ambient sound: the full environmental bed
- Room tone: the quiet location fingerprint for dialogue continuity
- Wild tracks: discrete background activity recorded separately on location
- Foley: post-production recreation of physical on-screen actions
Pro Tip: Record room tone immediately after the last take of each new location — before the crew moves gear or starts talking. That’s when the space is still “live” and the recording will match your production audio perfectly. Wild tracks can wait; room tone cannot.
What types of ambient sound will you actually use?
MediaCollege identifies several core ambient categories that show up across virtually every video format: wind, water, birds, crowds, traffic, and office noise. Here’s how they break down in practice.
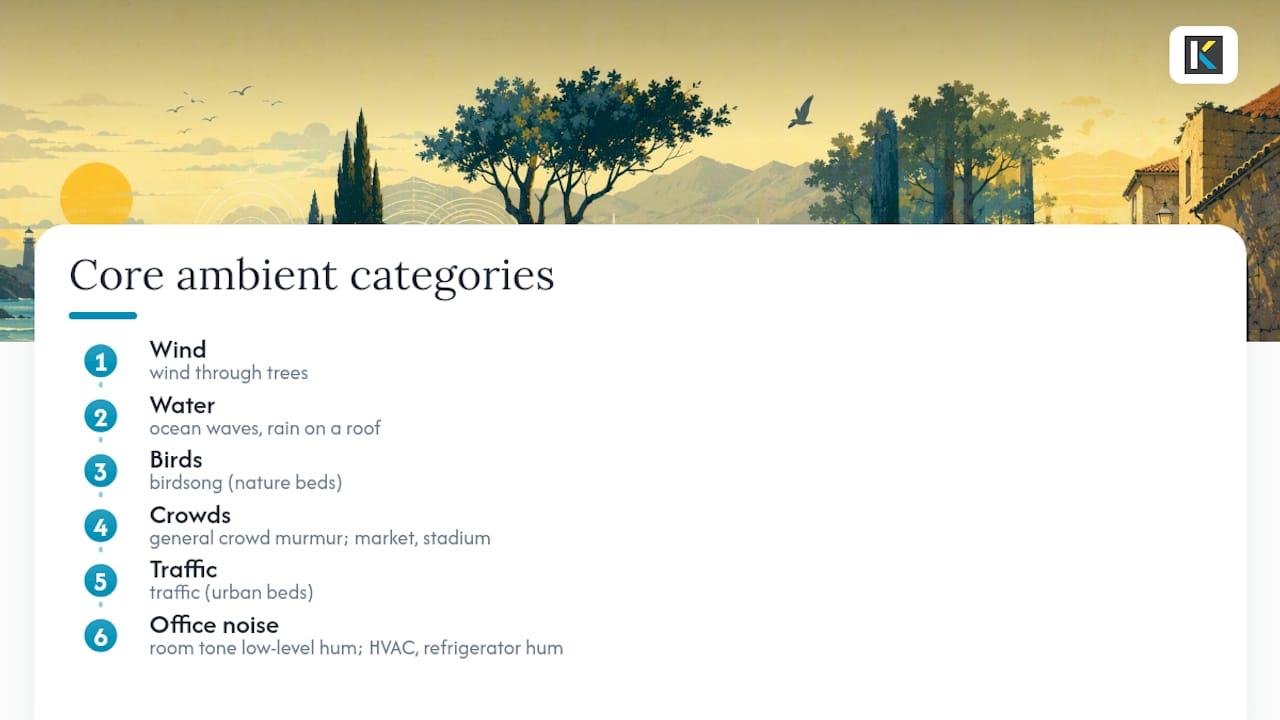
Room tone is your foundation layer. Every interior scene needs it. A quiet office, a bedroom, a kitchen — each has its own low-level hum and reflective character. Use it under dialogue cuts to prevent the edit from clicking.
Environmental beds cover outdoor locations: wind through trees, ocean waves, rain on a roof. A nature documentary without a subtle wind bed sounds like it was shot in a studio. These are often sourced from libraries when field recording isn’t practical.
Crowd and urban beds place a scene in a city, a market, a stadium. They’re usually layered: a general crowd murmur underneath, with occasional specific voices or activity on top. For narrative work, these beds do heavy lifting in establishing shots.
Interior mechanical beds are the sounds most editors forget: HVAC, refrigerator hum, fluorescent light buzz. They’re unglamorous but critical. A kitchen scene without a fridge hum sounds wrong to any viewer, even if they can’t say why.
Nature beds — birdsong, insects, flowing water — work across documentary, ambient video, and relaxation content. They’re forgiving to layer because their frequency content tends to sit below dialogue.
Designed ambience is the sound designer’s territory: processed, textured beds built from recordings and synthesis to create a specific emotional tone. Sci-fi interiors, horror corridors, dreamlike sequences. When the scene needs a mood that real-world recording can’t deliver, designed ambience fills the gap.
For quick edits and social content, library sources work well for most of these categories. For documentary and narrative work where location specificity matters, field recording gives you something no library can replicate.
Why does ambient sound matter so much for your edit?
The short answer: it’s the difference between a scene that feels observed and one that feels constructed.
Continuity is the most mechanical reason. When you cut between two angles of the same conversation, the background audio changes slightly between takes. Without a consistent ambient bed underneath, those cuts click. The viewer doesn’t think “the audio changed” — they think “something feels off.” A matched room-tone layer under the whole scene smooths those transitions invisibly.
The psychological effect runs deeper. Bose’s research on ambient noise notes that ambient levels directly affect concentration and cognitive state. At the right level, a subtle ambient bed anchors the viewer spatially — it tells their brain where they are. A forest sounds different from a city apartment, and that difference shapes how the audience receives the story being told in that space.
Mood is the third lever. The same dialogue scene feels different under a warm coffee-shop murmur versus a cold, empty-room hum. Ambient sound is one of the cheapest emotional tools in post-production, and it’s almost always underused.
A simple A/B test makes this concrete: take any dialogue scene, mute the ambient track, and play it back. The scene becomes clinical, distant, slightly unreal. Restore the bed and the scene breathes again. That difference takes maybe 20 minutes to build in the edit.
On-set ambient recording checklist: what to capture and how
Getting this right on set saves hours in post. Here’s the sequence.
Room tone procedure:
- Call “room tone” immediately after the last take at each new location.
- Ask everyone to freeze in place and stay silent for the full recording.
- Keep the same mic position used for production dialogue.
- iZotope recommends capturing 30–60 seconds of ambience as room tone — enough to loop without obvious repetition.
- Slate the recording verbally: location name, scene number, “room tone.”
Wild tracks and environmental beds:
- Record any distinctive location sound that’s present but not captured cleanly during takes: a nearby fountain, street noise, a specific machine.
- Aim for at least 60 seconds per wild track, longer for anything you might loop.
- Note the direction and distance of the source so you can match it in the edit.
Mic choices for ambient capture:
- Stereo pair (spaced omnis or an X/Y configuration): best for capturing a full, natural room or outdoor environment.
- Shotgun mic: useful for isolating a specific distant sound source (a crowd, a waterfall) while reducing off-axis noise.
- Lavalier mics: good for capturing a controlled interior room tone when a boom isn’t available.
Recording format and levels:
- Record at 24-bit/48kHz minimum. This gives you headroom for noise reduction without artifacts.
- Target peaks around -12 dBFS for ambient recordings, leaving plenty of headroom.
- Name files immediately:
SCENE_LOCATION_ROOMTONE_01.wavbeatsuntitled_003.wavat 2 AM in the edit.
Pro Tip: If the schedule is tight and you can only grab one thing, grab room tone. Wild tracks can be sourced from a library. A room tone that matches your production dialogue cannot.
How do you build and mix ambient sound in the edit?
A well-built ambient bed supports dialogue without the viewer ever noticing it. The goal is presence, not distraction.
The workflow, step by step:
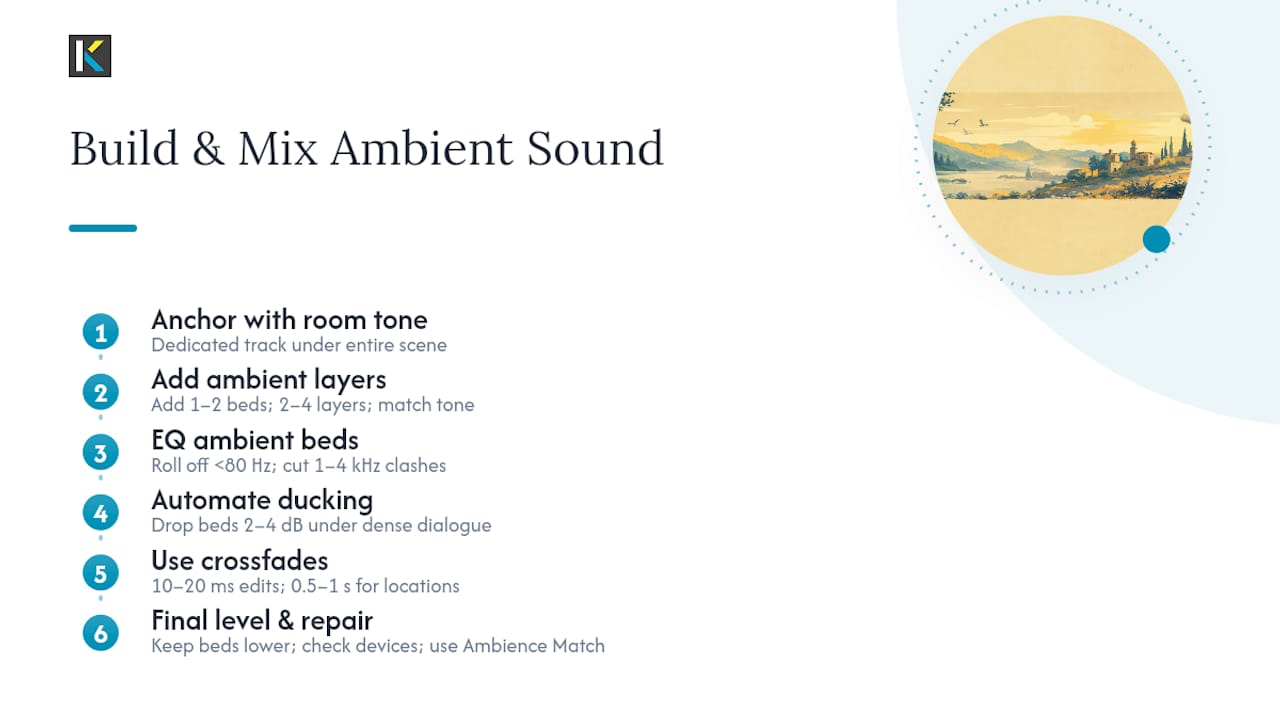
Start by importing your room-tone recording and placing it on a dedicated track beneath the entire scene. This is your anchor. Everything else builds on top of it.
Next, add one or two environmental beds from your wild tracks or a library. Pixflow recommends building 2–4 ambient layers per scene — room tone, ambience beds, and spot effects — and matching one quiet layer to the original dialogue tone for a natural blend. Don’t skip that matching step. A bed that’s spectrally mismatched to your dialogue will create a subtle but audible clash.
For the EQ pass: roll off low-end rumble below 80 Hz on ambient beds unless the scene specifically needs it (thunder, a subway). Cut any frequencies that compete with dialogue intelligibility, typically 1–4 kHz. Ambient beds should live in the spaces dialogue doesn’t occupy.
Ducking is your friend. Automate the ambient bed to drop 2–4 dB under dense dialogue, then return to full level during pauses and cutaways. The viewer won’t hear the automation; they’ll just feel the dialogue is clearer.
Crossfades at every edit point prevent clicks. A 10–20 millisecond crossfade on ambient tracks is usually invisible. For location changes, extend that to 0.5–1 second.
For the final level pass: ambient beds typically sit significantly below dialogue in a standard mix to avoid competition with speech. Check your mix on headphones, on a laptop speaker, and at a louder playback level. Translation issues — a bed that sounds fine in the edit suite but overwhelms dialogue on earbuds — almost always show up on the small-speaker check.
When AI-generated video or exported footage arrives without any ambient audio, the workflow described by Hackernoon applies: build scene-specific ambient texture shot by shot. Automated audio outputs rarely capture location-specific character, so manual building or matching is still necessary for anything that needs to feel real.
If you never recorded room tone on set, iZotope RX’s Ambience Match tool can learn the spectral profile of a short sample and apply it to fill gaps. It’s not a substitute for a proper recording, but it’s a genuine lifesaver on a tight deadline.
Where do you get ambient sounds: field recording vs. libraries?
Both approaches have a place. The choice usually comes down to how much location specificity you need and how much time you have.
| Field Recording | Library Sourcing | |
|---|---|---|
| Control | High — you capture exactly what you need | Lower — you search for the closest match |
| Cost | Gear + time investment | Free (CC0) to subscription fees |
| Speed | Slow — requires planning and travel | Fast — searchable and immediately usable |
| Uniqueness | Unique to your location | Shared with other productions |
License checklist before using any library sound:
- Confirm commercial use is permitted (many free libraries restrict this).
- Check attribution requirements — CC0 requires none; CC BY does.
- Distinguish editorial-only licenses from commercial licenses if your video will be monetized.
- Verify the sample rate and bit depth match your project (48kHz/24-bit is standard for video).
- For broadcast or streaming, confirm the license covers your distribution platform.
Free CC0 libraries like Freesound work well for personal projects and non-monetized content. Paid subscription libraries offer higher-quality, broadcast-cleared material for commercial work. For anything requiring a truly unique location sound, field recording is the only option.
Pro Tip: Before committing to a library bed, drop it into your timeline next to a short section of production dialogue and listen. If the spectral energy clashes — if the bed feels “brighter” or “darker” than the room your dialogue was recorded in — keep searching. A 30-second audition saves 30 minutes of EQ work.
Good sound design also connects directly to how well your video performs online. High-quality content with strong audio is one of the clearest signals for viewer retention, which feeds directly into platform discoverability.
Common ambient-sound mistakes and how to fix them fast
- Silence gaps between cuts: Place a looped room-tone slice under the entire scene. Even 0.5 seconds of dead air reads as an edit error.
- Abrupt level jumps when locations change: Use a 0.5–1 second crossfade between ambient beds at every location transition. The ear accepts gradual changes; sudden ones break immersion.
- Spectral clash with dialogue: Apply a gentle high-shelf cut (above 5 kHz) to the ambient bed and a low-shelf cut below 80 Hz. This carves space for dialogue without gutting the bed’s character.
- Obvious loop repetition: Offset two copies of the same bed by 30–40 seconds and blend them at slightly different levels. The repetition becomes inaudible. Alternatively, use a longer source file.
- Wrong room-size reverb on the bed: A tight, dry room tone under a wide outdoor shot sounds wrong immediately. Match reverb tail length to the visual space — short for interiors, longer for exteriors.
- Beds that are too loud: High ambient levels harm concentration and can fatigue viewers. If your ambient bed is audible as a foreground element, it’s too loud. Aim for presence, not prominence.
For any of these fixes, run a quick A/B test: bypass the ambient track entirely, then restore it. If the fix is working, the restored version should feel natural, not noticeable.
How ambient sound works across different video formats
The same principles apply everywhere, but the execution shifts depending on the format.
Ambient video and relaxation loops are the most ambient-forward format. Wikipedia describes ambient video as a genre where atmosphere is emphasized over narrative — think fireplace loops, rain on a window, forest walks. Sound choices here are minimal and deliberate: one or two long, gentle beds with slow dynamics and no sudden events. The audio is often the primary reason someone plays the video. Production tip: record in long, uninterrupted takes and avoid any sound that would pull focus — a bird call is fine, a car horn is not.
Documentary uses ambient sound to establish geography and context. A location bed tells the viewer where they are before anyone speaks. Wild tracks showing activity — a market, a construction site, a school at recess — add texture that B-roll alone can’t provide. Production tip: record a dedicated wild track of the location’s most distinctive sound, separate from your interview audio.
Narrative film and scripted content rely on room tone for continuity and designed ambience for emotional emphasis. A tense scene in an empty warehouse needs a different ambient character than the same scene in a busy office. Production tip: design your ambient beds to shift subtly as the scene’s emotional state changes — a slow build in low-frequency energy can signal rising tension without a single note of score.
Vlogs and social content use ambient beds primarily to mask inconsistent recording locations and make edits feel polished. A subtle café bed under a talking-head vlog shot in a noisy apartment makes the edit feel intentional. For social-specific format considerations, the ambient bed also needs to survive compression and playback on phone speakers. Production tip: keep beds simple and mid-range-focused for social — complex low-frequency beds get destroyed by mobile compression.
Businesses also use ambient video as a non-intrusive backdrop in lobbies, receptions, and events, where the audio bed needs to be present enough to fill the space but quiet enough to allow conversation.
How to sync ambient sound effectively with your visuals
Ambient sound and picture need to move together, not just coexist on the timeline.
The most common sync failure is a location change that’s visible in the picture but not audible in the audio. The camera cuts to an outdoor shot; the ambient bed stays on the interior setting for two more seconds. The viewer’s brain catches it instantly. The fix is simple: cut your ambient bed at the same frame as the picture cut, then crossfade the incoming bed in over 0.5–1 second.
For music sync techniques that apply equally to ambient beds, the principle is the same: align significant audio events to visual moments. A wave crashing on screen should coincide with the peak of the wave sound, not arrive a half-second late.
Dynamic sync matters too. If the camera pushes into a space — a slow zoom into a quiet room — the ambient bed should subtly increase in level and lose a little high-frequency content, simulating the acoustic effect of moving closer to the source. It’s a small detail, but it makes the edit feel physically coherent.
For ambient video specifically, sync means matching the rhythm of the visual to the rhythm of the sound. A crackling fire video with a fire sound that doesn’t match the visual crackle timing reads as stock footage. When the two align, the video feels recorded, not assembled.
Recording ambient sound in noisy or challenging environments
Difficult locations are where most ambient recordings go wrong. Here’s how to manage the most common problems.
High background noise (traffic, HVAC, crowds): You can’t eliminate these, but you can minimize them. Record during quieter periods — early morning for urban locations, between takes for interior HVAC. Position the mic closer to the “quieter” part of the space. In post, iZotope RX’s Spectral Repair and De-noise modules can reduce consistent noise floors without destroying the ambient character.
Reverberant spaces (large halls, tiled rooms): Excessive reverb makes room tone unusable for dialogue continuity. Record close to soft furnishings or use a directional mic to reduce reflections. If the reverb is unavoidable, record it anyway — it’s useful as a designed ambience layer even if it can’t serve as room tone.
Wind noise outdoors: A deadcat windshield on a shotgun mic reduces wind noise significantly. For stereo field recording, a blimp housing is more effective. Record in short bursts during wind lulls rather than one long continuous take — you’ll have more usable material.
Inconsistent noise sources (intermittent traffic, random voices): Record longer takes and edit out the intrusions in post. A 3-minute recording with two usable 45-second sections is better than a 45-second recording with no clean material.
Electrical interference (hum, buzz): Ground loops and fluorescent lighting create 60 Hz hum in US locations. Use balanced XLR connections wherever possible. In post, a notch filter at 60 Hz and its harmonics (120 Hz, 180 Hz) removes most electrical hum without audible artifacts.
Legal considerations when using ambient sound recordings
This is the area most creators skip until it becomes a problem.
Recordings you make yourself are generally yours to use, with one significant exception: if your recording captures a recognizable musical performance — a band playing in a park, a street musician — that performance is protected by copyright. Recording the ambient environment doesn’t give you a license to the music within it. If the music is identifiable, you need a license or you need to cut it out.
Recordings of people’s voices in ambient contexts (crowd noise, street conversations) generally don’t require individual consent in the US when recorded in public spaces where there’s no reasonable expectation of privacy. Private spaces are different. If you’re recording ambient sound in a venue, office, or private event, check whether your recording agreement covers audio.
Library sounds carry their own license terms. CC0 sounds are public domain and require no attribution or permission. Creative Commons Attribution (CC BY) sounds require credit. Commercial licenses from paid libraries typically cover most uses but may restrict broadcast or streaming on specific platforms. Read the license before you publish, not after.
Location-specific sounds can sometimes carry trademark implications. A recording that prominently features a trademarked jingle, a branded sound logo, or a recognizable proprietary sound design may require clearance even if you recorded it incidentally. This is rare but worth checking for commercial productions.
For any production with significant commercial distribution, a music clearance attorney or entertainment lawyer is worth the consultation fee. General information here is no substitute for advice specific to your project and distribution.
The habit that separates good editors from great ones
Every experienced editor has a version of the same story: the shoot where nobody recorded room tone, and the edit that took twice as long because of it. The habit that prevents that story is simple and takes less than two minutes on set.
After the last take at every new location, before anyone moves, call for 45 seconds of room tone. Same mic, same position, everyone still. Slate it. File it with the scene’s audio. That’s it. That one habit, repeated on every shoot, means you will never sit in an edit wondering why the dialogue cuts sound wrong and have no material to fix them with.
The second habit is equally simple: when you’re sourcing library beds, audition them in context, not in isolation. Drop the candidate bed under 10 seconds of your actual production audio before you commit. A bed that sounds perfect in a library preview can clash badly with your specific recording environment. The 30-second audition is the difference between a bed that disappears into the scene and one you spend an hour trying to EQ into submission.
Kudoflix makes ambient sound editing faster for every creator
Most editors don’t struggle with understanding ambient sound. They struggle with the time it takes to manage it. Finding the right bed, importing it, matching levels, keeping audio tracks organized across a long timeline — these are the steps that slow a project down.
Kudoflix’s online video editor handles audio layers directly in the browser, no download required. The built-in library of royalty-free background tracks means you’re not hunting for a legally cleared bed mid-edit. The audio commentary tools let you manage multiple audio layers without the complexity of a dedicated DAW. For quick social edits, vlogs, and template-driven projects, it’s the faster route to a polished result. For editors who want to go deeper into custom sound design, Kudoflix works as the assembly and finishing layer while you bring in your own recorded beds.
Start with a free Kudoflix account and see how much faster your next ambient-sound edit moves.
Sources
The sources below are the primary technical and editorial references used throughout this guide. Each one is worth bookmarking if you want to go deeper on any specific aspect of ambient sound in video production.
- The Basics of Room Tone in Audio Editing
- What Is Room Tone in Film? Everything You Need to Know
- Ambient Sound Design: How to Layer Background Audio
- Ambient sound — definitions and common uses
- Ambient video
- What Is Ambient Noise? Defining Background Noise.
Recommended