The fastest way to improve your screen recordings: capture only the tab or window you need, record at 1080p/16:9, use a dedicated mic on a separate track, pause instead of stopping when you make a mistake, and trim dead space in post. Those five habits alone eliminate most of the friction teams hit.
Here’s the full checklist before you record anything:
- Capture area: Record the smallest surface that contains your content — tab or window, not full screen — to cut file size and visual noise.
- Resolution: Lock to 1080p (16:9) to avoid black bars on YouTube and social platforms.
- Audio: Use a USB headset or dedicated mic; capture system audio only when necessary; set sample rate to a standard audio frequency with echo cancellation on.
- Webcam overlay: Small corner bubble for intros and explanations; hide it during dense on-screen steps.
- Mistakes: Pause or mute, then resume. Trim the gap in your editor. Never restart a full take.
- Developer hook: Call
navigator.mediaDevices.getDisplayMedia()with explicit audio/video constraints; handle audio tracks defensively since browser support varies. - Platform hooks: Use
ms-screenclip:for Windows handoffs, Apple ScreenCaptureKit for macOS/iOS, and Kaltura’s built-in annotation tools for team demos. - Post-production: Import, trim, caption, and apply a reusable template in Kudoflix to publish faster.
Pro Tip: Run a 30-second test recording before every session. Check audio levels, confirm the capture area is correct, and verify no notifications are visible. Catching a bad mic setting before a 20-minute take saves everyone’s time.
Key Takeaways
The single most effective screen recording integration habit is pairing a consistent capture template with a reusable post-production preset — it removes decisions from every step between record and publish.
| Point | Details |
|---|---|
| Capture area first | Record the smallest surface that contains your content — tab or window, never full screen by default. |
| Audio on a separate track | Record mic and system audio independently so you can re-record narration without redoing the screen capture. |
| Pause, don’t restart | Mute or pause at mistakes, leave 2–3 seconds of buffer, and trim the gap in your editor. |
| Export settings by target | Use H.264 MP4 for YouTube; drop to 720p WebM for internal shares and pull requests. |
| Kudoflix for post-production | Kudoflix’s templates, caption tools, and cloud exports cut the edit-to-publish step to minutes, no download needed. |
Table of Contents
- What are the best screen recording integration tips for capture area and resolution?
- How do you get clean, edit-friendly audio for screen recordings?
- When should you include a webcam overlay in a screen recording?
- How do you handle mistakes without restarting a full recording?
- How do annotations and zooming improve screen recording clarity?
- How do you integrate screen capture into a web app with getDisplayMedia?
- What platform-specific hooks should you know for screen capture integration?
- How do you build an efficient post-production workflow for screen recordings?
- What are the right export settings and pre-flight checks before publishing?
- The habit that saves the most time
- Kudoflix cuts the post-production step down to minutes
- Sources
What are the best screen recording integration tips for capture area and resolution?
Record only the tab or window you need to reduce visual noise and file size — full-screen capture drags in your taskbar, clock, and every notification badge. If your content lives in one browser tab or app, that’s your capture surface.
- Second monitor: Keep your script, notes, and recording controls on a second display. Record only the clean primary screen.
- Partial capture: If you must crop to a region, resize your content window to match that region exactly. Scaling artifacts appear when the capture area and content dimensions don’t match.
- Frame rate: 30fps covers most UI demos; bump to 60fps only when you’re recording smooth scrolling or animation where motion blur matters.
- Readability: Increase font size to at least 16pt, bump cursor size, and hide personal bookmarks or sensitive tabs before you start.
Pro Tip: Save a persistent browser window profile at exactly 1920×1080 and reuse it for every recording in a project. Consistent dimensions mean your templates, captions, and crop settings carry over without adjustment.
How do you get clean, edit-friendly audio for screen recordings?
Prioritize a dedicated microphone — USB condenser or XLR into an interface — and record mic audio on a separate track from system audio whenever your software allows it. Separate tracks mean you can re-record narration without touching the screen capture.
- Sample rate: 44.1 kHz is standard; 48 kHz if you’re delivering to video platforms that prefer it.
- Echo cancellation and noise suppression: Enable both in your OS audio settings or recording software.
- System audio: Capture it only when the demo requires it (a sound effect, a notification tone). Many browsers don’t pass system audio through
getDisplayMediaby default — test your target browser first. - Test clip: Record a short test clip, listen back on headphones, and check for clipping, hum, or sync drift before committing to a long take.
Kudoflix’s audio commentary tools let you layer narration directly onto your timeline after import, which is useful when you recorded the screen and mic on separate files.
When should you include a webcam overlay in a screen recording?
Use a small corner overlay during introductions and verbal explanations, then hide it the moment you’re navigating menus or showing dense data. The overlay adds presence; it shouldn’t compete with the content.
- Placement: Position the bubble opposite the area of interest. If your main action is in the top-right, put the webcam in the bottom-left.
- Size: Keep it small enough that it never covers a UI element or readable text.
- Reusability: Heavy camera presence makes clips harder to repurpose for different audiences. A face-only intro recorded separately gives you more flexibility.
- Lighting: Use a ring light or a soft window source behind your monitor. A neutral, uncluttered background keeps the focus on your screen.
Pro Tip: Record a 15–30 second face-only intro clip separately and splice it in during editing. The main screen recording stays clean and reusable; the intro adds personality without locking you into a specific camera angle for the whole clip.
How do you handle mistakes without restarting a full recording?
Pause or mute the moment you make a mistake, wait two seconds, then resume. That gap becomes a visible flat line in your audio waveform — easy to find and cut in any editor.
- Hotkeys: Learn your recorder’s pause/resume shortcut before you start. Platform-agnostic options: most tools use
F9or a custom binding. - Visible indicator: Keep a recording badge or status light visible so you and anyone nearby know capture is live.
- Short chapters: For long demos, break the recording into 5–10 minute segments. Shorter files are faster to trim and easier to re-record if a section fails.
Pro Tip: Leave 2–3 seconds of clean, still frames before and after each action. Those buffer frames make cut points invisible in the final edit — no jump cuts, no abrupt transitions.
How do annotations and zooming improve screen recording clarity?
Use focused annotations sparingly: a spotlight, a pen highlight, or a zoom to direct attention to a specific UI element. Constant animated effects train viewers to ignore them.
- Zoom for small text: When showing dense spreadsheets or small UI labels, zoom in and animate the transition rather than adding a tiny pointer arrow viewers can’t follow.
- Cursor highlighting: Enable click effects for step-by-step walkthroughs. A subtle ring around the cursor tells viewers exactly where to look without narration.
- Interactive elements: If your recorder supports chapter markers or quiz timestamps, plan those moments during capture — don’t add them as an afterthought.
- Accessibility: Use high-contrast annotation colors. Red-on-green combinations are invisible to color-blind viewers; blue or yellow on a dark background works for most audiences.
How do you integrate screen capture into a web app with getDisplayMedia?
Call navigator.mediaDevices.getDisplayMedia(displayMediaOptions) and handle the returned MediaStream. The API resolves to a MediaStream of the user-selected display surface; audio capture availability and constraints vary by browser and must be tested across targets.
A minimal start/stop pattern:
async function startCapture(displayMediaOptions) {
  let captureStream;
  try {
    captureStream = await navigator.mediaDevices.getDisplayMedia(displayMediaOptions);
    const videoTrack = captureStream.getVideoTracks()[0];
    console.log("Settings:", videoTrack.getSettings());
  } catch (err) {
    console.error(`Capture error: ${err}`);
  }
  return captureStream;
}

const displayMediaOptions = {
  video: {
    displaySurface: "window",
  },
  audio: {
    echoCancellation: true,
    noiseSuppression: true,
    sampleRate: 48000,
  },
};
Key options to know:
displaySurface:"tab","window", or"monitor"— prefer"window"or"tab"to limit capture scope.surfaceSwitching: Set to"include"to let users switch surfaces mid-capture.- Audio constraints: Apply
echoCancellationandnoiseSuppressionin the constraints object, but treat audio as optional. Some browsers return video-only streams even when audio is requested. - Permissions Policy: In framed contexts (
<iframe>), you needallow="display-capture"on the iframe element.
Treat audio capture as a defensive feature, not a guarantee. Always check
captureStream.getAudioTracks().lengthbefore assuming audio is present, and fall back to a mic-only track when the browser returns none.
Browser compatibility note: Chrome, Edge, and Firefox support getDisplayMedia in current releases. Safari’s support is more limited, particularly for audio. Always test audio behavior on your target browsers before shipping.
What platform-specific hooks should you know for screen capture integration?
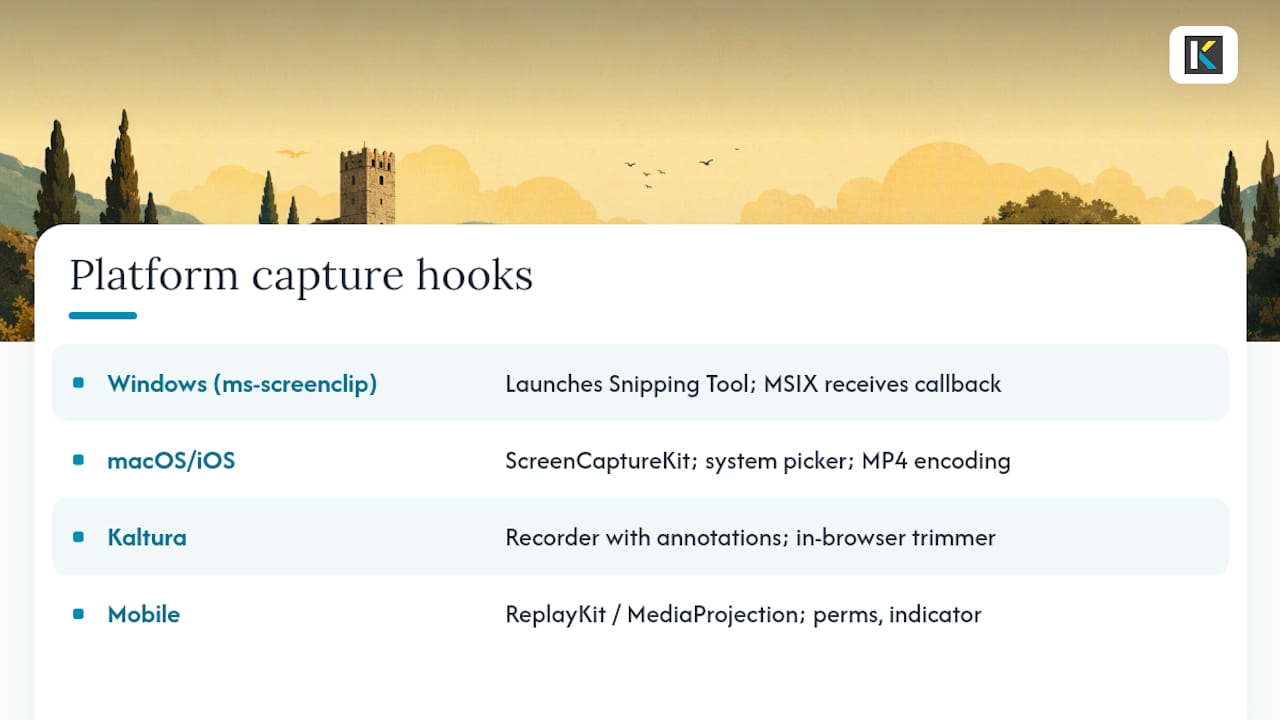
Pick the platform hook that fits your deployment: ms-screenclip: for Windows app handoffs, ScreenCaptureKit for macOS/iOS performance, and Kaltura for team recording with built-in annotation.
Windows (ms-screenclip): The ms-screenclip: URI scheme launches Snipping Tool and supports video capture with redirect-uri callbacks. Only packaged (MSIX) apps can receive the response securely — unpackaged apps cannot handle the callback. Use the ms-screenclip://capture/video endpoint and register your redirect-uri in the app manifest.
macOS/iOS (ScreenCaptureKit): Use the system content-sharing picker to let users select their capture surface. Attach SCRecordingOutput to encode directly to an MP4 file. Microphone capture is available as a toggle in the picker — enable it only when the use case requires it, since it triggers an additional permission prompt. ScreenCaptureKit requires macOS 12.3 or later.
On iOS and macOS, the system picker handles privacy automatically. Users see exactly what they’re sharing before capture starts, which reduces friction and improves app-review outcomes.
Kaltura: Select the capture area or whole screen from Kaltura’s recorder, use the built-in annotation tools during capture, and record at standard dimensions to avoid black bars in the player. Kaltura’s pause/resume hotkeys and in-browser trimmer reduce the round-trip to a separate editor for simple demos.
Mobile (iOS/Android): Use ReplayKit on iOS and MediaProjection on Android. Both require explicit permission handling, and Android’s MediaProjection needs a foreground service to stay active. Display a visible recording indicator — app stores flag apps that record without a clear user-facing signal.
Pro Tip: On macOS, test ScreenCaptureKit capture with both SCShareableContent filters and the system picker. The picker is simpler for end users; the filter API gives developers finer control over which windows appear in the stream.
How do you build an efficient post-production workflow for screen recordings?
Import screen recordings as separate audio and video tracks, trim pauses and mistakes, add captions and chapter markers, then apply a reusable template for consistent branding. That sequence keeps each step independent and reversible.
- Import: Bring in video and audio as separate tracks. If you recorded mic and system audio separately, keep them on distinct lanes.
- Trim: Cut the pause gaps you left at mistake points. Speed up loading screens or repetitive UI sequences.
- Captions: Add auto-captions or import an SRT file. Captions improve accessibility and watch time on social platforms.
- Template: Apply a project template with your intro, outro, lower-thirds, and export preset already configured.
- Export: H.264 MP4 for YouTube and web; WebM for smaller file sizes where the platform supports it.
For file organization, name files with a consistent scheme: YYYY-MM-DD_subject_v01.mp4. Store a low-resolution proxy alongside the original if file sizes slow down your editor.
Kudoflix’s template library includes intro/outro sets and caption layouts built for screen-recording projects, so you skip the setup and go straight to trimming. The trending format workflows for 2026 page covers export presets matched to current platform specs.
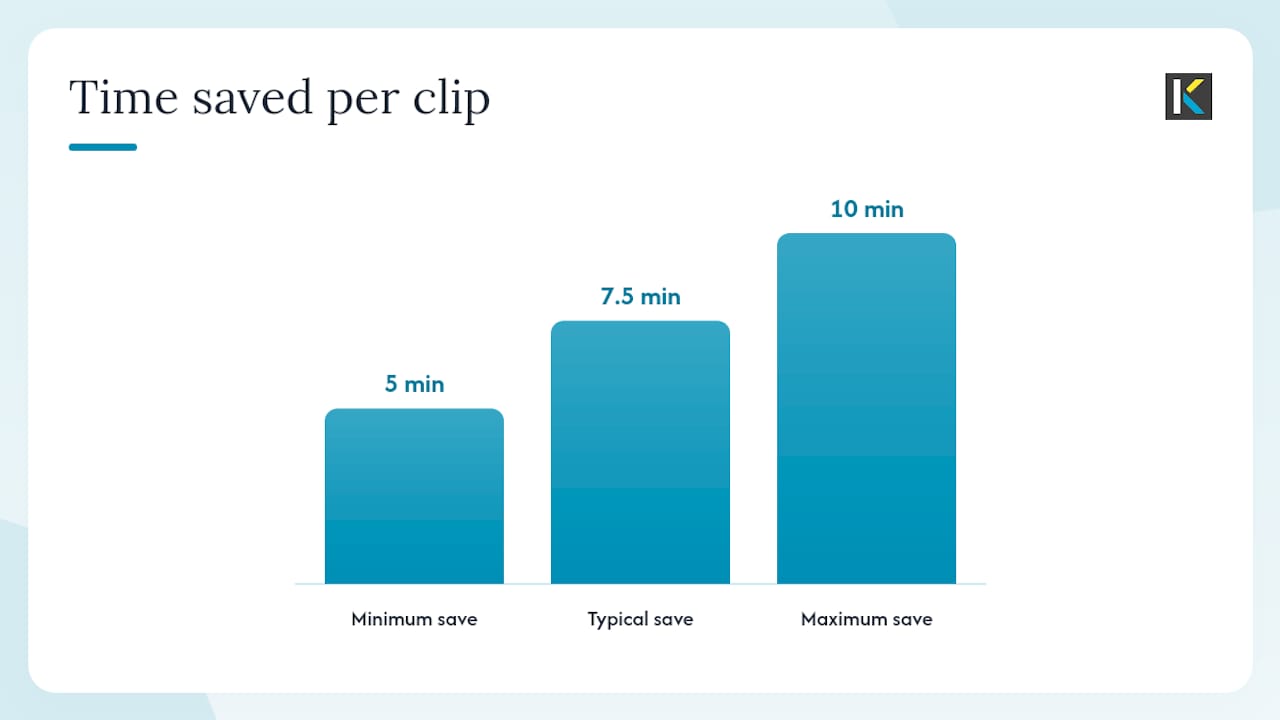
Pro Tip: Build one “trim-and-publish” template: intro clip, branded lower-third, auto-caption layer, and an H.264 export preset. Applying it at the start of every edit saves 5–10 minutes per clip and keeps your channel visually consistent.
What are the right export settings and pre-flight checks before publishing?
Run a head-to-tail playback, check audio sync, blur any sensitive data on screen, confirm captions are accurate, then export with platform-appropriate settings.
Pre-flight checklist:
- [ ] Capture area correct — no taskbar, personal tabs, or notifications visible
- [ ] Audio levels consistent, no clipping or background hum
- [ ] Sensitive data blurred or cropped out
- [ ] Webcam overlay positioned correctly and hidden during dense steps
- [ ] Captions reviewed for accuracy
- [ ] File size within platform limits
Hardware encoders reduce CPU strain and prevent frame drops during export — use your GPU encoder (NVENC, VideoToolbox, QuickSync) when available rather than software x264.
Pro Tip: For pull-request reviews and internal shares, compress to 720p WebM before attaching. Smaller files load faster in browsers and don’t hit email attachment limits.
The habit that saves the most time
Standardize one capture template and one post-production preset for your team. That single decision repays itself on every recording you make.
Here’s what that looks like in practice: a team that agrees on a 1920×1080 browser profile, a shared Kudoflix template with intro/outro and captions, and a naming convention like YYYY-MM-DD_topic_v01 eliminates the “what settings did you use?” conversation permanently. Editors open the file, apply the template, trim, and export. No decisions, no rework.
Run a short experiment applying the template to multiple screen recordings and track how long the edit takes compared to your current workflow. The time savings compound quickly once the template handles the repetitive setup.
Kudoflix cuts the post-production step down to minutes
Raw screen recordings sit between capture and publish — and that middle step is where most teams lose time. Kudoflix handles it without a download or a complicated interface. Import your recording, apply a template with your intro, captions, and branding already in place, trim the mistakes you paused through, and export a shareable link. The whole sequence runs in the browser.
The features that matter most for screen-recording projects: trim tools that let you cut pause gaps in seconds, a camera bubble placement tool for webcam overlays, export presets matched to YouTube and social formats, and a media library that keeps your project files organized. If you’re working with a team, cloud-based exports mean everyone gets the same link without file transfers.
Start with a free Kudoflix account and import your next screen recording to see how fast the template-to-publish workflow actually runs.
Sources
The sources below cover the full range from API documentation to practical creator guides:
- 24 Tips for Creating High Quality Screen Recordings | Center for Innovative Teaching and Learning | Northern Illinois University
- Capturing screen content on iOS — Apple Developer Documentation
Recommended