
Project-based video editing keeps every asset, project file, sequence setting, and piece of metadata for a single video together in one organized workspace. Instead of hunting across folders and drives for a missing clip, you open one project and everything is right there. For creators and small businesses, that structure means faster turnarounds, cleaner revisions, and a workflow you can repeat every time. Kudoflix is built around exactly this approach, giving you a browser-based project workspace with templates, autosave, and export presets so you can get organized without installing a thing.
Table of Contents
- What is project-based video editing, exactly?
- Why project workflows pay off for creators and small businesses
- What does a project-based editing workflow look like?
- Which tools support a project-based editing workflow?
- File organization rules you can apply right now
- How long does a project-based edit take, and what does it cost?
- Your checklist to start your first project today
- How Kudoflix supports project-based editing
- Key Takeaways
- The discipline matters more than the software
- Kudoflix makes project-based editing simple from day one
- Useful sources
What is project-based video editing, exactly?
Project-based video editing organizes all media assets, metadata, project files, and sequence settings into a single cohesive workspace tied to one video. Think of it as a container. Open the project, and you see everything: raw footage, audio tracks, music, graphics, proxy files, export presets, and the edit itself.
A typical project contains:
- Raw footage — your original camera files
- Proxies — lower-resolution copies for smooth playback on modest machines
- Audio and music — dialogue, sound effects, licensed tracks
- Graphics and titles — logos, lower thirds, motion graphics
- Project file — the edit itself, with all cuts and sequence settings saved
- Exports — finished renders for each platform or client
“The process of cutting and assembling your final video project from all of your footage is called editing — and it starts with compiling your assets into one place.” — Virginia Commonwealth University Library
The alternative is scattered file-based editing: clips on the desktop, music in Downloads, graphics in a random folder. That approach has one predictable failure mode: the dreaded “media offline” error, where the editor loses track of a file because it moved or was renamed. A strict folder structure with descriptive filenames prevents that entirely.
Why project workflows pay off for creators and small businesses
The biggest payoff is time. Good organization saves 30–40% of editing time on complex projects when editors set up matching folders and label clips before cutting. For a small business owner producing a product video or a social media creator turning around weekly content, that percentage adds up quickly.
Beyond speed, the benefits stack up quickly:
- Faster revisions. When a client asks for a change, you reopen the project, make the cut, and re-export. No rebuilding from scratch.
- Reusable templates. Save a project with your intro, outro, and color grade, then duplicate it for the next video. Video templates cut setup time on every subsequent project.
- Version control. Saving sequential versions (v1, v2, v3) inside the project folder means you can roll back without losing work.
- Easier handoffs. Share the project folder with a collaborator and they have everything they need. No “can you send me that clip?” back-and-forth.
Pro Tip: Save a “starter project” with your brand colors, fonts, and intro already in place. Duplicate it at the start of every new video and you skip the setup phase entirely.
What does a project-based editing workflow look like?
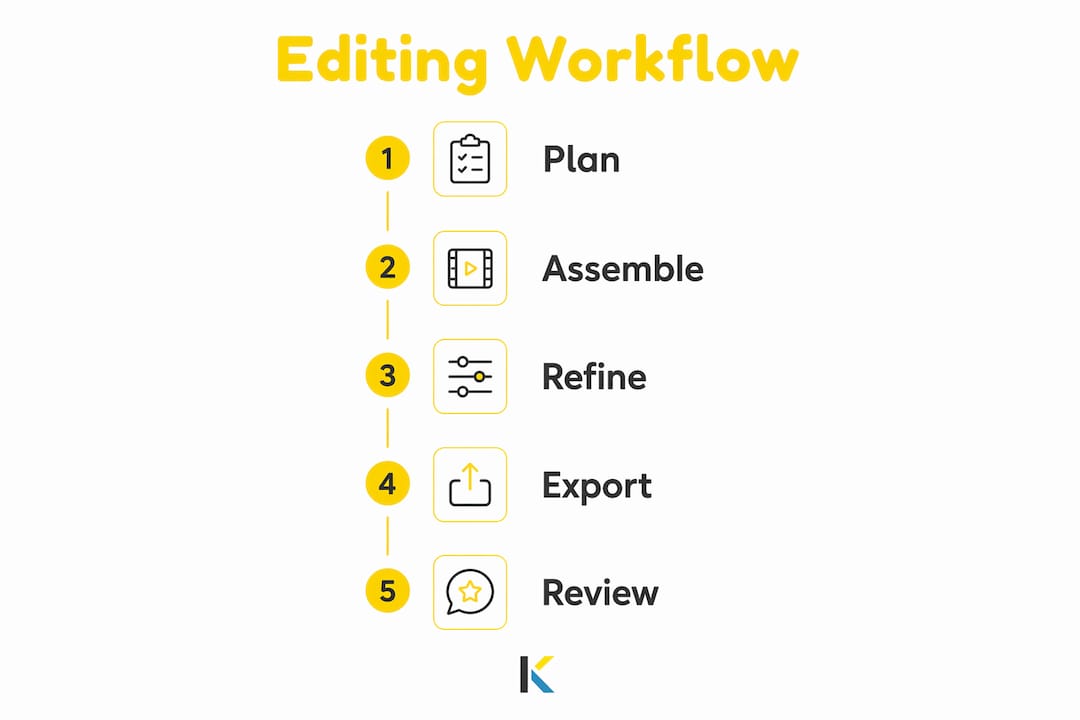
A complete, repeatable workflow moves through eight stages. Here they are in order, with a rough sense of where your time goes:
- Pre-project setup. Create your folder structure, set resolution and frame rate before importing anything. For YouTube: 1920×1080 at 24 or 30 fps. For TikTok or Reels: 1080×1920 vertical.
- Import and organize. Drag your footage folder into the media panel. Rename clips with scene or take labels so you can find them instantly.
- Review and mark selects. Watch all footage and flag the best takes. This is where you decide what the story is.
- Assembly edit. Drop every usable clip onto the timeline in order. Do not obsess over precision here.
- Fine cut. Tighten pacing, remove dead air, and make story decisions.
- Audio pass. Set dialogue levels between -12 and -6 dB, music at -20 to -30 dB under dialogue, and apply a high-pass filter at 80–100 Hz to cut rumble.
- Color correction and grade. Fix exposure and white balance first, then apply a look.
- Graphics, titles, and export. Add text, lower thirds, and render. H.264 works well for web (YouTube, social); ProRes is better for archival or further editing.
Assembly edits should be notably longer than the target length. Story decisions happen at the assembly stage — leave yourself material to tighten later.
Statistic callout: Professionals consistently recommend keeping your assembly 20–40% over target length. A 3-minute final video should have an assembly notably longer than the final length to allow for tightening later. Cutting down is always easier than padding a short timeline.
Which tools support a project-based editing workflow?

Video editing software has been democratized — free and lower-cost cloud editors make non-destructive, project-organized editing available to anyone. Three broad categories exist:
Browser-based online editors (like Kudoflix)
- Pros: no download, works on any device, autosave, built-in templates and asset libraries, instant sharing
- Cons: dependent on internet connection, may have limits on very large raw files
Lightweight downloadable NLEs (non-linear editors)
- Pros: offline access, handles large file volumes, more timeline control
- Cons: requires installation, steeper learning curve, often more complicated than small-business users need
Cloud collaboration platforms
- Pros: team review tools, frame-accurate commenting, version history
- Cons: higher cost, built for agencies rather than solo creators
For individuals and small businesses, a browser-based editor covers the full project workflow without the setup friction. Look for these features specifically: project folders, a media library, template support, autosave and versioning, and export presets for multiple platforms.
File organization rules you can apply right now
Before you open any editor, build this folder structure on your drive or in the cloud:
/Project Name
  /Raw Footage
  /Audio
  /Music
  /Graphics
  /Proxies
  /Project Files
  /Exports
Do:
- Use descriptive filenames:
Interview_JohnDoe_Take3.mp4, notclip0047.mp4 - Include dates in the format YYYY-MM-DD so files sort chronologically
- Tag clips with keywords or color labels inside your editor
Don’t:
- Rename files after importing them into a project (breaks media links)
- Store assets on a desktop or in Downloads
- Skip proxies for 4K or high-frame-rate footage
Pro Tip: Generate proxies on import for any footage over 1080p. You edit on the small copies, and the editor relinks to full-resolution files at export. Playback stays smooth even on a basic laptop.
For backup, follow a local-plus-cloud rule: one copy on your drive, one in cloud storage. Losing a project to a hard drive failure after days of editing is avoidable.
How long does a project-based edit take, and what does it cost?
Timeline depends on complexity, not just video length. Here is a realistic breakdown:
| Project Type | Editing Time | Skill Level |
|---|---|---|
| Quick social clip (30 sec) | A few hours to a day | Beginner |
| Short-form content (2–5 min) | 1–3 days | Beginner–Intermediate |
| Multi-camera or long-form | Several days to weeks | Intermediate |
| Professional broadcast/film | Months | Advanced |
For skill development, basic editing (cuts, transitions, titles, export) is learnable over a weekend. Competent editing with good pacing, audio mix, and color takes 2–3 months of practice. Professional-level work takes 1–2 years of deliberate effort.
Cost factors for small businesses:
- Software subscription — free tiers exist; paid plans unlock advanced features
- Storage — cloud storage for large projects adds up; check your editor’s storage options
- Music licensing — royalty-free libraries are included in some platforms
- Outsourcing — hiring a freelance editor adds cost but saves time on complex projects
- Hardware — faster machines reduce render times, though browser-based editors shift that burden to the cloud
Your checklist to start your first project today
- Create your project folder with all seven subfolders
- Open your editor and set resolution and frame rate before importing
- Import footage and generate proxies for any large files
- Watch all clips and mark your selects
- Build your assembly edit (keep it 20–40% longer than your target)
- Tighten to a fine cut, then do your audio pass
- Apply color correction, then add titles and graphics
- Set export presets: H.264 for web, ProRes for archival
- Export and watch the finished file on a different device before publishing
Pro Tip: Use a template for your first project rather than building from scratch. Starting with a pre-built structure lets you focus on the story, not the setup.
Pro Tip: Watch your export on your phone before you publish. Compression artifacts and audio issues that are invisible on a large monitor show up immediately on a small screen.
How Kudoflix supports project-based editing
Kudoflix maps directly to the project workflow described above. Everything runs in the browser, so there is no installation, no compatibility headache, and no waiting for software updates.
Key features for project-based workflows:
- Media library — all your imported assets stay organized inside the project
- Templates — professionally designed templates for social, business, and personal videos
- Autosave and versioning — your work is saved automatically, so a browser crash does not cost you hours
- Export presets — one-click exports sized for YouTube, TikTok, Instagram, and more
- Browser-based access — open your project from any computer without transferring files
For hands-on setup help, Kudoflix’s FAQ and documentation covers project setup, template use, and export settings in plain language.
Key Takeaways
Project-based video editing is the single most effective habit a creator or small business can build: one organized workspace prevents lost files, speeds revisions, and makes every future project faster.
| Point | Details |
|---|---|
| What a project contains | Raw footage, proxies, audio, graphics, project file, and exports — all in one folder. |
| Assembly edit length | Keep your assembly 20–40% longer than the target; tighten in the fine cut. |
| Organization saves time | Good folder setup and labeling saves 30–40% of editing time on complex projects. |
| Export format matters | Use H.264 for web publishing and ProRes for archival or further editing. |
| Start with Kudoflix | Kudoflix gives you project folders, templates, autosave, and export presets in the browser — no download needed. |
The discipline matters more than the software
Most beginners spend too much time picking the right tool and not enough time building the right habit. The folder structure, the assembly-first approach, the proxy workflow — none of that requires expensive software. What it requires is doing it the same way every single time until it becomes automatic.
The editors who produce consistent, polished work are not necessarily the ones with the most powerful machines. They are the ones who never lose a file, never rebuild a project from scratch, and never spend twenty minutes hunting for a clip they shot last Tuesday. Workflow discipline is the skill that compounds. A weekend spent learning cuts and transitions is useful. A month of editing real projects with a consistent folder structure and a proper assembly-to-fine-cut process is what actually builds speed and confidence.
Edit real projects, not just tutorials. A tutorial teaches you where the buttons are. A real project teaches you how to make decisions under pressure, how to cut something you love because it slows the story down, and how to finish. Finishing is the skill most beginners never develop because they keep restarting on a better tool.
Kudoflix makes project-based editing simple from day one
If the workflow above sounds like a lot to manage in a complicated desktop application, Kudoflix is the direct answer. You get project organization, a full media library, professionally built templates, autosave, and platform-ready export presets — all inside a browser, with no download and no steep learning curve.
For individuals and small businesses, that means:
- No installation friction — open a project from any device and pick up where you left off
- Templates that match your workflow — start with a structure instead of a blank timeline
- Export presets built in — one click for YouTube, TikTok, Instagram, and more
If you have been putting off your first video project because the software felt too complicated, see how Kudoflix simplifies it and start your first project today.
Useful sources
- Post-production projects guide — Projective.io
- How To Edit Video: Complete Beginner’s Guide — Ruah Creative House
- A Beginner’s Guide to Video Editing — Envato Tuts+
- Video Editing — Wikipedia
- What Is Video Editing? — Coursera
- Editing and Sharing: Video Project Guide — Virginia Commonwealth University Library
Recommended