Make a 60–90 second coach-ready highlight reel by recording stable 1080p footage (720p is acceptable if storage is limited), picking your top 10–20 plays, front-loading the best 4–5 within the first 30 seconds, identifying yourself on every clip, and exporting a clean MP4 link coaches can open in one click.
What you need before you start:
- Raw footage files (at least one full game or practice session)
- Player name, position, graduation year, height/weight, contact email
- A free or paid video editor (browser-based works fine)
- A hosting account: YouTube, Google Drive, or Dropbox
Key Takeaways
A coach-ready recruiting reel puts your top 4–5 plays in the first 30 seconds, identifies you on every clip, and delivers a clean 1080p MP4 link that opens without a login.
| Point | Details |
|---|---|
| Front-load your best plays | Coaches decide within 30–60 seconds; your top 4–5 plays must appear first. |
| Keep it 60–90 seconds | Reels longer than 2 minutes lose most coaches before the strong plays appear. |
| Identify yourself on every clip | Use an intro card plus lower-third overlays with name, position, and jersey number. |
| Export as 1080p MP4 (720p is acceptable if storage is limited) | This format plays on every device without codec issues; share as a YouTube unlisted link. |
| Kudoflix speeds the workflow | Browser-based templates with built-in intro cards and export presets cut editing time to under an hour. |
Table of Contents
- What a sports highlight reel creation guide actually covers
- How to capture footage coaches can actually evaluate
- How to review footage and choose your best plays
- How to order clips so coaches keep watching
- How to identify yourself and add contact info coaches need
- Editing techniques that make clips readable and persuasive
- How to export and share a coach-ready reel
- Which tools help you assemble a reel quickly?
- Common mistakes that get reels ignored
- Pro editor tips for sport-specific reels
- An editor’s honest take on what actually works
- Kudoflix gets your reel from clips to coach-ready fast
- Sources
What a sports highlight reel creation guide actually covers
This is a recruiting-first playbook. Every decision below, from which angle to film to how to name your export file, is filtered through one question: will a college coach watch this and want to contact you? NCSA Sports confirms that coaches often decide within the first 30–60 seconds whether a reel is worth watching. That single fact drives the entire workflow.
The 6-step process at a glance:
- Record — Capture 1080p landscape footage, stabilized, from the right angle for your sport (30–60 min)
- Log — Timestamp every strong play immediately after the game (15–20 min)
- Select — Triage down to 15–30 raw candidates, then cut to 10–20 trimmed clips (30–45 min)
- Order — Front-load your top 4–5 plays; build a short narrative arc behind them (15 min)
- Brand — Add an intro card, player overlays, and contact info on every clip (20–30 min)
- Edit, export, and share — Trim, add music if appropriate, export as MP4, and send a clean link (30–45 min)
Total realistic time for a first reel from a single game: roughly 2–3 hours. Subsequent reels using saved templates drop to under an hour.
How to capture footage coaches can actually evaluate
Bad footage kills a reel before editing begins. Coaches need to see your footwork, your decision-making, and your positioning relative to other players. A shaky, backlit, portrait-mode clip hides all of that.
Technical specs to lock in before filming:
- Resolution: 1080p preferred; 720p is acceptable if storage is limited. Anything lower makes it hard to read jersey numbers or foot placement.
- Orientation: Landscape only. Portrait-mode video is unusable for recruiting reels.
- Frame rate: 30 fps for general play; 60 fps if you plan to use slow motion in post.
- Stabilization: Mount on a tripod or gimbal. Handheld panning during a sprint is one of the most common reasons clips get cut.
Camera placement by sport:
- Soccer and lacrosse: Sideline at midfield, slightly elevated if possible, so the full play develops in frame.
- Basketball: Corner baseline or center court elevated — never directly under the basket.
- Football: Elevated endzone or press box for skill positions; sideline for linemen.
- Baseball/softball: Behind the backstop for pitchers and catchers; first-base side for hitters.
Lighting matters more than most parents realize. Avoid positioning the camera so the sun or stadium lights are directly behind the action. Action videography specialists recommend shooting with the light source at your back or to the side to keep subjects properly exposed.
Multiple angles add real value for position-specific skills. A second phone on a tripod at a different vantage point costs nothing and gives you coverage when the primary angle misses a play.
Pro Tip: Right after the game, scrub through the footage and drop a timestamp note (a text file or voice memo works) for every play you remember being strong. You will forget half of them by morning.
How to review footage and choose your best plays
The goal here is speed and objectivity. You are not watching film for coaching purposes. You are hunting for moments that show a coach something they want to recruit.
Selection criteria, in priority order:
- Impact plays: Goals, assists, interceptions, blocks, touchdowns — the outcome moments coaches remember.
- Decision-making: Plays where you read the situation correctly and made the right choice under pressure.
- Technical execution: Clean mechanics — a precise first touch, a tight dribble move, a well-timed cut.
- Position-specific skills: A center’s screen-setting and rebounding, a goalkeeper’s distribution, a quarterback’s pocket movement.
Target 15–30 raw candidates on your first pass. Then cut ruthlessly. Drop any clip where you are obscured by another player for more than a second, any play that requires a long build-up to make sense, and any duplicate of a skill you already have a better example of. Short-form sports clips that perform well typically run 6–25 seconds; analytical clips can stretch to 20–60 seconds. Use those ranges as your trim targets.
A simple spreadsheet with columns for timestamp, play type, quality rating (1–3), and keep/cut works better than any dedicated logging app for most people. You can sort by rating and build your shortlist in minutes.
How to order clips so coaches keep watching
Structure is what separates a montage from a recruiting reel. A montage shows everything. A recruiting reel makes an argument.
Your top 4–5 plays go first, full stop. NCSA Sports’ guidance is direct on this: coaches decide in the first 30–60 seconds. If your best moment is at the 1:45 mark, most coaches never see it.
Ordering options:
- Best-first: Strongest play opens, second-strongest closes, everything else fills the middle. Works for most recruiting reels.
- Escalating intensity: Builds momentum toward a climax. Better for social content than coach submissions.
- Grouped by skill: Useful when you want to show range (three passing plays, then three defensive plays). Works well for versatile players.
- Chronological: Almost never the right choice for recruiting. Coaches do not care about game sequence.
Keep most clips short, typically a few seconds each. Longer context-heavy plays usually do not suit a concise recruiting reel. Sports video editing as storytelling means every clip should carry its own weight — decision-making and technique visible within the clip itself, not explained by surrounding context.
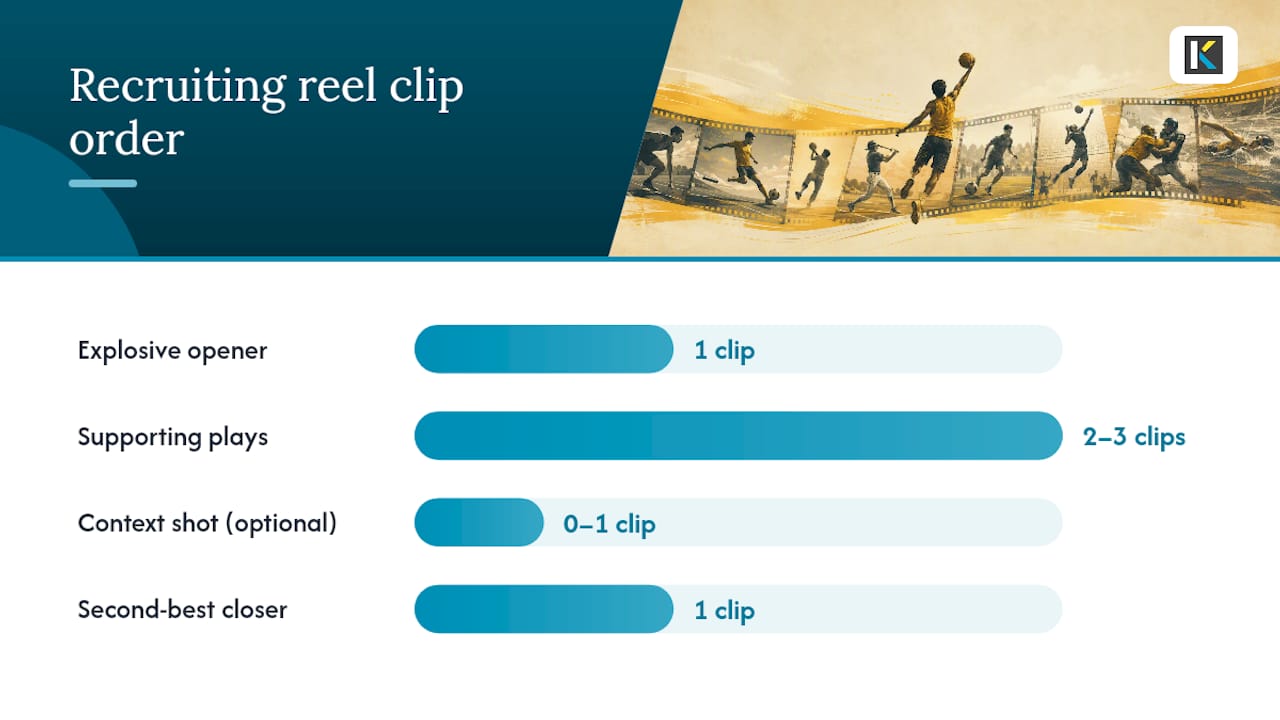
For a recruiting reel, the micro-structure looks like this: explosive opener (best play), two or three strong supporting plays, a brief context shot if needed, then your second-best play as the closer. For a social promo version, you can afford more rhythm variation and a music-driven build.
How to identify yourself and add contact info coaches need
A coach watching 50 reels a week cannot guess which player you are. If you are not identified on every single clip, your reel is incomplete.
What belongs on your intro card:
- Full name and jersey number
- Position and graduation year
- Height, weight, and dominant hand/foot
- Contact email and phone number
- Top stats or awards (GPA if relevant to the program)
NCSA Sports recommends including all of this on a clean intro card that runs 5–8 seconds before the first clip. Keep the background simple and the text large enough to read on a phone screen.
Overlay best practices:
- Use a small arrow or circle to highlight your player before each clip begins, especially in team sports where the camera covers multiple athletes.
- Place your name and jersey number as a lower-third overlay on every clip, not just the intro.
- Keep overlays out of the center of the frame. Bottom-left or bottom-right, small enough not to block action.
Many coaches watch reels muted on a phone. Readable text overlays — name, position, and key stats — function as comprehension tools, not decoration.
Pro Tip: Test your finished reel on a phone screen at arm’s length. If you cannot read the contact info without zooming in, the text is too small.
File naming and metadata: Name your export file with your last name, first name, position, and graduation year — for example, Smith_Jordan_CB_2027.mp4. When you share a Google Drive or YouTube link, use the same naming convention in the file or video title so coaches can find it in a crowded inbox.
Editing techniques that make clips readable and persuasive
Good editing is invisible. A coach should be focused on the play, not the cut.
Trimming rules: Start each clip slightly before the action begins so the coach has one second of context. End it shortly after the peak moment. Most plays need 3–8 seconds; a long run or a full sequence might justify up to 12.
Transitions: Use hard cuts between clips for energy and pace. Short dissolves (8–12 frames) work for context changes or when moving between skill categories. Avoid flashy wipes, zooms, or spin transitions — they signal amateur work immediately.
Slow motion: Use it sparingly and only to highlight mechanics or a game-changing play. One or two slow-motion moments in a 90-second reel is plenty. More than that and the reel starts to feel padded.
Music and copyright: Choose royalty-free music from a cleared library. Using a commercial track without a license can get your YouTube video muted or taken down, which means a coach clicking your link finds a silent or blocked video. Always export a second version without music for direct coach submissions — some programs have policies against music in recruiting reels.
Export settings for coach delivery:
| Setting | Recommended value |
|---|---|
| Container | MP4 |
| Video codec | MP4 |
| Resolution | 1080p |
| Frame rate | Match source (30 or 60 fps) |
| Video bitrate | 8–12 Mbps |
| Audio codec | AAC |
| Audio bitrate | kbps |
MP4 in an MP4 container plays on every device a coach might use, from a MacBook to an Android phone, without any codec issues.
Copyright note: If your footage includes broadcast or third-party camera angles, check usage rights before including them. Clips you or your family filmed are generally fine. Broadcast clips pulled from a stream carry network rights.

How to export and share a coach-ready reel
The best reel in the world does nothing if the coach cannot open the link.
Hosting options:
- YouTube (unlisted): The most reliable option. Coaches can open it in any browser, on any device, without logging in. Set it to unlisted so it does not appear in search results during initial outreach.
- Google Drive: Good for sharing the raw MP4 file. Set sharing to “anyone with the link can view.” Works well when a coach requests a downloadable file.
- Dropbox: Similar to Drive. Useful if the program specifies a file download.
- Recruiting platforms: Some programs use dedicated platforms. Follow their submission instructions exactly.
File size and compression: A 90-second 1080p MP4 file at 10 Mbps runs roughly 110 MB. That is manageable for Drive or Dropbox. For YouTube, size is not a concern. Avoid over-compressing to reduce file size — it introduces blocking artifacts that make fast movement look pixelated.
For platform-specific exports, proven packaging formats break down as: vertical shorts for TikTok and Short vertical clips (10–25 seconds) work well for platforms like Instagram Reels; square videos (15–30 seconds) for cross-posting; and wide cuts (20–45 seconds) suit YouTube or embedded players. seconds). Keep these as separate exports, not the same file.
Recommended email subject line format:
[Name] | [Position] | [Grad Year] | Highlight Reel — [School/Club]
Example: Jordan Smith | CB | 2027 | Highlight Reel — Westfield FC
Keep the email body to three sentences: who you are, one line on your stats or achievements, and the link. Coaches read dozens of these. Short wins.
Privacy: Never post your initial recruiting reel publicly on social media before you have made contact. Use unlisted or link-access settings for outreach. A separate social version with music can go public once you are in active communication with programs.
Which tools help you assemble a reel quickly?
Your tool choice should match your time budget and technical comfort, not the most feature-rich option available.
Three workflow tiers:
- Minimal (phone only): Film, log, and edit entirely on your phone. Phone-based workflows are genuinely viable for parents and athletes who need a first reel fast. The ceiling is lower, but a clean phone-edited reel beats a never-finished desktop project. Check out quick smartphone editing tips to get the most from this approach.
- Intermediate (Kudoflix online editor): No download, no installation. Import your clips, apply a recruiting template with a pre-built intro card and lower thirds, drop in your plays, add your contact info, and export. The Kudoflix video editor includes royalty-free music, transitions, and export presets built for this exact workflow. This is the fastest path to a polished, coach-ready reel for most athletes and parents.
- Advanced (desktop NLE): Tools like DaVinci Resolve give granular control over color, audio mixing, and multi-camera sync. Worth it if you are producing reels for multiple players or want frame-level precision. The time investment is significantly higher.
What to look for in a template:
- A clean intro card with text fields for name, position, grad year, and contact info
- Lower-third overlays that do not block the center of the frame
- A pre-set export configuration for 1080p MP4
- Royalty-free music included or a clear option to mute
Reusable templates with built-in intro cards and export presets are the single biggest time-saver in a repeatable reel workflow. Build one template correctly and every subsequent reel takes a fraction of the original time.
Pro Tip: Save your branded template after your first reel. The next time you need to update for a new season or add a new game, you drop in fresh clips and re-export. The intro card, overlays, and music are already set.
Common mistakes that get reels ignored
Most reels that coaches skip share the same handful of problems.
The most common errors:
- Too long: Anything over 2 minutes loses most coaches. Aim for 60–90 seconds.
- Weak first 30 seconds: If the reel opens with a title card that runs 20 seconds, or with a mediocre play, coaches are gone before the good stuff starts.
- No player identification: No intro card, no overlays, no jersey number called out. The coach cannot tell which player to watch.
- Bad angles: Filming from the wrong position so the player is always facing away, or the play is obscured by other athletes.
- Copyrighted music: A muted YouTube video is a dead link.
- Poor audio: Distracting wind noise or muffled crowd sound does not disqualify a reel, but clean audio adds professionalism.
Pre-send checklist:
- [ ] Intro card present with name, position, grad year, and contact info
- [ ] Top 4 plays appear within the first 30–45 seconds
- [ ] Player identified with arrow/circle overlay on every clip
- [ ] Name and jersey number as lower-third on every clip
- [ ] All clips trimmed to 3–12 seconds
- [ ] Music is royalty-free or reel exported without music
- [ ] Export is 1080p MP4, MP4
- [ ] Hosting link opens without login on a phone
- [ ] Contact email in the video and in the email subject line
- [ ] File named with last name, first name, position, and grad year
Pro editor tips for sport-specific reels
The gap between a decent reel and a scout-ready one usually comes down to a few specific techniques.
Sport-specific timing templates:
- Soccer: Open with a goal or assist (4–6 seconds), follow with two defensive plays (3–5 seconds each), add a dribbling sequence (5–8 seconds), close with a second goal or a key pass. Total: 60–75 seconds.
- Basketball: Lead with a scoring play (3–5 seconds), then a defensive stop or steal (3–4 seconds), an assist (3–4 seconds), and a rebounding sequence (4–6 seconds). Coaches want to see both ends of the floor.
- Football (skill positions): Open with your best route/catch or run (4–6 seconds), two or three more plays showing different skills (3–5 seconds each), one slow-motion clip of your mechanics (4–6 seconds at 50% speed).
- Baseball/softball: Pitchers lead with strikeouts and movement pitches; hitters lead with hard contact. Keep each at-bat clip to the pitch and result only — cut the full windup unless mechanics are the point.
Advanced editing moves:
- Match-frame cut: End one clip on a freeze frame, then cut to the next clip starting from the same body position. Creates a seamless visual transition between plays.
- Reaction-to-action cut: Show a coach or teammate reacting (1–2 seconds), then cut to the play that caused the reaction. Adds context without narration.
- Layered audio: Keep the ambient crowd sound at low volume under music. It grounds the clip in a real game environment and sounds more professional than music over silence.
- Selective slow motion: Apply 50% speed only to the 1–2 seconds that show the key technique — a release point, a first step, a tackle technique. Slow the moment, then return to full speed for the result.
Building a reusable project template is the single move that separates editors who produce one reel a month from those who produce ten. Set up your intro card, lower thirds, music track, and export preset once. Every player after the first one takes under an hour. The Kudoflix template library is built around exactly this principle — load a sport-specific template, drop in clips, and export.
Pro Tip: For coaches who request position-specific reels, duplicate your master project and swap out clips rather than building from scratch. You keep the branding and structure; only the content changes.
An editor’s honest take on what actually works
Most athletes spend too much time worrying about production quality and not enough time on clip selection. A reel shot on a phone with perfect clip selection will outperform a beautifully color-graded reel with mediocre plays every time. Coaches are evaluating the athlete, not the editor.
The second thing most people get wrong is the first 10 seconds. I have reviewed reels that open with a 15-second animated logo, a slow-motion walk onto the field, and a title card listing the player’s club history. By the time the first play appears, a coach has already moved on. Lead with your best play. Everything else is context.
The workflow in this guide reflects what actually gets responses: stable footage, front-loaded plays, clear identification, and a clean link. Kudoflix’s template-based approach fits that workflow well because it removes the friction between “I have the clips” and “I have a shareable reel.” The platform handles the branding and export settings so you can focus on clip selection, which is where the real work is.
Test your finished reel with someone who has not seen the footage. If they cannot tell which player to watch within the first five seconds, go back and add overlays. If they lose interest before the 45-second mark, your ordering needs work. Real feedback from a fresh set of eyes is worth more than any editing technique.
Kudoflix gets your reel from clips to coach-ready fast
Editing software that requires a download, a license key, and a two-hour tutorial is not the right tool for a parent filming from the sideline or an athlete with a recruiting deadline this week. Kudoflix runs in your browser, requires no installation, and includes sport-ready templates with pre-built intro cards, lower thirds, royalty-free music, and 1080p export presets.
The workflow is direct: open the Kudoflix online editor, select a recruiting template, import your clips, drop in your player info, and export a coach-ready MP4. The template handles the structure; you handle the clip selection. For athletes and parents who want a polished reel without learning a desktop editing suite, Kudoflix’s professional editing approach is the fastest path from raw footage to a shareable link. Start your first reel today at kudoflix.com.
Sources
These are the key references that informed this guide. Each covers a distinct part of the reel creation process and is worth reading in full if you want to go deeper on a specific step.
- How to Make a Highlight Video: Step-by-Step Guide
- Sports video editing: the complete guide | LucidLink
- The complete guide to creating a highlight reel in CapCut
- How to Make a Highlight Video on Your Phone for Free – Sports Parent Guide
Recommended