
Use 1080×1350 pixels (4:5) for Feed posts and 1080×1920 pixels (9:16) for Stories and Reels. Export as MP4 with H.264 video and AAC audio, since that’s the format Instagram processes with the least quality loss. The fastest path is an online resizer or browser-based editor, where you pick the preset, reposition the frame, and export in under a minute without installing anything.
TL;DR:
- Resizing for Instagram requires different aspect ratios: 4:5 for Feed and 9:16 for Reels and Stories, with a maximum file size of 4GB.
- The fastest workflows involve online editors, phone apps, or FFmpeg, each suited to different batch sizes and control needs.
- Export settings must use MP4 container with H.264 video and AAC audio at 5 to 8 Mbps to survive Instagram compression.
- Keep faces, text, and calls to action outside the top 14% and bottom 20-35% of the frame to avoid UI overlays.
- Designing vertically at 9:16 first and then cropping down to 4:5 or square saves time and ensures consistent framing across placements.
Table of Contents
- How to Resize Video for Instagram: Dimensions by Placement
- Three Ways to Resize a Video Fast (Online, Phone, or Desktop)
- Export Settings That Survive Instagram’s Compression
- Safe Zones and Framing for Reels and Stories
- Common Resizing Mistakes and How to Fix Them
- How Kudoflix Makes Instagram Resizing Faster
- The One Workflow Worth Committing To
- Try Kudoflix’s Free Instagram Presets
- Sources
- FAQ
How to Resize Video for Instagram: Dimensions by Placement
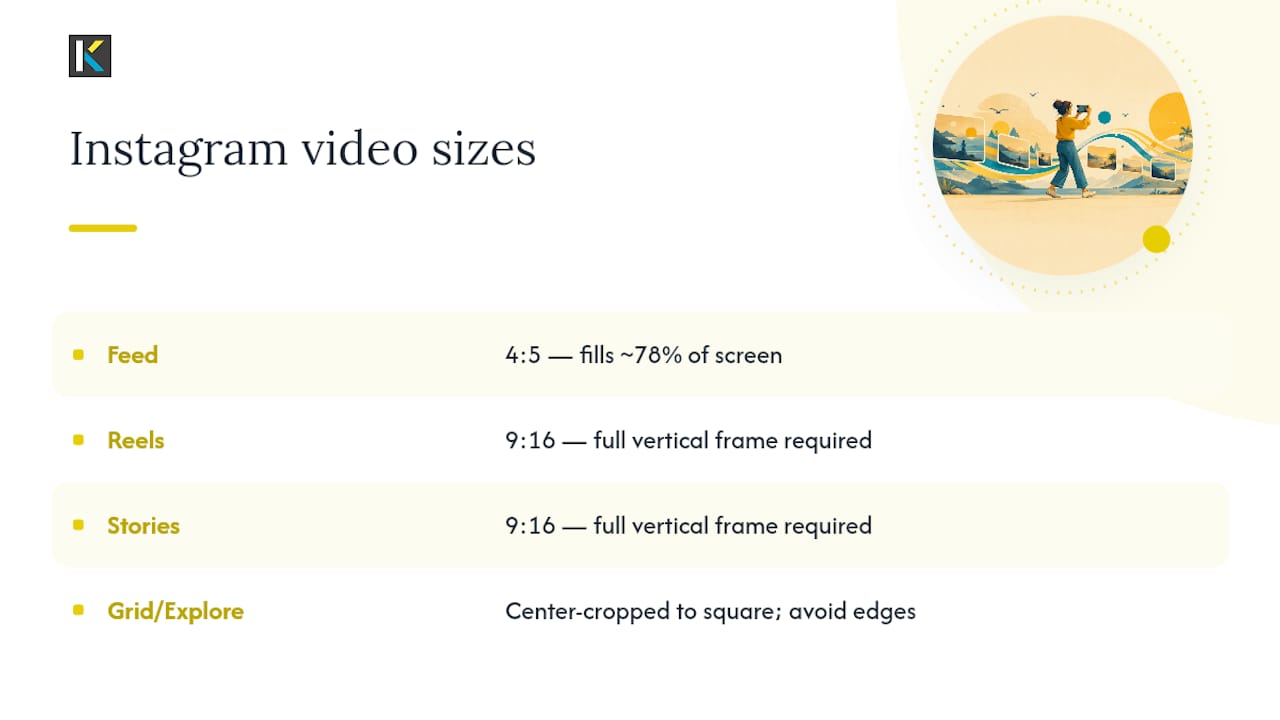
Every Instagram surface expects a different shape, and guessing wrong is why so many uploads come out cropped or padded with black bars. The table below covers the four placements that matter most for everyday creators.
These specs track closely with the current Instagram video specifications, which also caps file size at 4GB regardless of placement.
Feed defaults to 4:5 because vertical framing simply takes up more of the screen. A 4:5 clip fills roughly 78% of a phone display, compared to about 42% for a 16:9 landscape video, according to CleverUtils’ breakdown of Instagram video sizing. Reels and Stories need the full 9:16 frame because anything less gets pillarboxed, the vertical version of letterboxing, with gray or black bars eating into the sides.
One thing people miss: your Feed grid thumbnail and your Explore thumbnail don’t always crop the same way. Instagram tends to center-crop toward a square for grid previews, so keep your subject away from the far left and right edges even when you’re exporting in 4:5.
Three Ways to Resize a Video Fast (Online, Phone, or Desktop)
You’ve got three realistic workflows, and which one you pick depends on how many clips you’re resizing and how much control you need.
- Online resizer or browser editor. Upload your clip, select the Instagram preset (9:16 for Reels/Stories or 4:5 for Feed), drag to reposition the subject inside the frame, then export as MP4 H.264. This is the fastest option for a single video and needs zero software installed.
- Phone app. Import the clip into your mobile editor, choose the aspect ratio preset, drag the frame to recompose, then export straight to your camera roll. Load it into Instagram as a draft first to preview how it actually looks before posting.
- Desktop with FFmpeg. For batch jobs or pixel-precise control, a one-line command handles it. A center-crop to 9:16 looks like this:
ffmpeg -i input.mp4 -vf "crop=ih*9/16:ih,scale=1080:1920" -c:v libx264 -crf 20 -pix_fmt yuv420p output.mp4, an approach detailed in CleverUtils’ resize guide. If you’d rather keep the entire original frame instead of cropping, pad it with a blurred, zoomed background instead of plain black bars, a trick Kompozy’s Instagram resizing guide recommends over hard letterboxing.
Crop when your subject is centered and you can afford to lose the edges. Pad when the frame contains information you can’t sacrifice, like a wide product shot or a group of people. Auto-reframe tools built into some apps work fine for simple, single-subject footage, but they tend to misjudge fast motion or multiple people moving independently, so always scrub through the result before exporting.
Export Settings That Survive Instagram’s Compression
Instagram re-encodes every upload, which means a file that looks flawless on your desktop can come out soft or blocky once it’s live. The settings below are built to survive that second pass.
- Container and codec: MP4 (H.264 video, AAC audio at 128 to 192 kbps), which matches Instagram’s own accepted formats.
- Frame rate: 30 fps for most content; 60 fps only if you’re shooting fast motion like sports or dance.
- Color space: yuv420p, the standard that avoids playback glitches on most devices.
- Bitrate: 5 to 8 Mbps for 1080p footage.
- FFmpeg quality setting: CRF 18 to 20 if you’re exporting through the command line.
Here’s the part that trips people up: cranking your bitrate way past 8 Mbps doesn’t buy you anything. Instagram compresses the file on its end regardless, so extra data just means a longer upload with no visible improvement, a point Kompozy’s export guide backs up directly. Aim to keep files under 500MB for a quick upload, and always stay under the 4GB hard limit. Before you publish anything, upload it as a draft and check it on your actual phone screen. Desktop previews lie about how compression and cropping will really look.
Safe Zones and Framing for Reels and Stories
Instagram’s own UI, captions, profile name, like button, and share icons, sits directly on top of your video. Keep faces, text, and calls to action out of the top 14% and the bottom 20% to 35% of your 9:16 frame, based on measurements from ScreenSnap Pro’s Reels sizing breakdown. That bottom zone is bigger than most people expect.
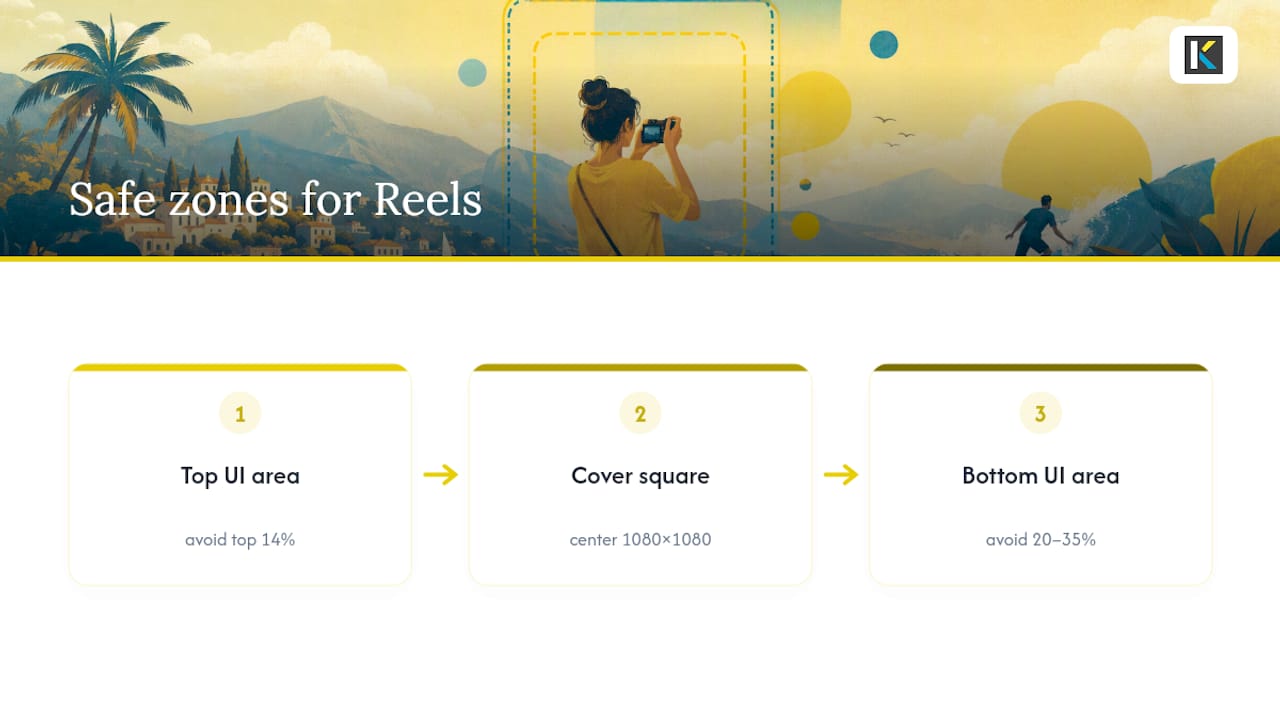
For cover images, keep your subject centered inside a rough 1080×1080 square in the middle of the frame. Instagram often crops your Reel or Feed cover down toward square for the profile grid, and anything sitting near the edges gets cut off.
Pro Tip: Shoot and edit vertical-first at 9:16, then export your 4:5 and 1:1 versions from that same vertical master instead of recomposing each one from scratch. You get consistent framing across every placement, and you cut your editing time roughly in half.
Common Resizing Mistakes and How to Fix Them
Most upload problems trace back to one of four things, and each has a fast fix.
- Subject cropped out of frame: Re-export at the correct target aspect ratio and reposition the crop before you export again.
- Black bars on the sides: Either crop tighter to fill the frame or pad with a blurred, zoomed background instead of leaving flat black space.
- Blurry or blocky video after upload: Re-export using H.264 at 5 to 8 Mbps rather than a much higher or lower bitrate.
- Wrong or awkward thumbnail: Export a custom cover image sized for the grid so Instagram isn’t grabbing a random frame.
Quick pre-upload checklist: correct aspect ratio, subject inside the safe zone, H.264 MP4 export, and a phone preview before you hit post.
How Kudoflix Makes Instagram Resizing Faster
Some browser-based editors run entirely in your browser, so there’s no download, no install, and no waiting around before you can start cropping. These may offer Instagram-ready presets for Feed, Reels, and Stories, along with templates and transitions built for social formats, and use cloud processing so exports don’t stall out even on older devices.
A typical workflow: open the online video editor, pick your Instagram preset, use the safe-zone overlay to check your framing, then export as MP4 H.264 and preview it on your phone before posting. If you want a head start on composition, the video templates library has layouts already built for vertical formats.
The One Workflow Worth Committing To
If you only remember one thing from this guide, make it this: design vertical-first at 9:16, then crop down to 4:5 and 1:1 instead of recomposing every version separately. For quick one-off edits, a phone app gets you there in minutes. For anyone resizing footage in bulk, an FFmpeg batch script saves real time over doing it clip by clip.
— Mandrixx
Try Kudoflix’s Free Instagram Presets
Some no-download online editors offer an alternative to juggling multiple apps or wrestling with FFmpeg syntax just to get one clip into the right shape. Pick an Instagram preset, drag your frame into place, and export as MP4 in seconds, all from a browser tab, with free tiers often available before needing to pay. If your videos are getting pixelated or your CTAs are landing behind the UI, that usually comes down to skipping a step this guide already covers, not a tooling problem. When you’re ready for more polish, the Starter plan runs $9.99 a month, or you can browse real examples made with Kudoflix to see what a finished Reel or Feed post looks like before you commit. Open the online editor and resize your first clip right now.
Sources
- Instagram Video Specifications Guide (2026) – Sendcove
- Instagram Reels Size 2026: Dimensions & Specs — ScreenSnap Pro
- How to resize video for Instagram (feed, Reels, Stories — 2026) · Kompozy
FAQ
How Do I Resize a Video to Fit Instagram?
Pick the placement you’re posting to, Feed uses 4:5 (1080×1350), Reels and Stories use 9:16 (1080×1920), then crop or reposition your footage to that ratio in an editor. A browser tool like Kudoflix’s online editor lets you select the preset and export as MP4 H.264 in a few clicks.
Why Don’t I Have the Resize Option on Instagram?
Instagram’s in-app editing tools are limited and vary by placement, so a dedicated resize feature isn’t always visible or available for every video type. Resizing before you upload, using a phone app, browser editor, or desktop tool, avoids this problem entirely and gives you far more control over framing.
How Can I Adjust Video Size Without Losing Quality?
Export in MP4 with H.264 video and AAC audio at 5 to 8 Mbps for 1080p footage; going much higher rarely helps since Instagram re-encodes every upload anyway, per Kompozy’s export guidance. Always preview the finished file on your phone before posting to catch quality issues desktop screens miss.
Is Instagram 16:9 or 4:3?
Neither is the default anymore. Feed favors vertical 4:5, while Reels and Stories require 9:16, according to current Instagram video specs. Older 16:9 landscape video still uploads, but it gets pillarboxed on vertical placements and loses screen space on Feed.
Recommended